Email Inbox
You can utilize the Email Inbox once you’ve added an email account.
You have to send and receive emails regarding transactions all the time with customers, suppliers, partners, and your own staff when you run a business. You may link your company emails straight to your ERPNext system with the Email Inbox feature. This makes it easy for people to converse and do business at the same time.
ERPNext puts all of your business emails and documents, such as Leads, Opportunities, Issues, Orders, and Invoices, in one location so you can access all of your operational data and communication history.
In ERPNext (v14 and v15), the Email Inbox gives each user their own inbox, uses secure authentication, and works nicely with document timelines.
To set up an Email Inbox for a user, follow these steps.
1. Create a User
A System User can only have one Email Inbox. Make sure you do this before you set up your Email Inbox:
- You and your coworkers are now using ERPNext.
- Giving people the right permits and duties.
- Go to the User page to add or change users.
Notes:
- A User can have more than one Email Account connected to them.
- The Email Inbox can only be seen by the User who owns it. They can give it to other Individuals if they wish to.
- People who don’t have access to the system or utilise the website can’t have Email Inboxes.
2. Create a domain for email
ERPNext comes with a multitude of preconfigured email domains, which makes it easy to set up popular email services. If you use one of the supported providers, you can set up an email account right now.
You can utilize some default email domains, such as:
- Gmail
- Yahoo
- SparkPost
- SendGrid
- Outlook.com
- Yandex.email
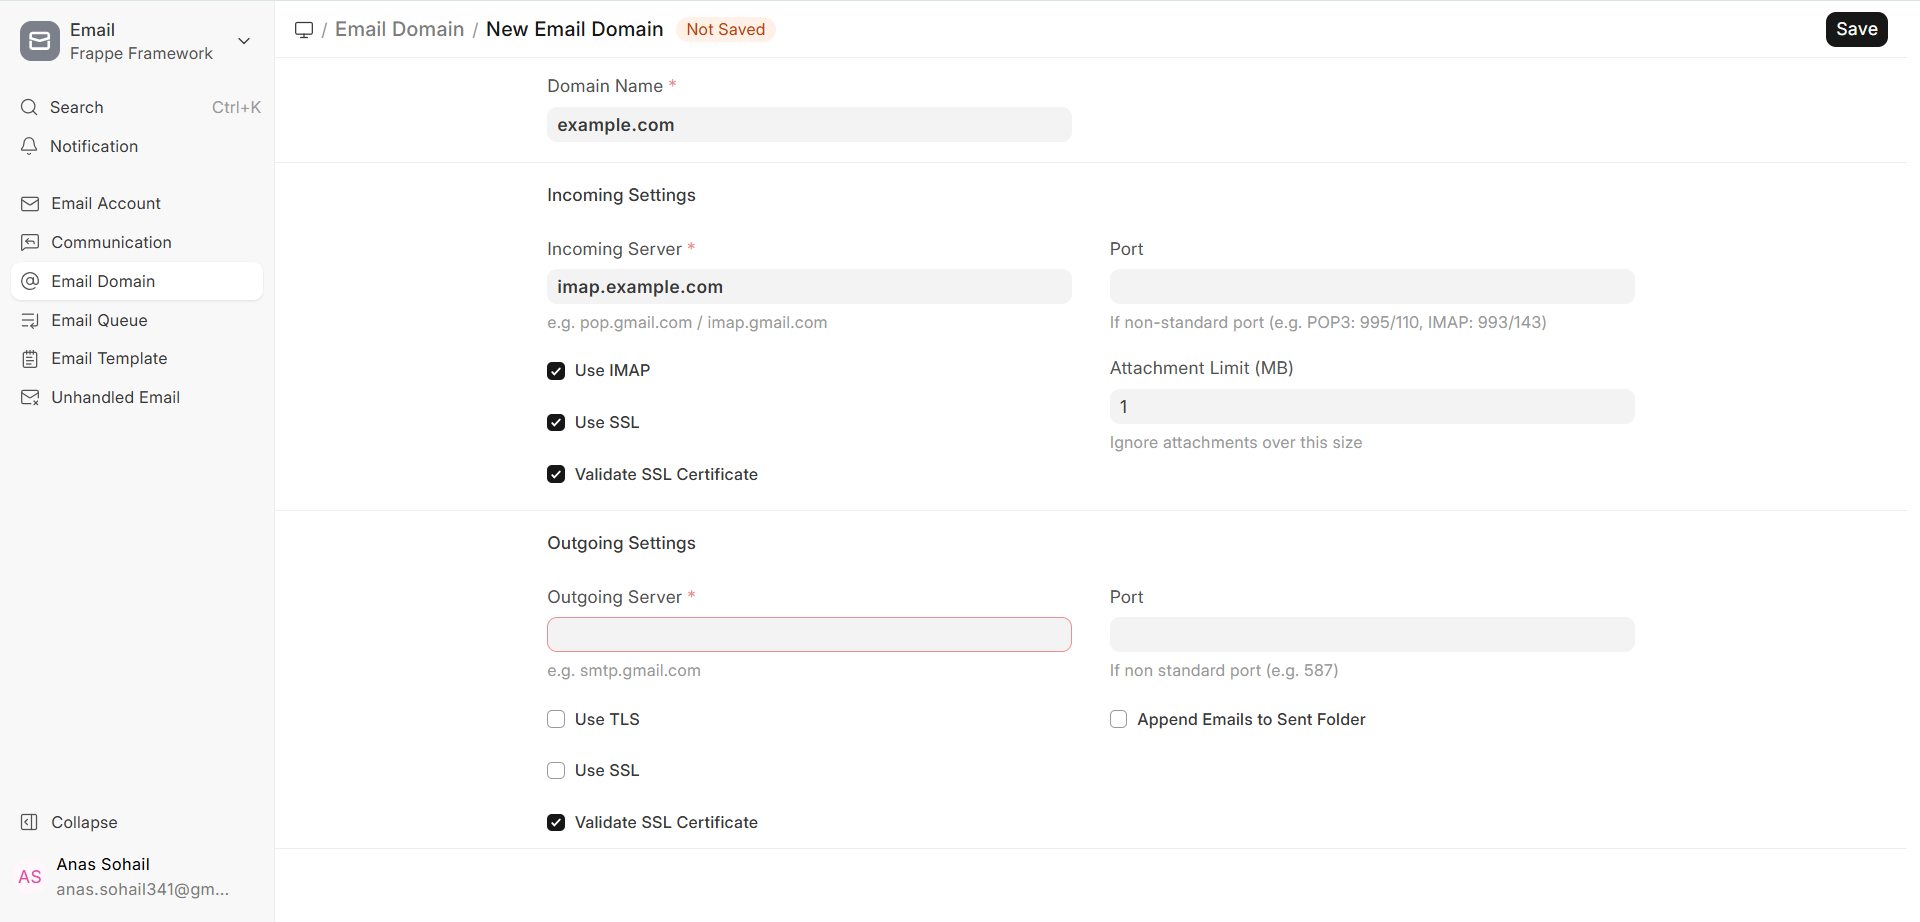
If you wish to send and receive emails from email services other than Gmail, Outlook, or your own webmail, you need to set up an Email Domain in ERPNext. An Email Domain stores all the information that an email gateway needs, like:
- SMTP server’s address and port
- The IP and port of the POP3 or IMAP server
- Protocols for safety (SSL/TLS)
What you have to do to show who you are ?
You may set it up this way, just like you would with email applications like Thunderbird or Microsoft Outlook.
Follow these steps to add a new domain to your email:
Go to Settings > then Emails > then Email Domain > Click on New
After you set up an email domain:
- You can use it again to set up email accounts for more than one person.
- All email accounts with the same domain have the same gateway and security settings.
- Changes to the email domain will effect all email accounts that are linked to it.
More notes:
- If you use Gmail or Outlook, the latest versions of ERPNext say you should utilise OAuth to log in.
- Make that IMAP access is enabled on in the settings of your email provider.
- You should utilise a separate transactional email provider if you get a lot of emails.
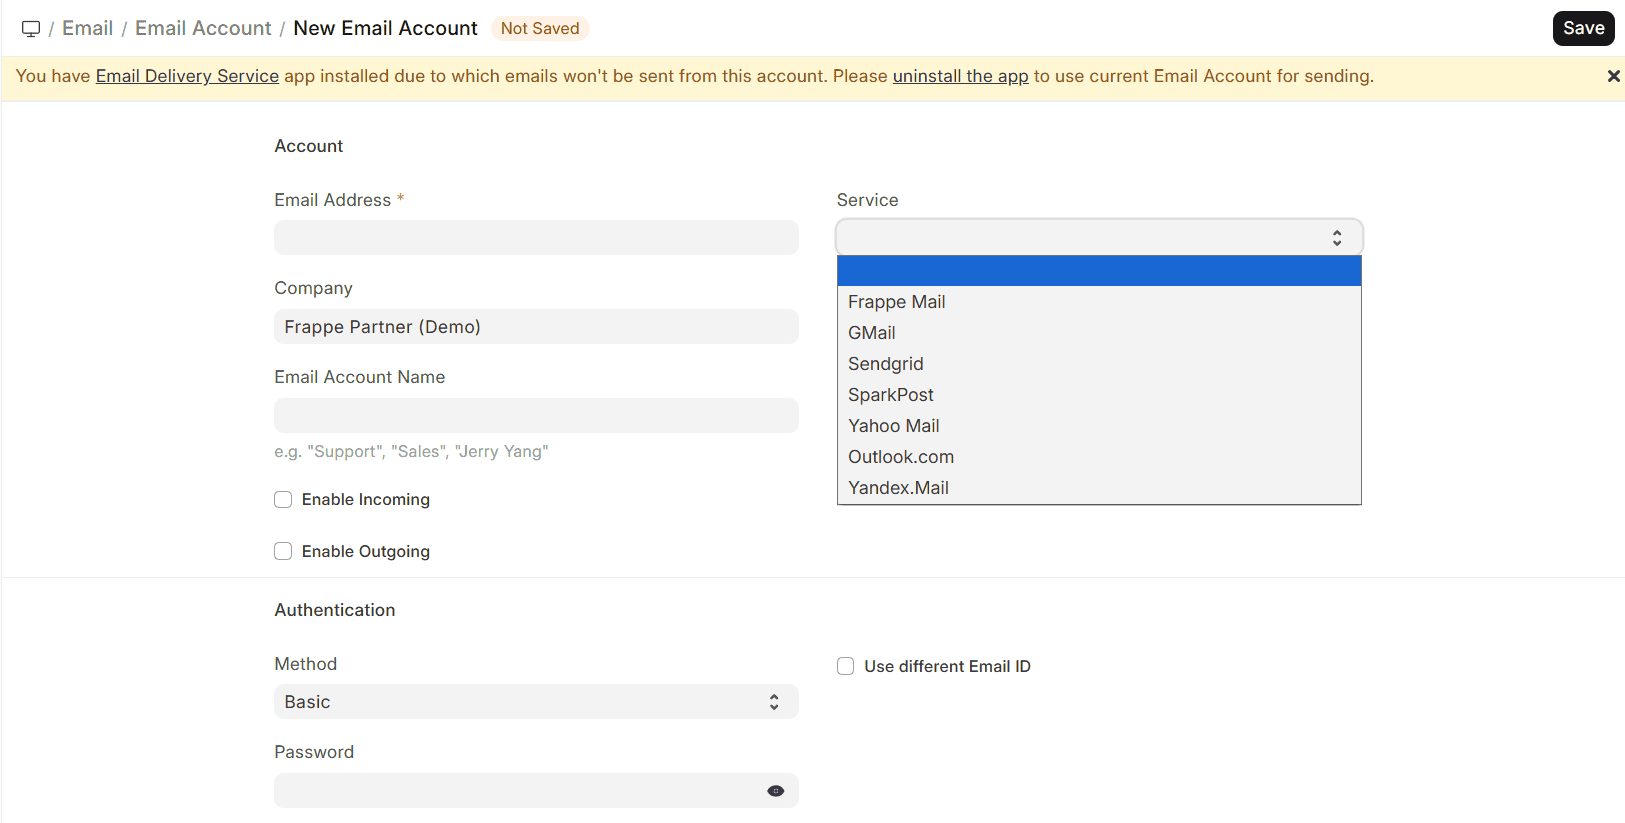
3. Your Email Address
An Email Account connects a user’s email account to ERPNext so they can read and send emails from the Email Inbox.
To connect a user’s email to ERPNext, you need to create a distinct Email Account record for each user. With Email Accounts in ERPNext v16, you can log in safely, have individual inboxes for each user, and collaborate closely with documents and schedules.
When you set up an email account:
Check if the Email ID and the email address of the user are the same. Pick the correct email domain, such as Gmail, Outlook, or one you picked up yourself. You might have to alter the settings for your incoming (IMAP/POP3) and outgoing (SMTP) mail. These options are normally found in the Email Domain.
If you’re making an email account for a coworker and don’t know their password, turn on Awaiting Password. If this option is set on, the User will have to input their email password (or go through OAuth authentication) to go into ERPNext.
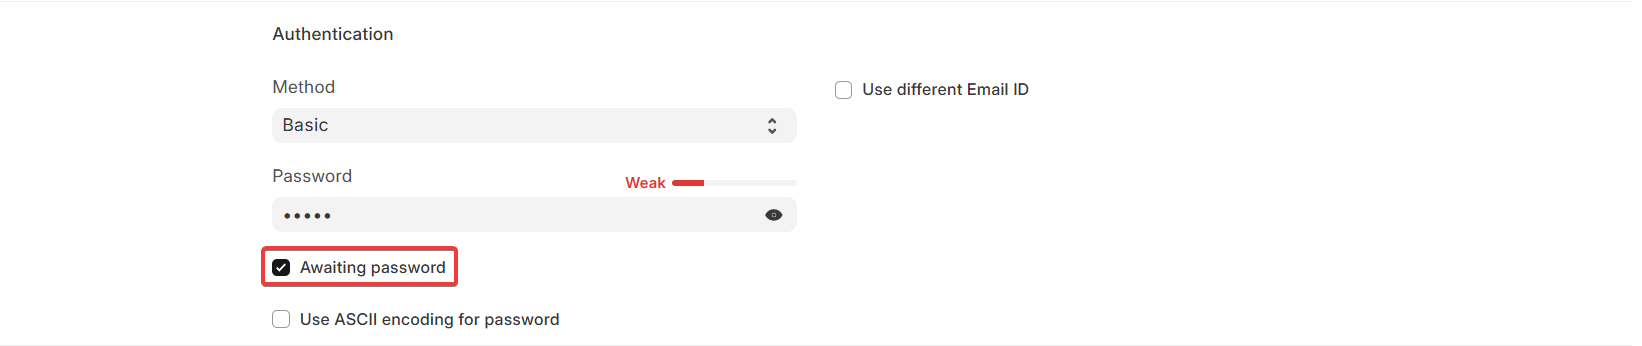
This is in keeping with the greatest security procedures and keeps passwords safe.
Email Password
The email password is stored safely and encrypted for password-based authentication. ERPNext v16 highly urged that email providers like Gmail and Outlook use OAuth to verify users. It’s great that you don’t have to remember your passwords.
When OAuth is utilized, the Email Account will prompt the user to conclude the authorization procedure instead of inputting a password. Don’t fill out the Append To field if you’re building an email account simply for a user’s inbox. If you don’t fill out this area, emails will go to the user’s personal email account.
If you choose Append To, new emails will automatically go to a certain DocType, such Issue or Lead. People use this a lot for shared inboxes or those used for support.
The Email Account page has information about how to set up your account, how to log in, and what your provider needs from you.
4. Linking an email account to the user master
After you make the Email Account, you need to link it to the proper User.
- Look up the user’s record.
- Select the email account you set up in the Email User Link area.
- Keep the User.

This connection makes sure that:
- The associated Email Account only enables that User read emails in the Inbox.
- You need to set up shared or role-based access so that other people may see these emails.
- Link for People Who Use Email
- More than one email account can belong to one person.
- Each email account that is connected to the Email Inbox view shows up as its own folder or inbox.
This is useful for folks who have more than one email account for different vocations, including sales and support.
5. How to Use the Inbox in Email
Once you set up the Email Inbox the right way:
- When the User logs in, the Email Inbox icon will appear on the top navigation bar.
- When you click the icon, the Email Inbox view opens up and shows all the emails that were taken from the associated Email Accounts.
- The supplier selects when and how often emails will be synchronised on their own.
From the Email Inbox, users can accomplish the following:
- Check your email and read it.
- Check out the files that are attached.
- Reply to, forward, or do something with emails
- Link emails to files in ERPNext
It is possible to keep track of all email activities.
5.1 Folders
With ERPNext, a single individual may check many email accounts from a single interface.
To change from one folder or account to another:
- Click “Email Inbox” on the left side.
- Pick the email account you want.
- Look in shared directories like:
- Inside the Box
- Sent
- Spam
- Trash
- Drafts (if the supplier lets you)
This folder-based navigation is straightforward to use because it’s like how the old email service worked.
5.2 Things to Do
Users may execute standard email tasks right from the Email Inbox in ERPNext:
- Reply—Send a message back to the person who sent it.
- Answering everyone implies replying to everyone.
- Forward—Send the email to another person.
- Mark as Spam: Put the email in the junk folder.
- Put the email in the Trash to get rid of it.
- Restore: Get emails back from the Spam or Trash folders (this depends on the provider).
The system keeps track of all the answers and forwards that are sent, and if necessary, it adds them to the Timeline of the document that is connected.
5.3 Link again
You can link emails to ERPNext documents by yourself or automatically to help you keep track of them.
You can use Relink or Make From Email to:
- Pick one email from your inbox.
- Choose the type of document you wish to utilise, such as an Issue, Lead, Opportunity, Project, or Task.
- Pick the specific document you wish to link the email to.
After being linked:
- The email appears in the Timeline of the document.
- You can set up future replies to go to the same document without having to do anything.
- This is really helpful for communicating to customers, dealing with support tickets, and following up on sales.
Related Topics
Visit Us Here