Help Articles For ERPNext Part 4
Permission Error Problems
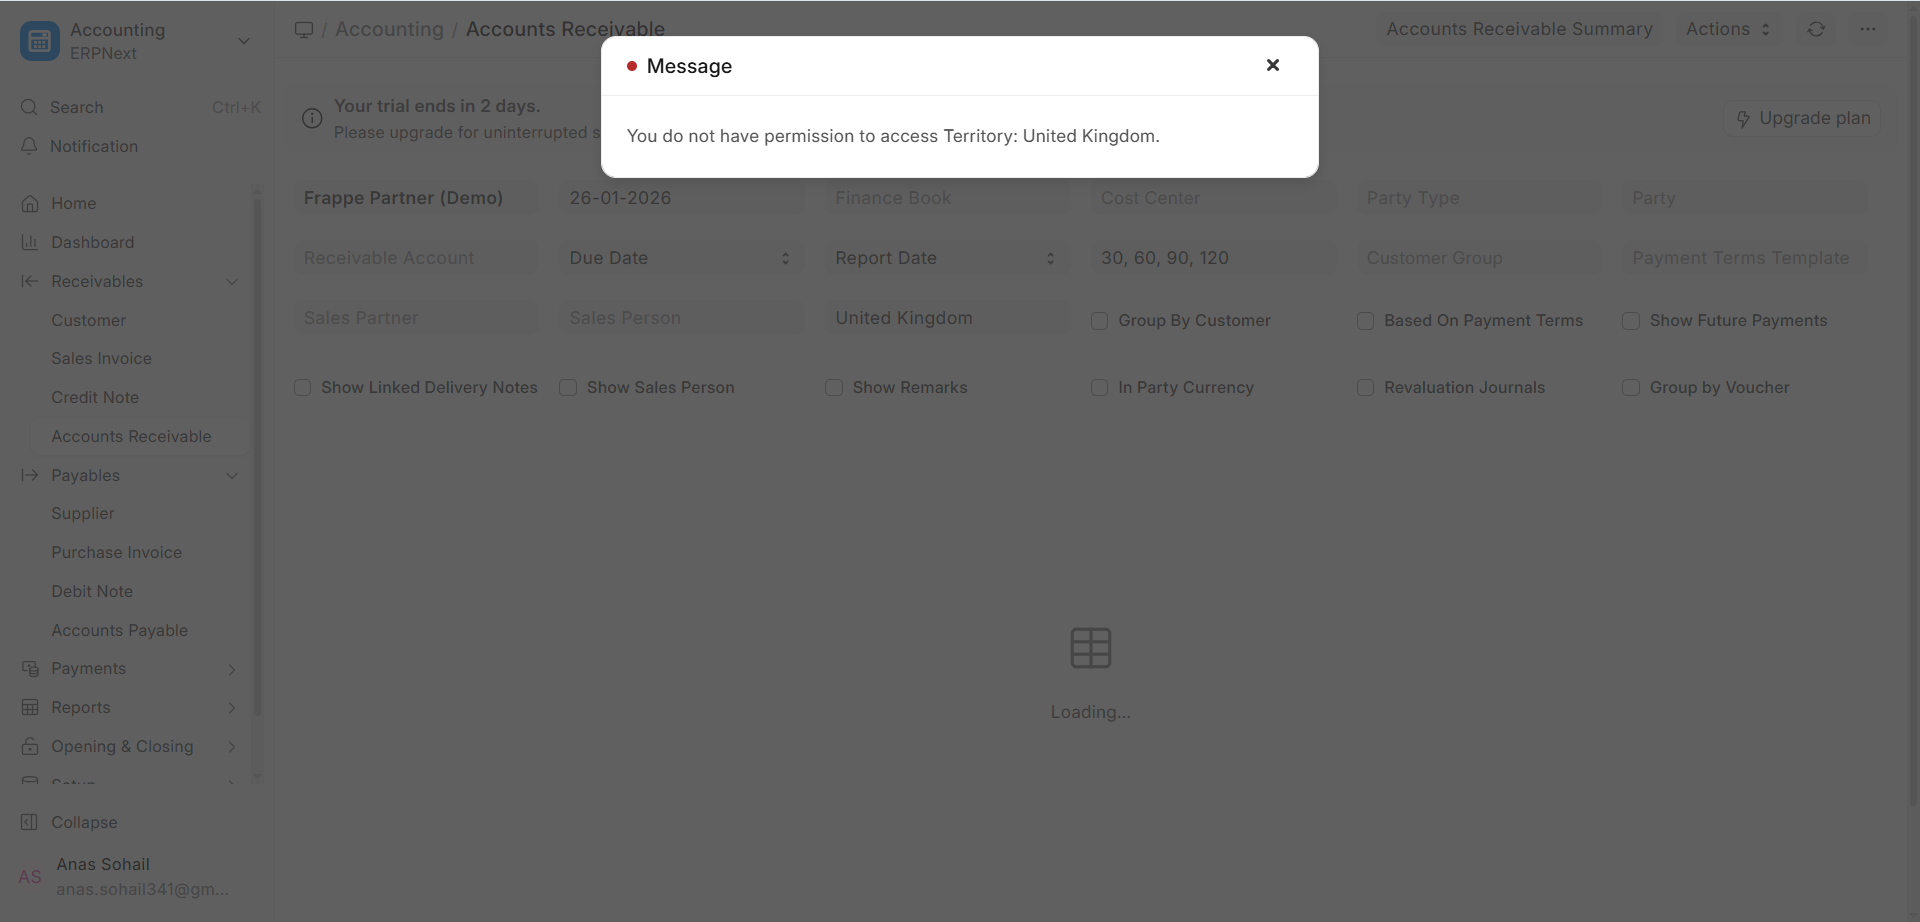
Question:
A user has been given roles like Accounts User and Accounts Manager. But when the user tries to open the Accounts Receivable report, the system shows an error message saying that the user does not have permission to access the Territory master.
Answer:
According to the permission framework in ERPNext v16, a user needs to have at least Read permission on all DocTypes that are linked in a report or form in order to be able to access it. Reports often have more than one linked field (Link or Dynamic Link fields), and ERPNext checks the permissions for each of those linked DocTypes before letting you in.
When you look at the Accounts Receivable report, you can use Territory as a linked field to filter, group, or show customer-related data. The user must have at least Read access to Territory because it is a master DocType. ERPNext v16 won’t let you see the report if you don’t have this permission. It will show a permission error, even if the user has full access to the report’s main module (Accounts).
Steps to fix the problem:
- The user has been given the roles of Accounts User and Accounts Manager.
- The error message says that the user doesn’t have enough permission on the Territory master.
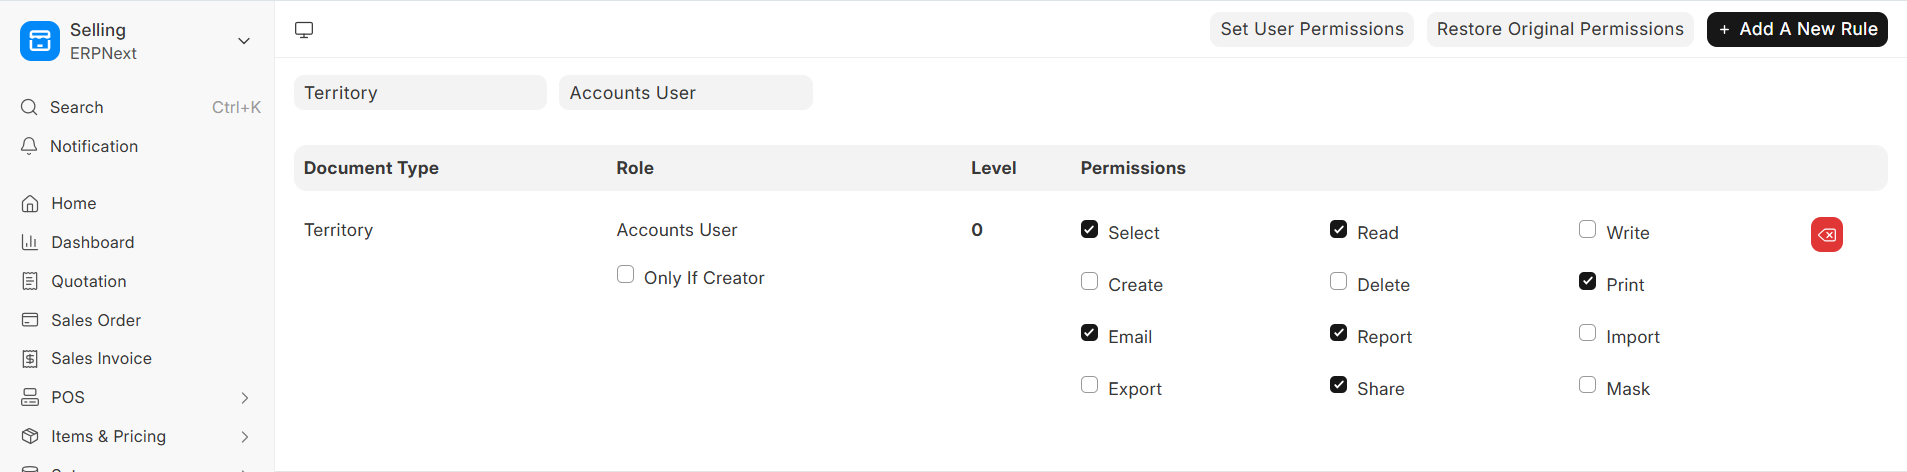
- In ERPNext v16, the Accounts User and Accounts Manager roles do not have Read permission for the Territory DocType by default.
- To fix this, use the Role Permission Manager to give one of the roles (like Accounts User) Read permission on the Territory master.
After this permission is changed and saved, the user will be able to access all of the linked DocTypes that the Accounts Receivable report needs. Because of this, the user should be able to open and use the report without getting any more permission errors.
Using Prepared Report
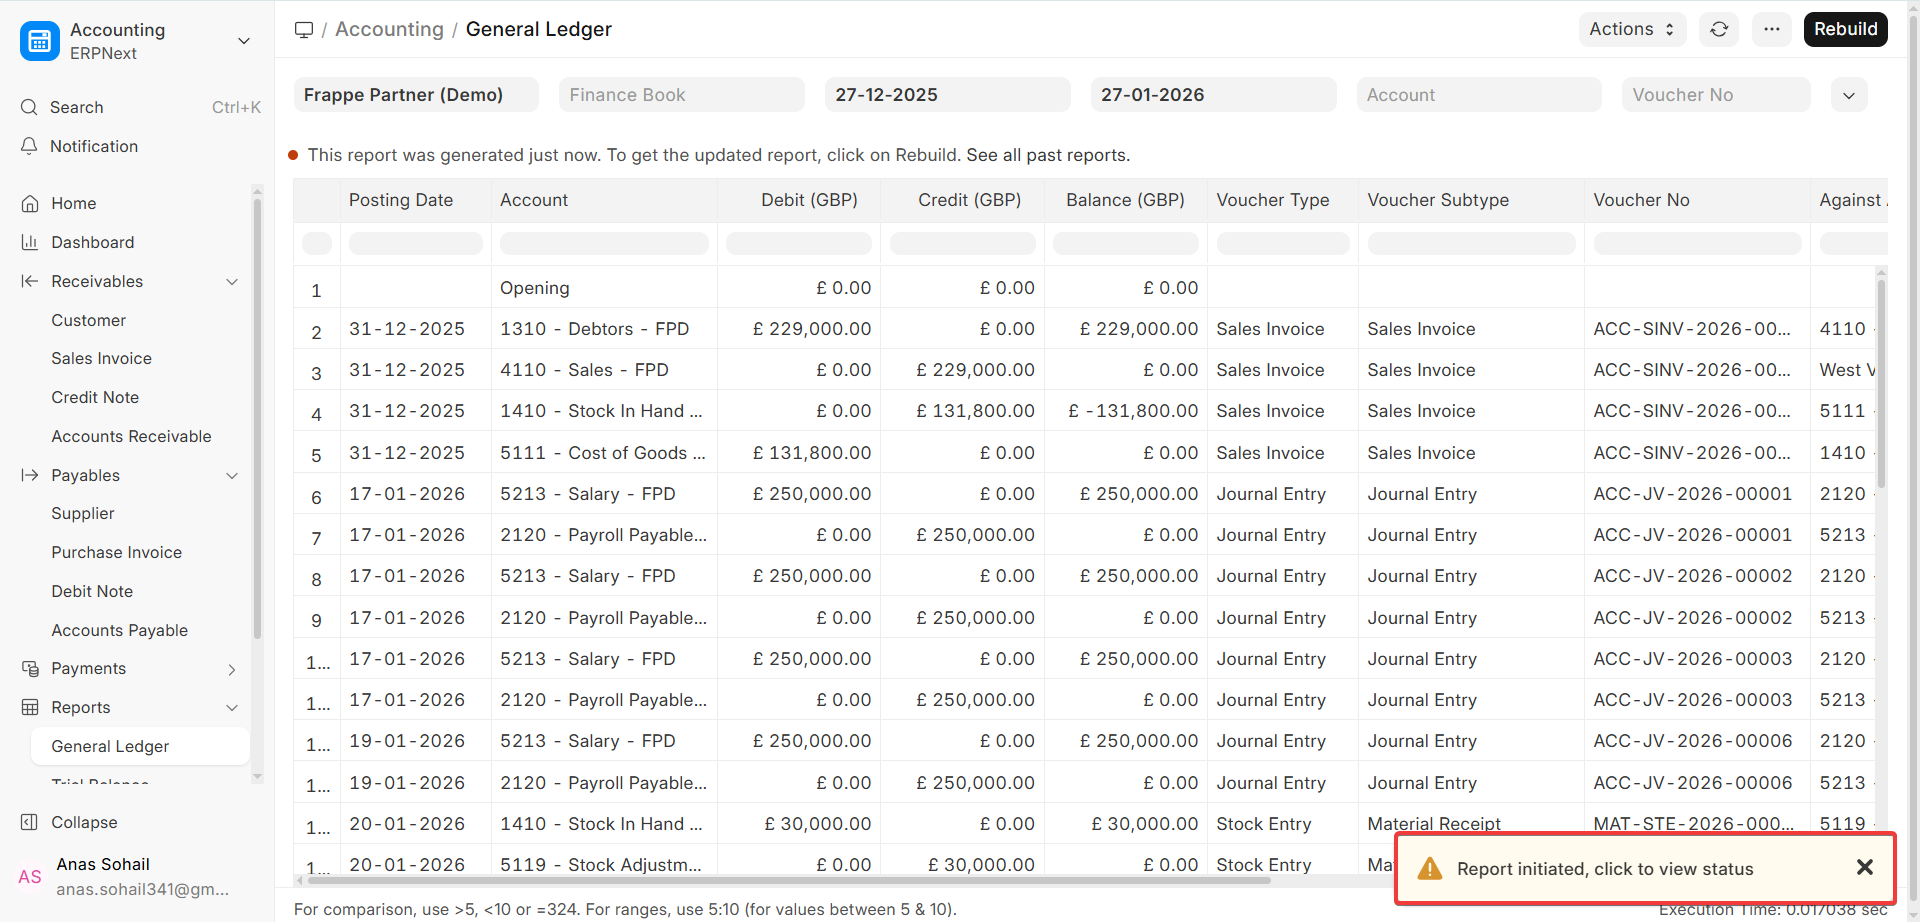
When you try to make reports that deal with a lot of data, like the General Ledger, Stock Ledger, or Accounts Receivable report for a whole financial year, you might get a “Request Timed Out” error. This usually happens because the report needs a lot of data processing and aggregation, which is too much for the server to handle or the request time limits when it is run at the same time.
ERPNext v16 has the Prepared Report feature, which was added earlier and has been made much more stable in recent versions, to help with these kinds of situations. When you set up a report as a Prepared Report, it is made in the background by jobs that run in the background. This keeps the user interface from freezing up when big reports are running, stops timeouts, and lets users keep working while the report is being processed. The prepared output is saved and can be seen by people who have permission at any time.
How to Set Up Prepared Reports
- From the Settings module, go to Page and Report Role Permission.
- To manage permissions at the report level, choose Report in the Set Role For field.
- In the Report field, choose the report for which you want to turn on or off the Prepared Report feature.
- To control availability, check the box next to “Disable Prepared Report.”
- If you don’t check this box, users can make the report as a Prepared Report.
- If you check this box, the Prepared Report option will be turned off and the report will only run in real time.
- To make the changes, click Update.
This setup lets system administrators turn on Prepared Reports only for reports that use a lot of resources, which keeps ERPNext v16 running at its best.
How to Use a Prepared Report
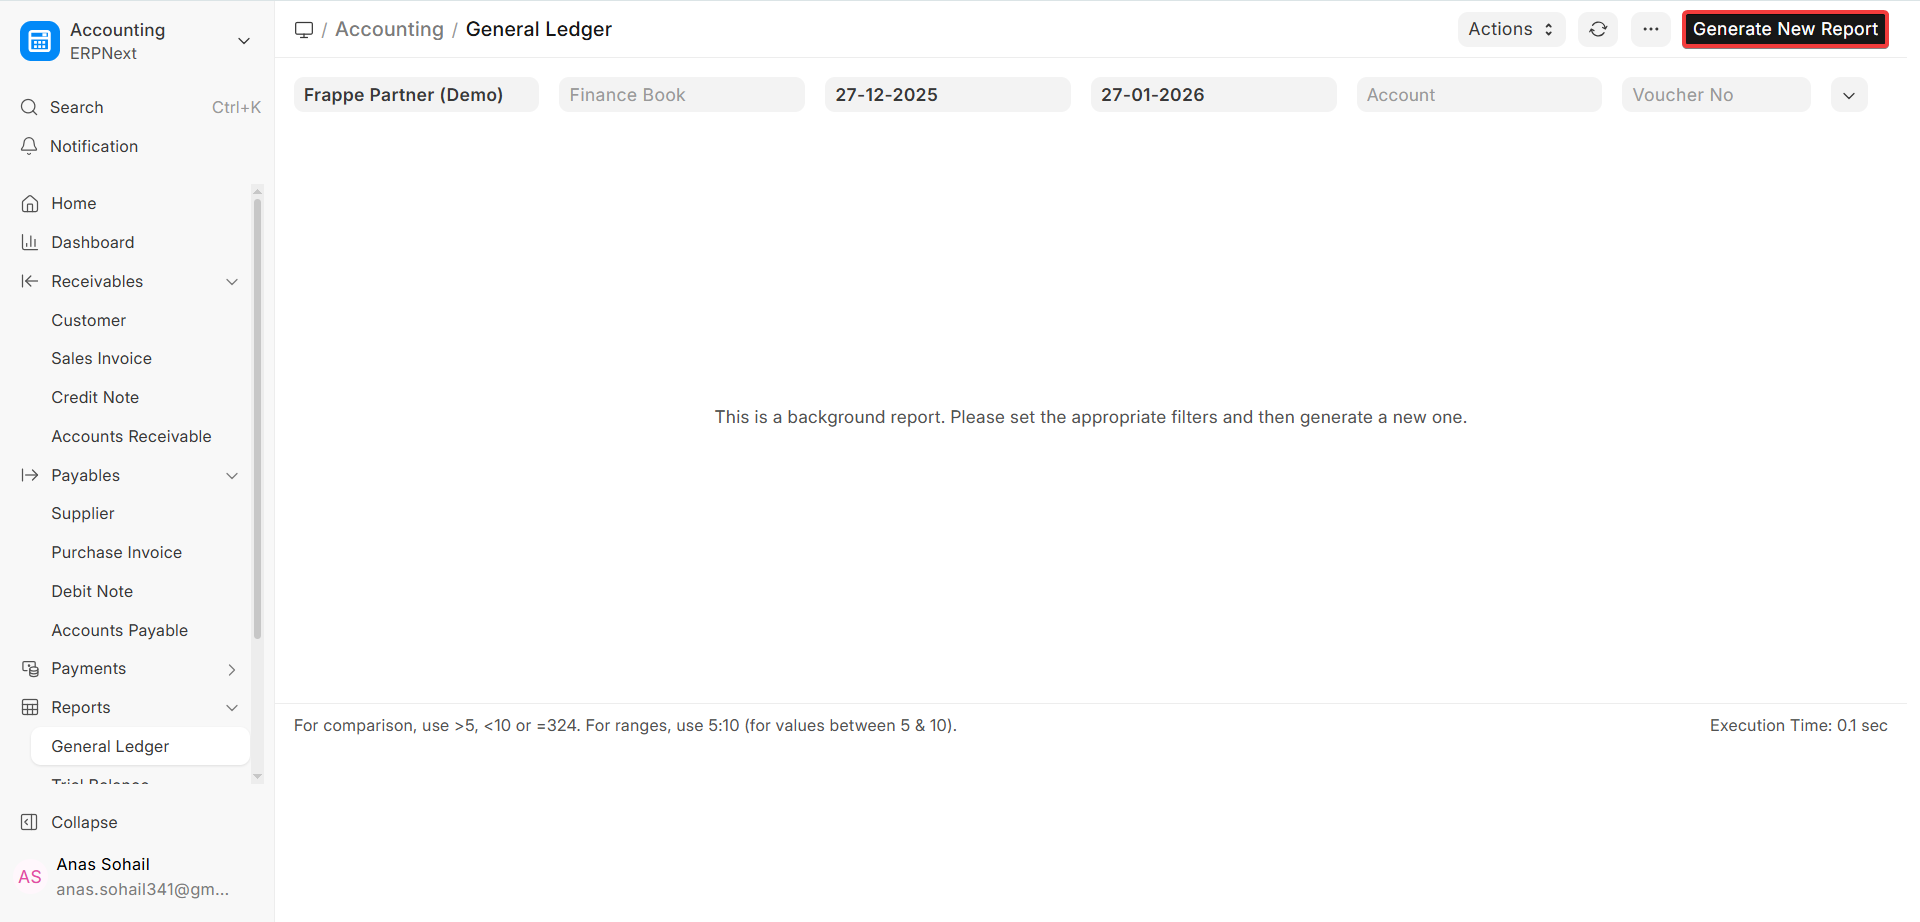
- Open the report you need (like the General Ledger) and use the filters you need, like Company, Date Range, Accounts, or Cost Centres.
- If this report has Prepared Reports turned on, you will see a Generate Report button instead of the usual “load right away” behaviour. To start making a report, click this button.
When you click “Generate Report,” a message will appear in the bottom-right corner of the screen saying:
“Report started. You can see how it’s doing here.
- You can either stay on this page or click here in the notification to go to the Prepared Report status page. This takes you to a new page just for the report instance.
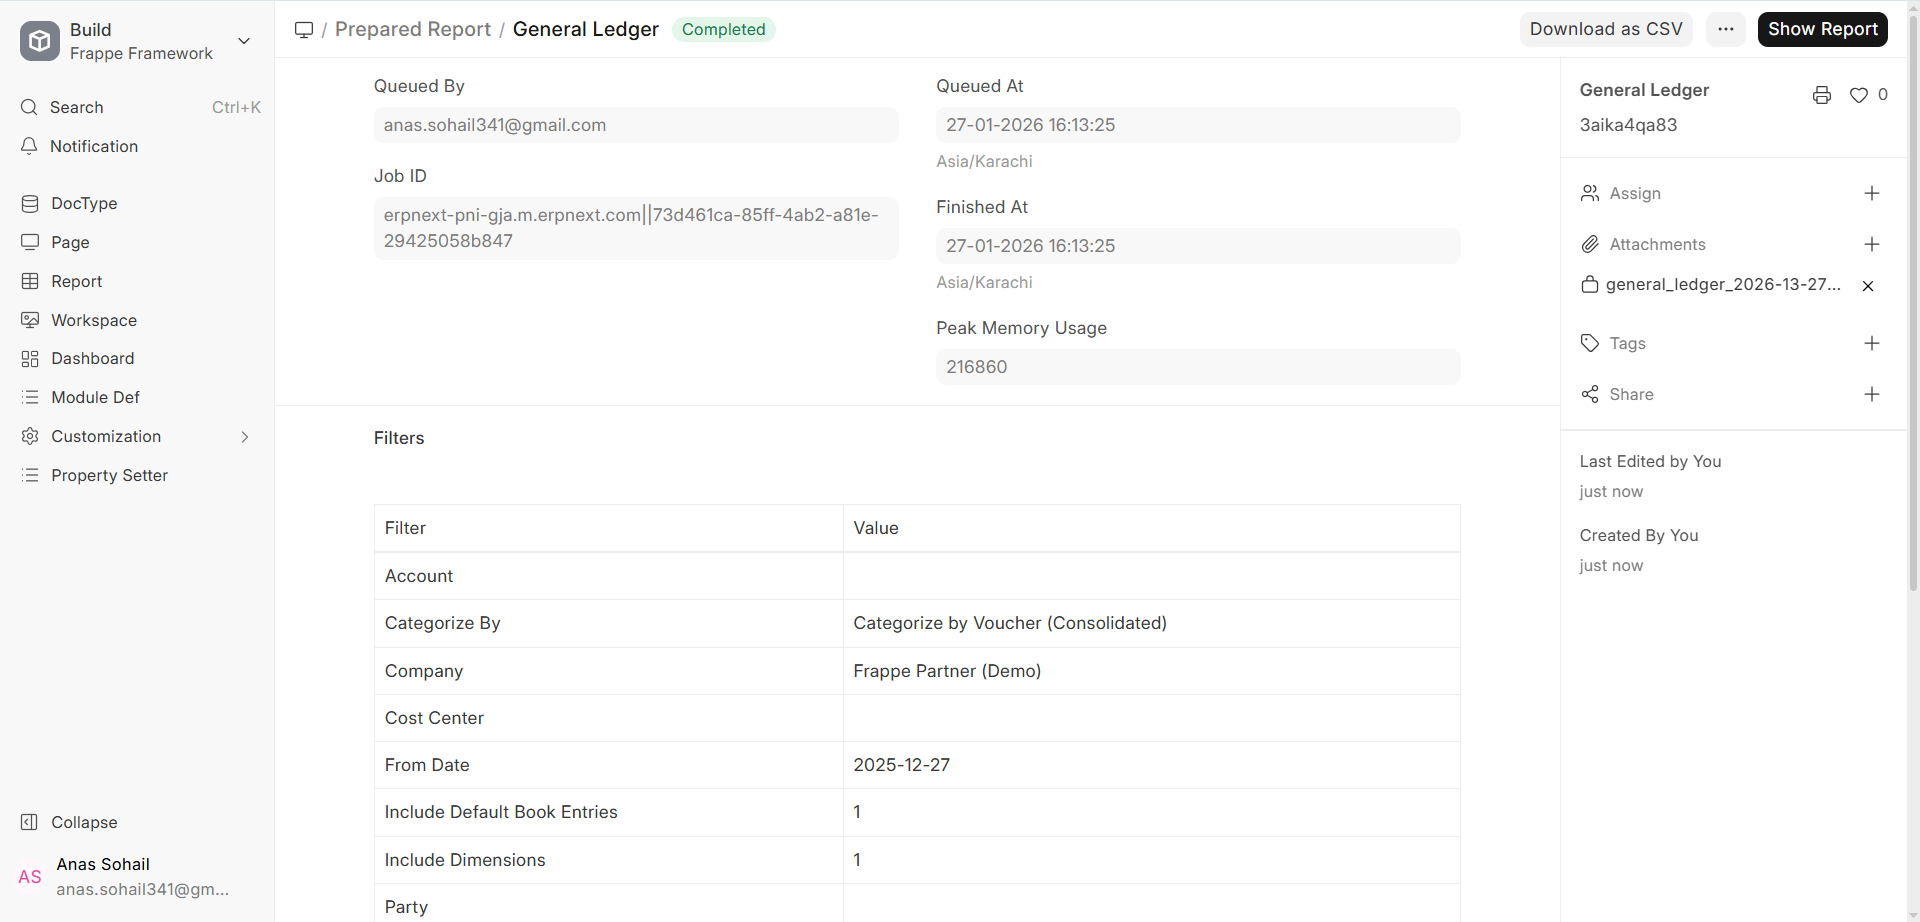
The report will first show a status like “Queued” or “In Progress” on this page. This means that the scheduler and background workers are working on it in the background. When processing is done, the status will change to “Completed,” and a button will appear that says “Show Report.”
- To see the report output without reprocessing the data, click Show Report.
Prepared Report is a DocType in ERPNext v16, so role permissions control who can view, manage, or re-run prepared reports. The Role Permission Manager lets administrators give users the right level of access to see prepared reports, their status, and their results.
What if Emails are not being received by the Recipients?
When you send an email from ERPNext, you usually expect the person to get it. But if you get feedback that the email wasn’t delivered, there are a number of checks and steps you can take in ERPNext v16 to find and fix the problem. These steps help check the configuration, the status of the delivery, and any mistakes that might have happened in the email pipeline.
If you send an email to an address that is spelt wrong, has the wrong format, or doesn’t exist, it won’t get there. This may seem obvious, but it’s one of the most common reasons why emails don’t get delivered. It’s easy to miss, especially when emails are sent automatically from reports or transactions. Always check the Email ID of the person you are sending it to again.
The next thing to do is check to see if your ERPNext system is able to send Emails at all. You can do this by sending yourself a test email. You can do this by making a new Communication record by hand.
Click on New in the Communication List, type in your own Email address as the recipient, add a subject and message, and send the Email. This test Email confirms that outgoing Email is working at a basic level.
If the method above doesn’t work, you should check your Email Account settings again and change them if necessary.
Open the right Email Account from Email Account and carefully check the Email Address, Login ID, Password or App Password, Incoming/Outgoing Server, Ports, and SSL/TLS settings. If everything looks good, click the Save button. When you save, ERPNext v16 will try to connect to the mail server. The system will give you an error if there is a problem with the configuration, and you can fix it then.
Check the Email Queue, too, for any unsent messages or those that encountered errors. This queue logs every outgoing email and its delivery progress. Should an email show an “Error” status, you can open the corresponding entry and find more details in the “Error” field.
This field tells you why the email didn’t go through, like problems with authentication, connection timeouts, or mail server rejections.
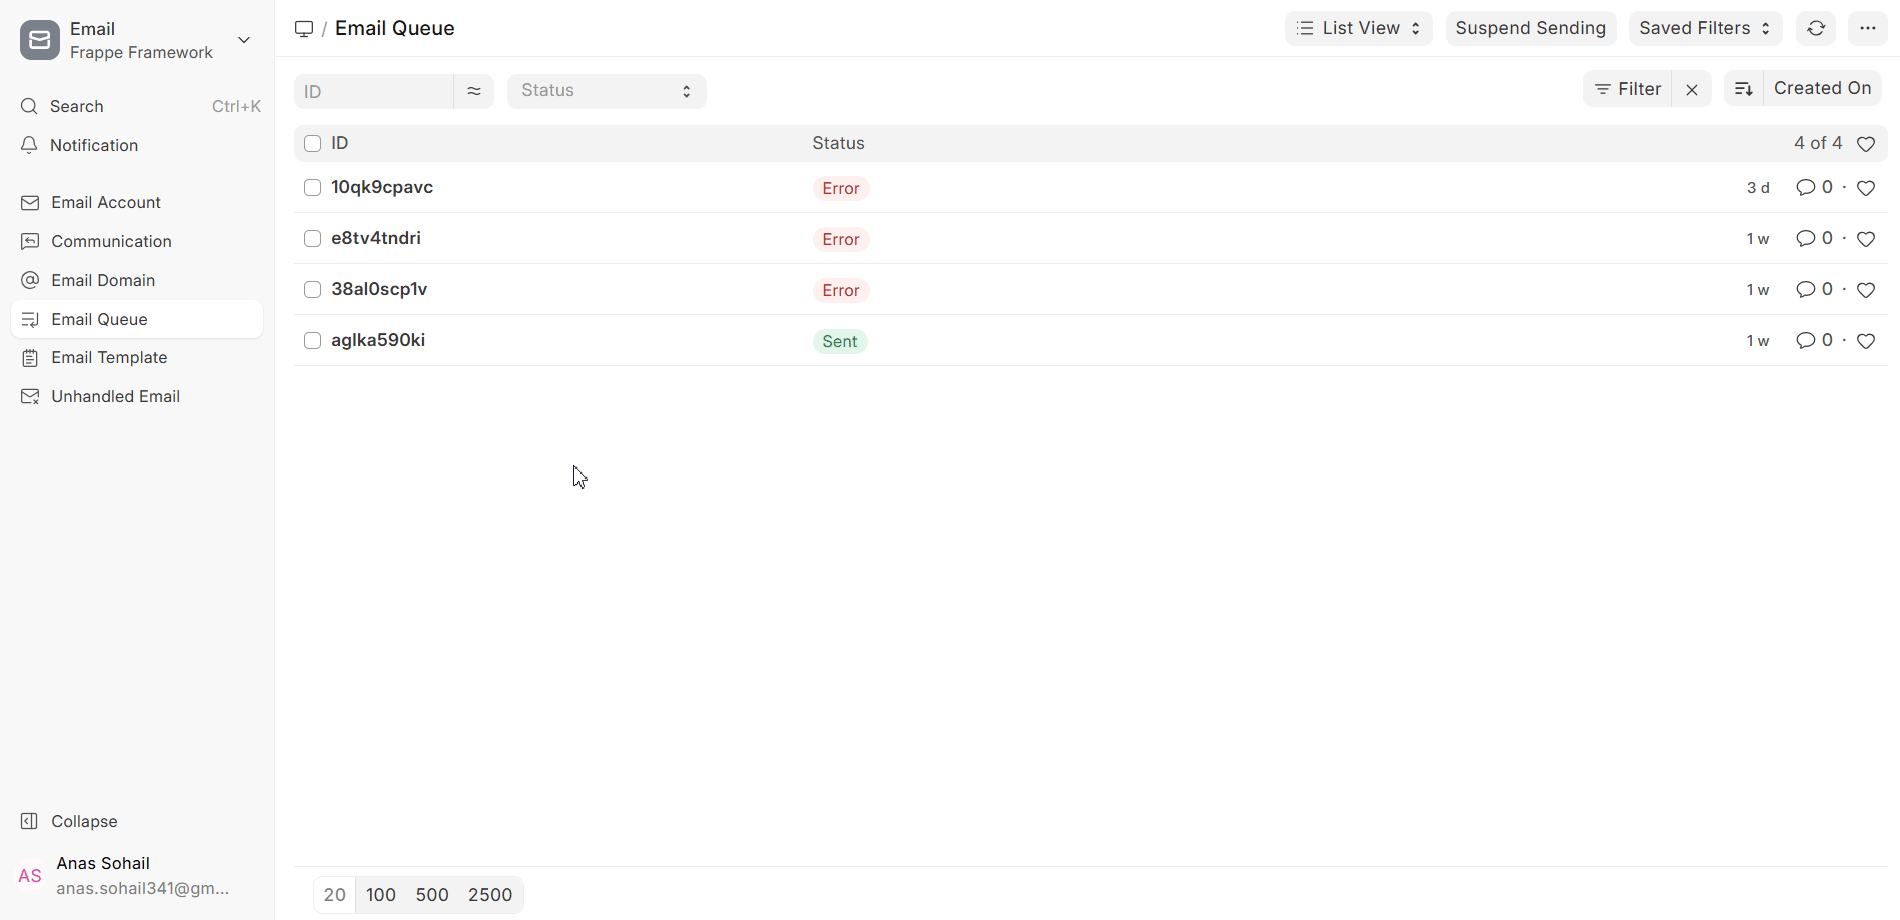
NOTE: Depending on the email service provider, server settings, or security policies (for example, wrong login information, blocked ports, or missing app passwords), the error message may be different. So, always check the exact error message in the Email Queue to find out what you need to do to fix it.
Maximum Number of Fields in a Form
If you’re creating or modifying Custom Fields in ERPNext v16, you could encounter an error message similar to this one:
“The row size is too large. The upper limit for a table’s row size, not counting BLOBs, is 65535. This number accounts for extra storage as well. For more specifics, please refer to the manual.
Some columns need to be changed to either TEXT or BLOB data types.
This particular error tends to surface when you’re attempting to save a new Custom Field or modify a DocType that’s already packed with fields.
What does it mean?
This error means that the database table that the DocType is based on has reached the maximum number of rows it can hold. There is a database table for each DocType in ERPNext. The database engine (MariaDB/MySQL, which is used in ERPNext v16) sets limits on that table. The system can’t add more columns of some data types when you go over this limit.
Theoretically, MySQL/MariaDB tables can have up to 4096 columns, but in reality, the limit is much lower. This is because the database limits each record to a maximum size of 65,535 bytes (not including data stored separately, like BLOB and TEXT fields). The actual usable row size may be even smaller depending on the storage engine and character set that are used.
The maximum row size limits both the number and size of the columns in a table. ERPNext usually uses utf8mb3 or utf8mb4 encoding, which means that each character can use up to 3 or 4 bytes. A VARCHAR(140) column that uses utf8mb3 may need up to 420 bytes of space, not counting overhead. So, a table can only have about 156 of these columns before it reaches its limit.
As a default, the Frappe Framework (which ERPNext v16 is based on) stores several field types, like Data, Link, Select, Dynamic Link, Password, and Read Only, as VARCHAR(140) columns. Because of this, a DocType that relies heavily on these field types can realistically only support about 150 to 160 of these fields before it hits the row size limit.
Solution:
You can get around this problem by making the following changes to add more fields to the system:
Change a few of the existing fields to Text, Small Text, Text Editor or Code. On MySQL / MariaDB, the representation in the row is not the actual content of the column TEXT and BLOB. Rather, they retain a little pointer in the row. Due to this fact, they do not contribute much to the row size constraint and are able to release huge space to more fields.
In lowering the value in Length Property, you make or completely modify Custom Fields. This is defaulted at 140 in ERPNext creating a VARCHAR(140) column. Please, shorten it (to 50 or 80). This will reduce the storage space required and it will improve the space on one DocType of fields.
Locke and delete any Custom Fields that you are not really using. When you remove Custom Fields off the UI they do not necessarily disappear off the database. Custom Fields and their data can be removed permanently in the database permanently in case you are certain that you no longer need them. This can be done with the a command of trim-tables of the Frappe framework to trim off columns that are not utilized. Some assistance is available in the official documentation at:
https://frappeframework.com/docs/user/en/bench/reference/trim-tables
To successfully handle DocType constraints and row size corruption in ERPNext v16, to the best of your ability, you should select the appropriate field types, optimize the lengths of the fields and communicate with Custom Fields every now and then to clean up old unused fields.
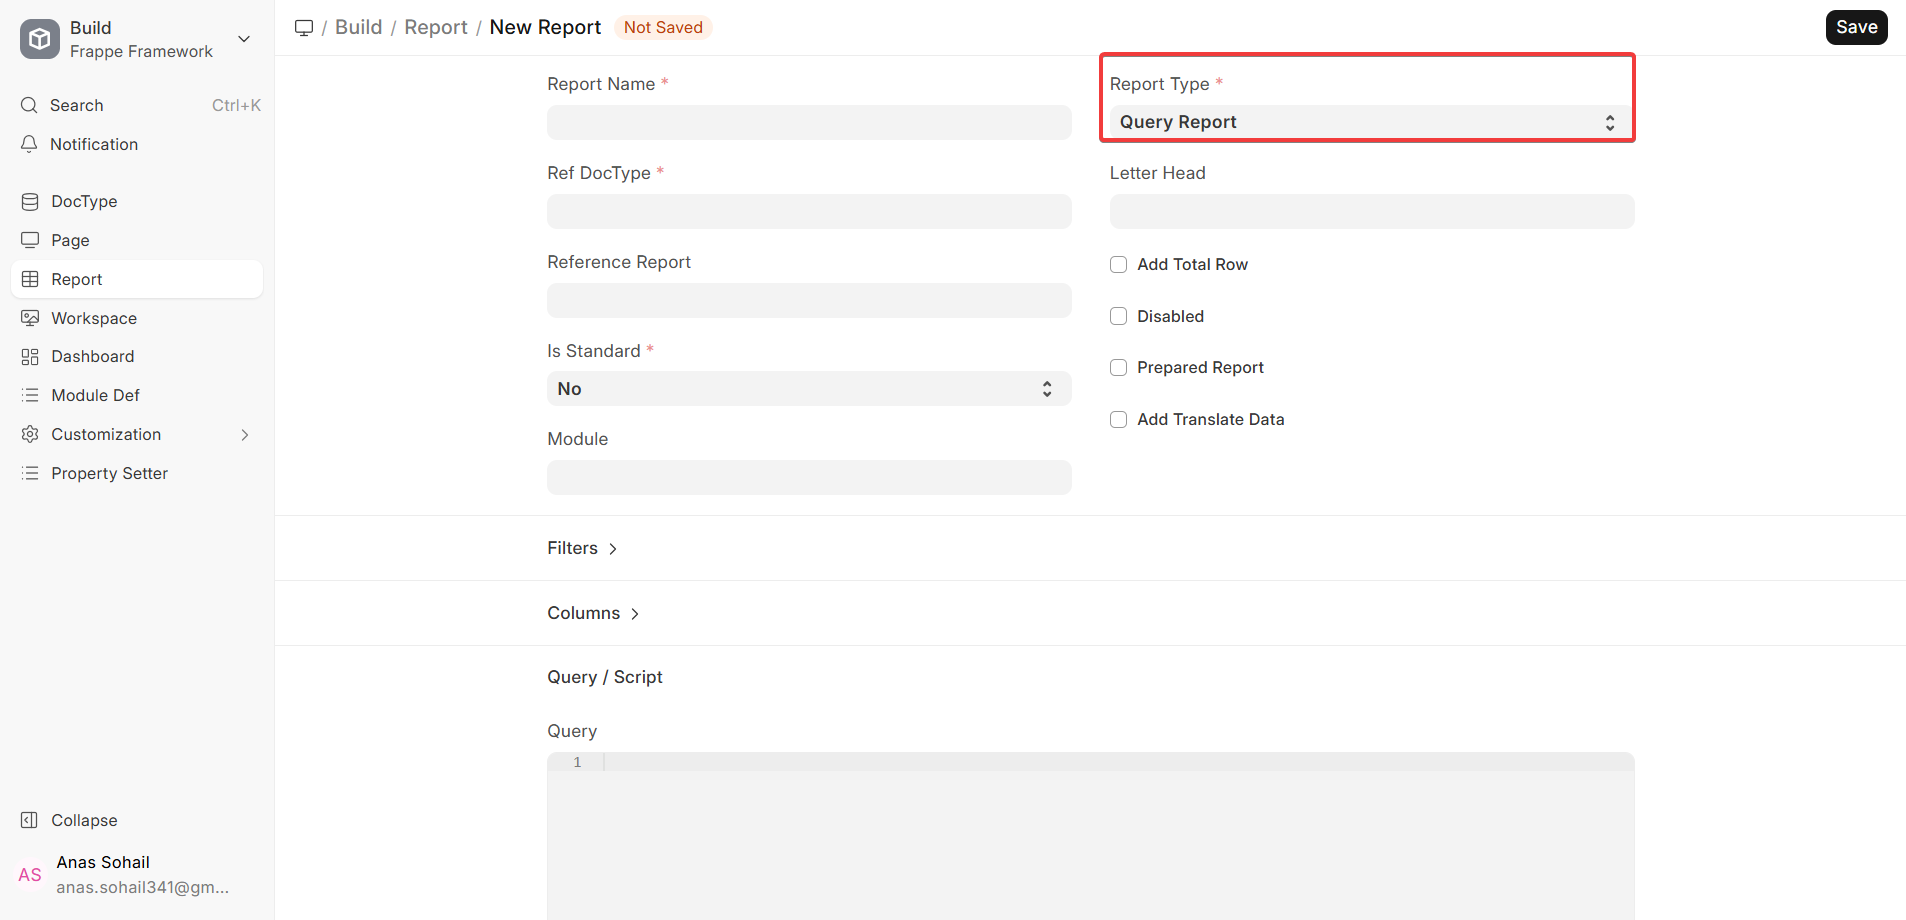
Making Custom Reports
ERPNext has three types of reports.
1. The Report Builder
Report Builder is a built-in tool that allows the customisation of reports in ERPNext v16 with no need to write any code. It allows individuals to construct simple, tabular reports directly on the user interface with no need of writing any code. Using Report Builder you will get an opportunity to select some fields out of a DocType and filter the data and sort it and select grouping options when they are reasonable. You may also give the report a desired name and then restrict the accessibility by using role based accessibility.

Report builder is most suitable with operational and list-based reports that are sourced using a single DocType, or its child tables. Most people can easily maintain it and have the ability to use it even one who is not a technological expert since it uses the normal DocType fields and relationships.
2. Report on Queries
SQL is used to write Query Reports, which get data directly from the ERPNext database. If you need more flexibility than what Report Builder offers, like joining multiple tables, doing aggregations, or using complicated filtering logic at the database level, these reports are helpful. ERPNext turns the results of the SQL query into a report.
Due to security concerns, cloud and hosted users of ERPNext v16 cannot write or change Query Reports from the UI. This is because SQL access can let sensitive data slip out if it isn’t carefully managed. Developers with the right access usually make and keep Query Reports up to date.
The Purchase Order Item to be Received report in the Stock module is a good example of a Query Report.
3. Script Report
Script reports are written in Python and run in the server side. These reports are to be directed towards complex business logic, arithmetic, and data processing which can not be well-done with SQL. Script reports have the ability to retrieve information on multiple DocTypes, perform bespoke calculations, and offer back structured results in the form of columns, charts, and summary pages.
In the ERPNext v16 application code, Script Reports fall under the code itself, and they cannot be changed within a hosted or cloud based account. To make any modification to these reports, its developer will be required to provide access to the server or the codebase of the app.
One example of a Script Report is the Financial Analytics report in the Accounts module.

Dynamic Filters work in both Script Reports and Query Reports. This means that filters can change based on user input or the values of other filters. But you can’t use Dynamic Filters in Report Builder reports.
Deleting Custom Reports
You can customise the different types of reports that come with ERPNext v16 to fit your business needs. You can change the layout of reports, add or remove fields, and apply filters as part of these customisations. There are times when a custom report is no longer needed or needs to be replaced. You can safely delete it in these cases. Keep in mind that this only works for Custom Reports. You can’t delete standard reports that come with ERPNext.
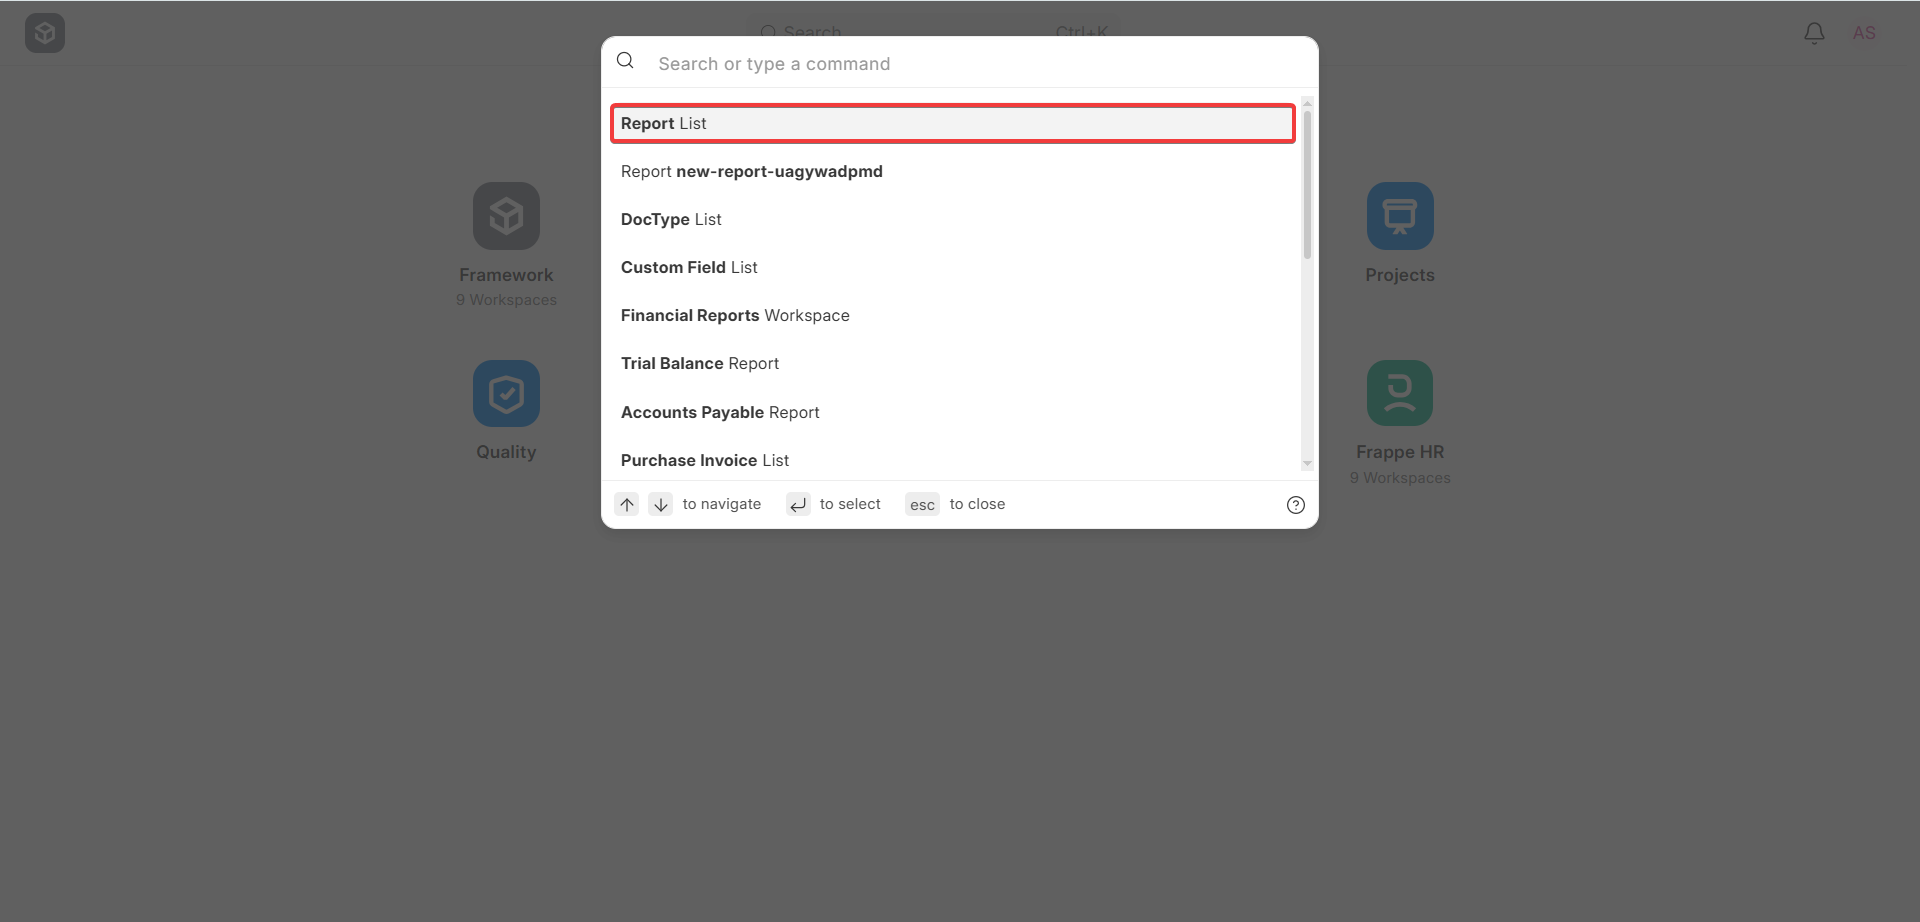
Step 1: Access the Report List
Simply type “Report List” into the Awesome Bar and select it. The Report List displays every report within your ERPNext instance, encompassing both the pre-installed and any custom ones you’ve created. This unified perspective simplifies the task of finding, managing, and filtering the reports you want to delete.
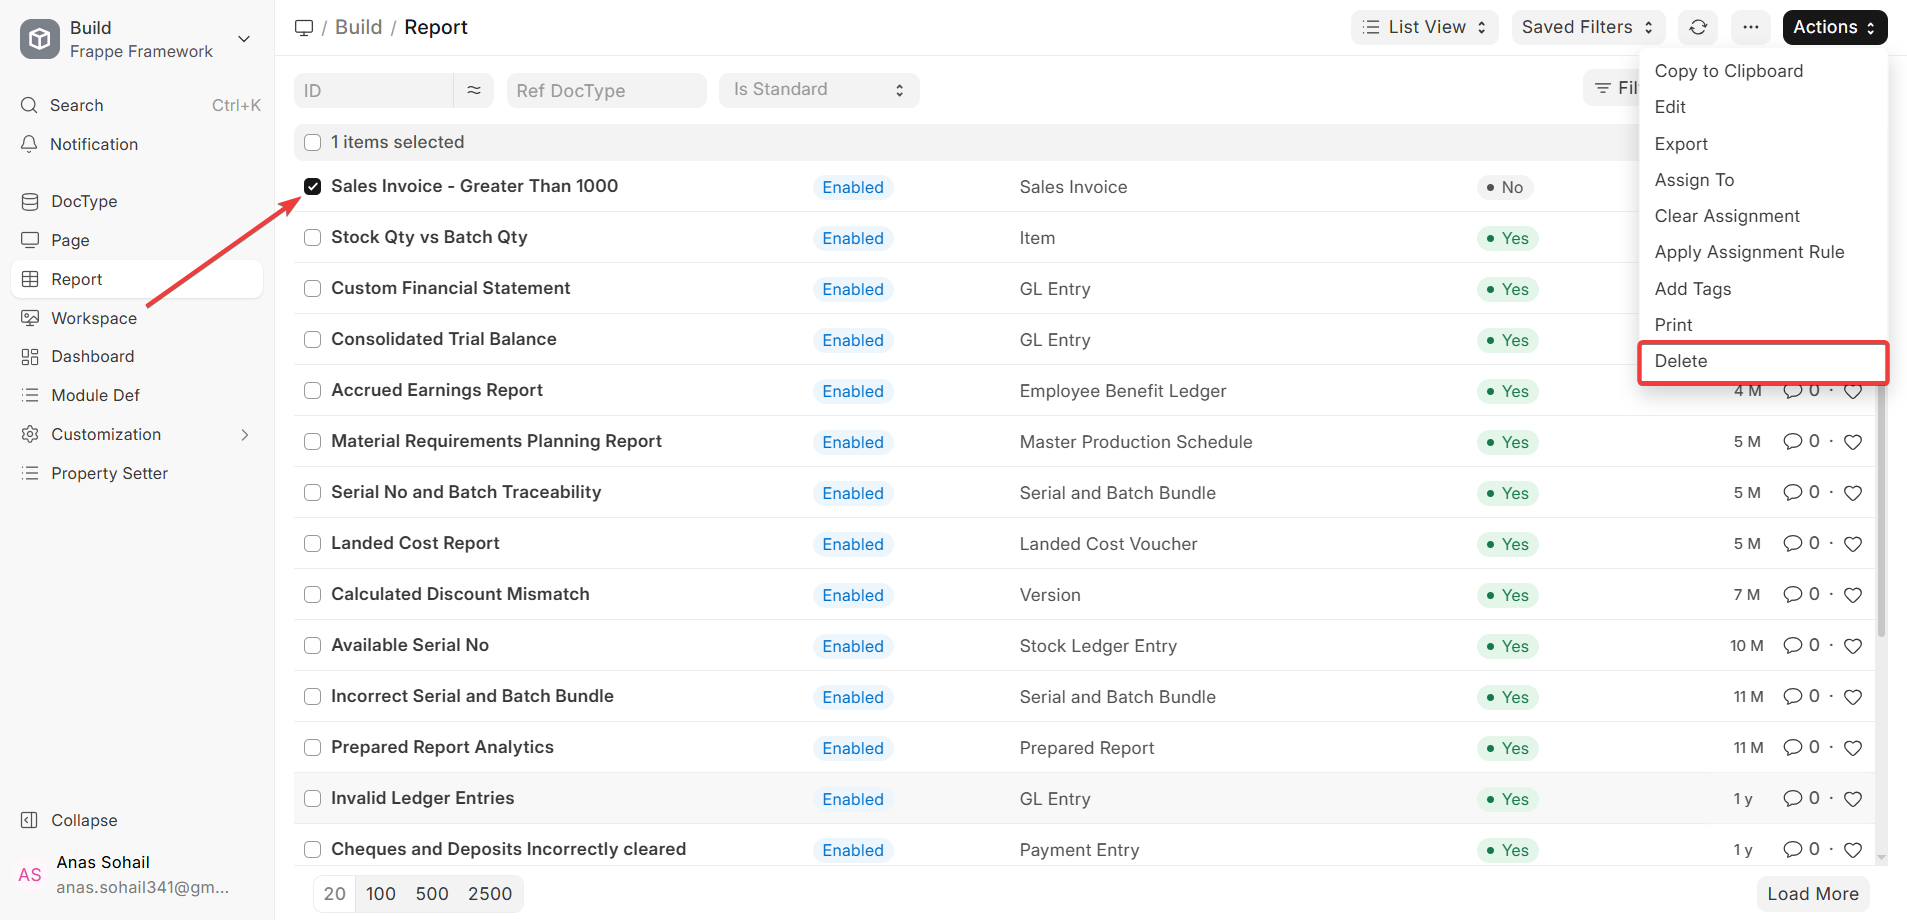
Step 2: Deleting the Report
Find the Custom Report you want to get rid of in the Report List. Select the report, then click the Delete button found in the Actions menu. Before ERPNext permanently removes the report, it’ll ask you to verify your choice.
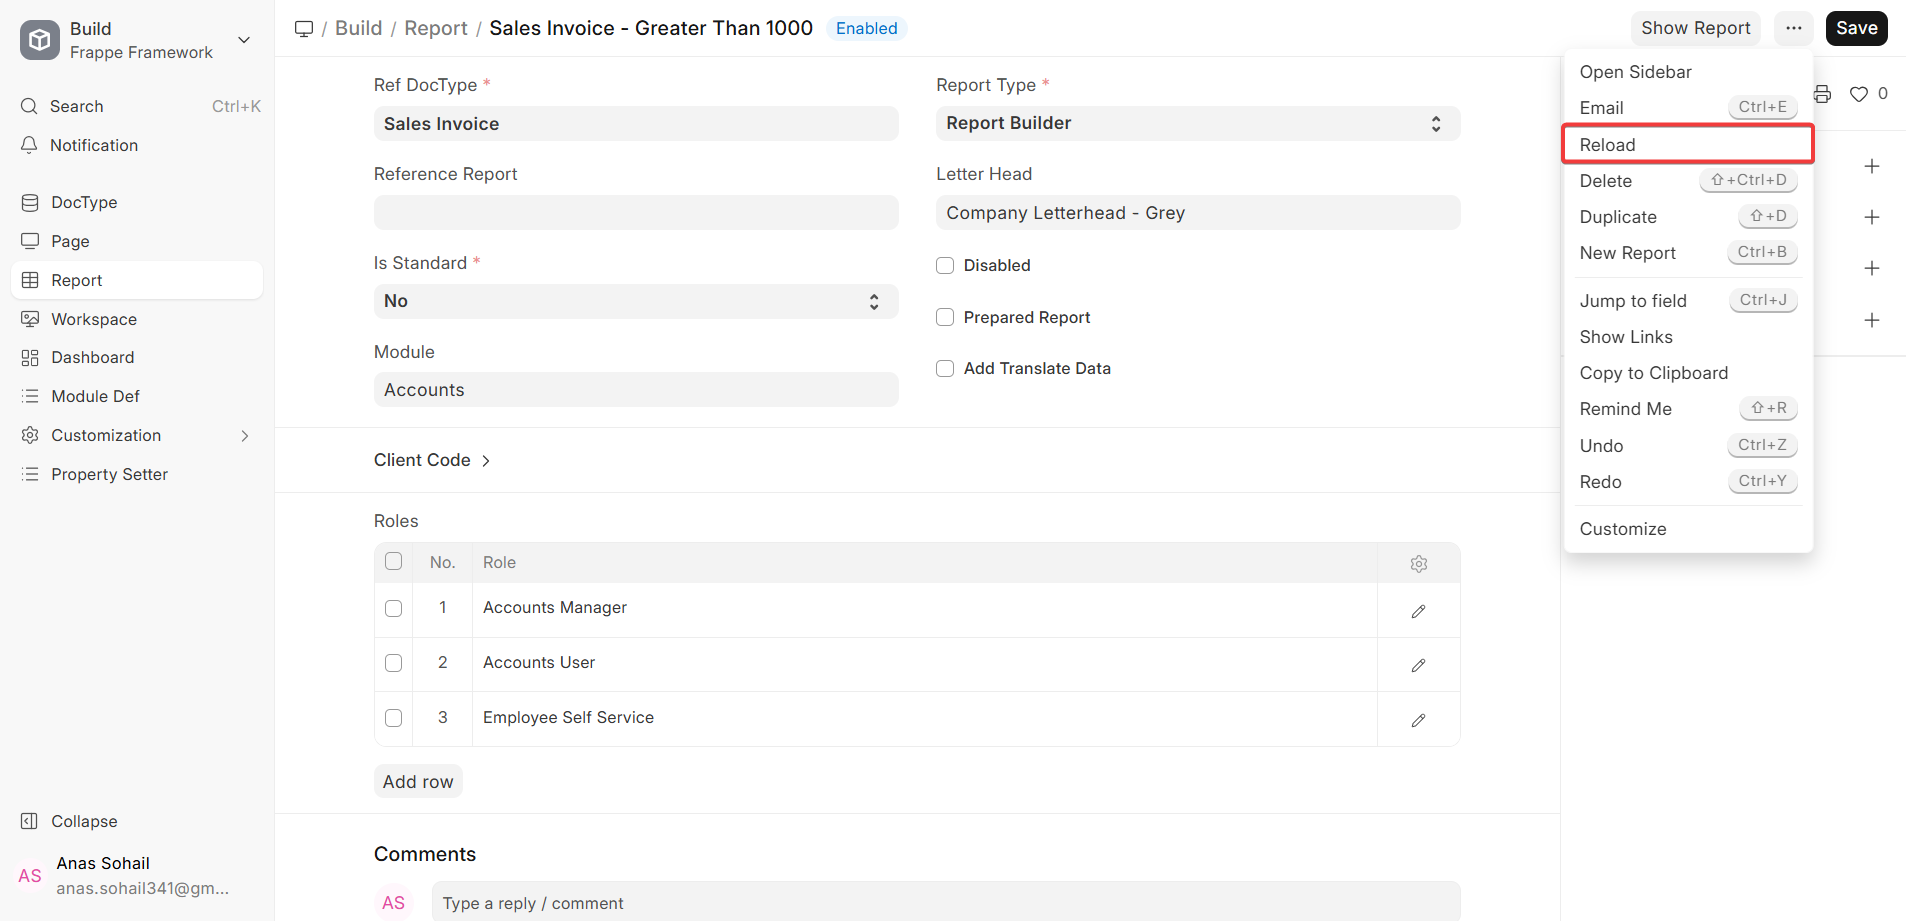
You can also remove the custom report directly from the File menu. This method is especially convenient if you’re already looking at the report and want to get rid of it without going back to the main list.
When you delete a custom report, it’s gone from your system right away.
Be sure to verify that any links pointing to that report, whether in dashboards or elsewhere, are still functional.
Removing a custom report from your ERPNext system won’t affect the actual data. It simply deletes the report’s unique Configuration.
Report Showing Multiple Lines for One Document
Question:
I wrote a report about a Purchase Invoice. Why does the report show the following invoice twice?
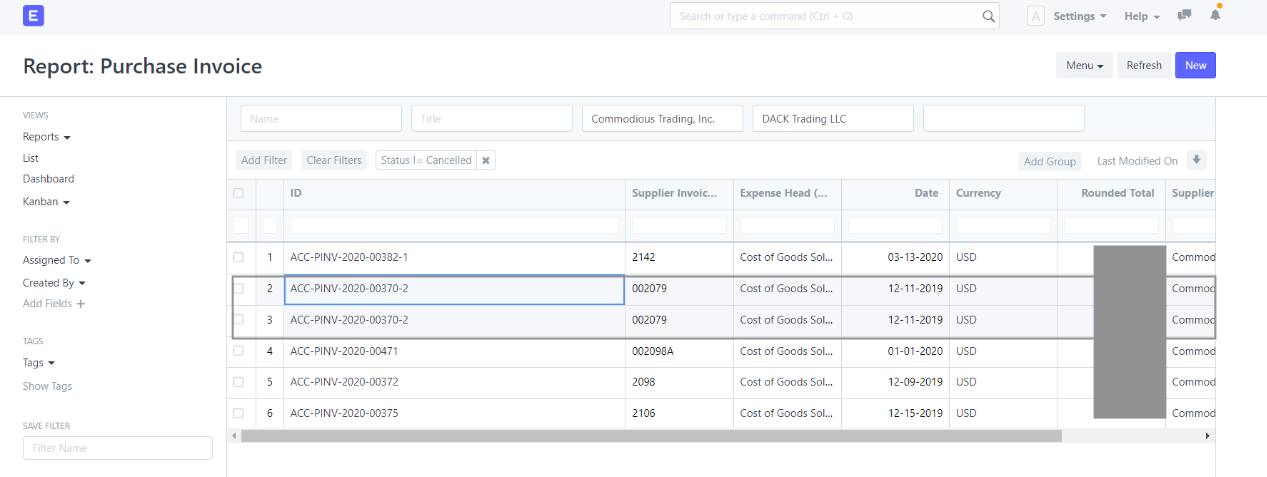
Answer:
You probably did this because you picked a field from a Child Table (like Items, Taxes, or Payment Schedule) instead of just the parent table fields in the Pick Columns part of the report.
A single parent document can have more than one row in a Child Table. If a Purchase Invoice has two items in the Items table, the report will show two lines for the same invoice, one for each item. If you choose a field from the Taxes or Payment Schedule table, for example, multiple rows in that table will also cause the report to show the same information twice.
To make sure this is true, look at the child table columns all the way to the right of the report. You will see which child table is making more than one queue appear.
Answer:
If you want one line for each invoice, only choose fields from the parent document when you make your report.
To pull information from the child table, you have a couple of options. You have a couple of options for handling this. You could use a Group By clause in your report, or, alternatively, you could build a Query Report to combine the data. The outcome is identical regardless of the approach: each parent document appears only once, with the child table’s data accurately summarized.
This method ensures that child table rows are shown accurately with their related parent documents. However, the choice of columns requires careful thought, as it depends on the specific goals of the report.