Quality Inspection
The Quality Inspection feature in ERPNext v16 lets you check the quality of things at different stages of your business process, such as when they come in, when they go out, and while they are being made. This makes sure that only goods that meet certain quality standards are accepted, delivered, or moved on in production. This helps keep products the same, lowers the number of rejections, and meets quality and legal standards.
You can link Quality Inspections to stock and production transactions. You can also set up ERPNext to stop these transactions from going through until the inspection is finished and approved.
To use this feature, go to:
Home > Stock > Tools > Check Quality
Prerequisites
Before you create and use a Quality Inspection in ERPNext v16, you need to do the following setup steps:
Item: The item that needs to be checked must be in the Item master.
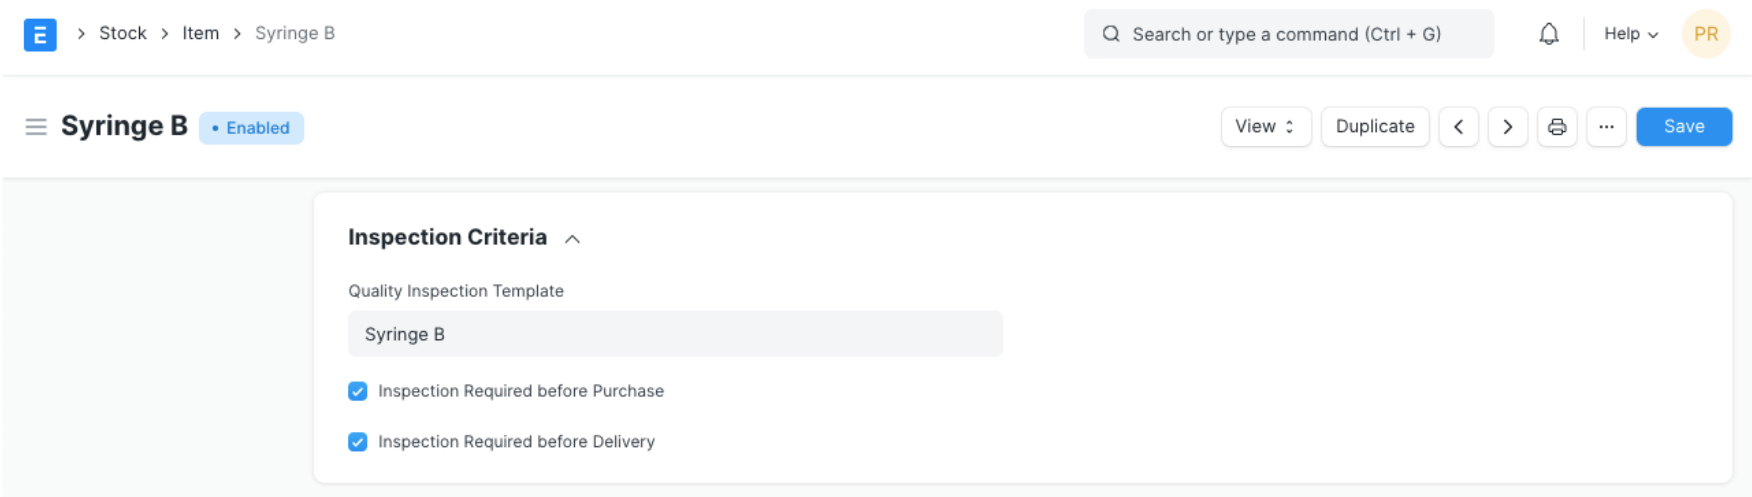
Enable Quality Inspection Criteria in the Item Master: On the Item form, check the right boxes for Quality Inspection (Incoming, Outgoing, or on Process). After you turn on ERPNext, you won’t be able to submit any stock receipt, delivery, or production documents that are linked to it until a Quality Inspection is done.
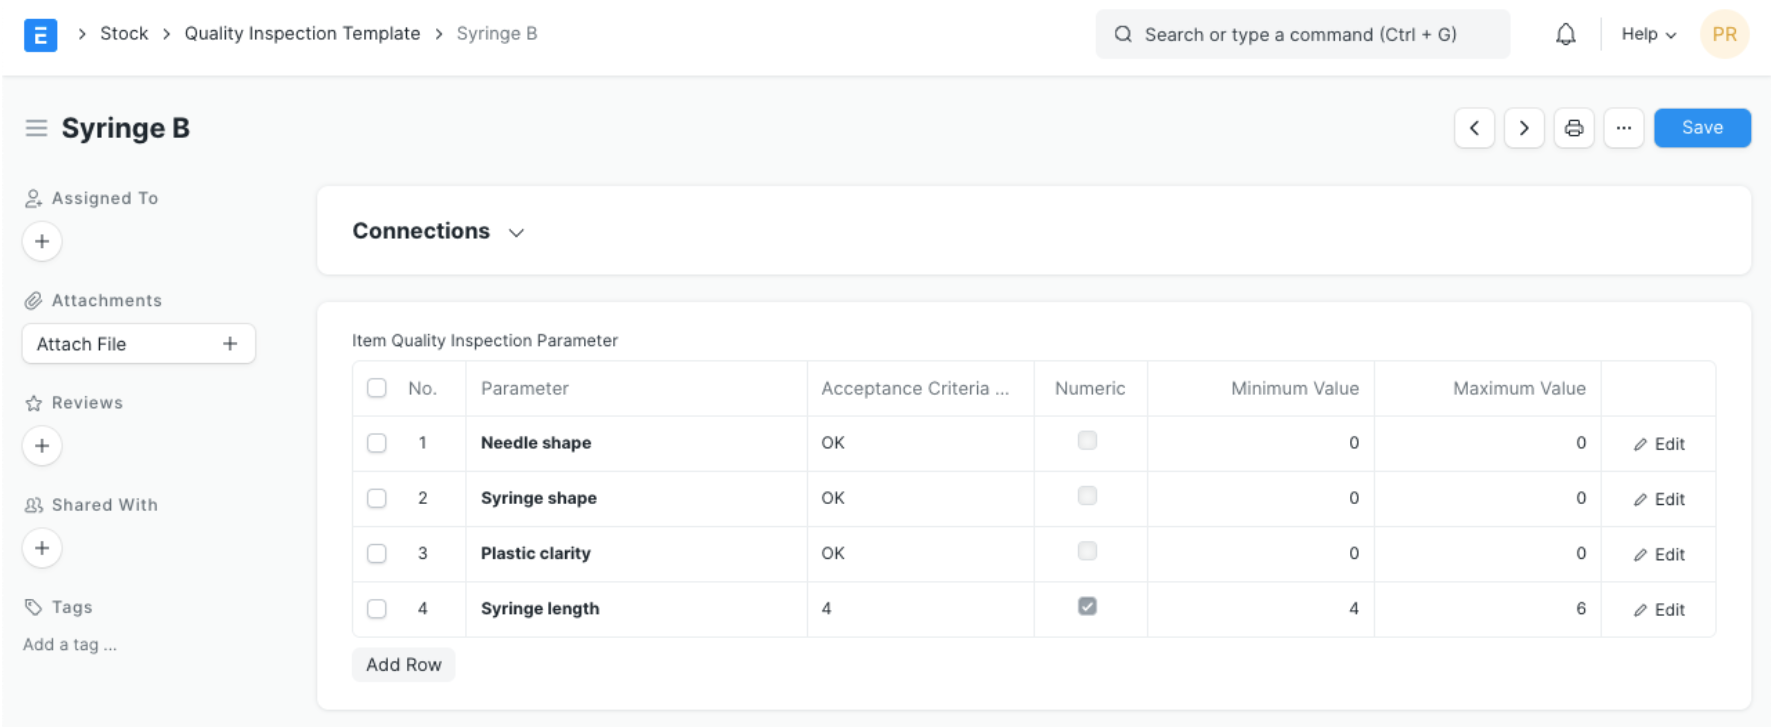
(Optional) Create a quality check template: You can set up the inspection parameters, measurement units, acceptable value ranges, and rejection criteria ahead of time with a Quality Inspection Template. You can connect this template to the Item master after you save it. This way, it will automatically come up every time a Quality Inspection is done on that item. This saves time and makes sure that everything is always the same.
How to Do a New Quality Check
A transactional document, such as a Delivery Note, Purchase Receipt, or Subcontracting Receipt, is often used to do a Quality Inspection. In the draft document’s Quality Inspection section, go to the Item table and click on “Create a New Quality Inspection.”
You can also do Quality Inspections on Job Cards to make sure that things are being made to a high standard. In this case, the inspection is linked to the production item on the Job Card that is being worked on.
Pick the type of inspection for a quality check based on what’s going on in your business:
- Incoming (Purchase): For things that suppliers or subcontractors have sent to you.
- Outgoing (Sales): For things that are being sent to customers.
- In Process (Manufacturing): For things that are being checked while they are being made.
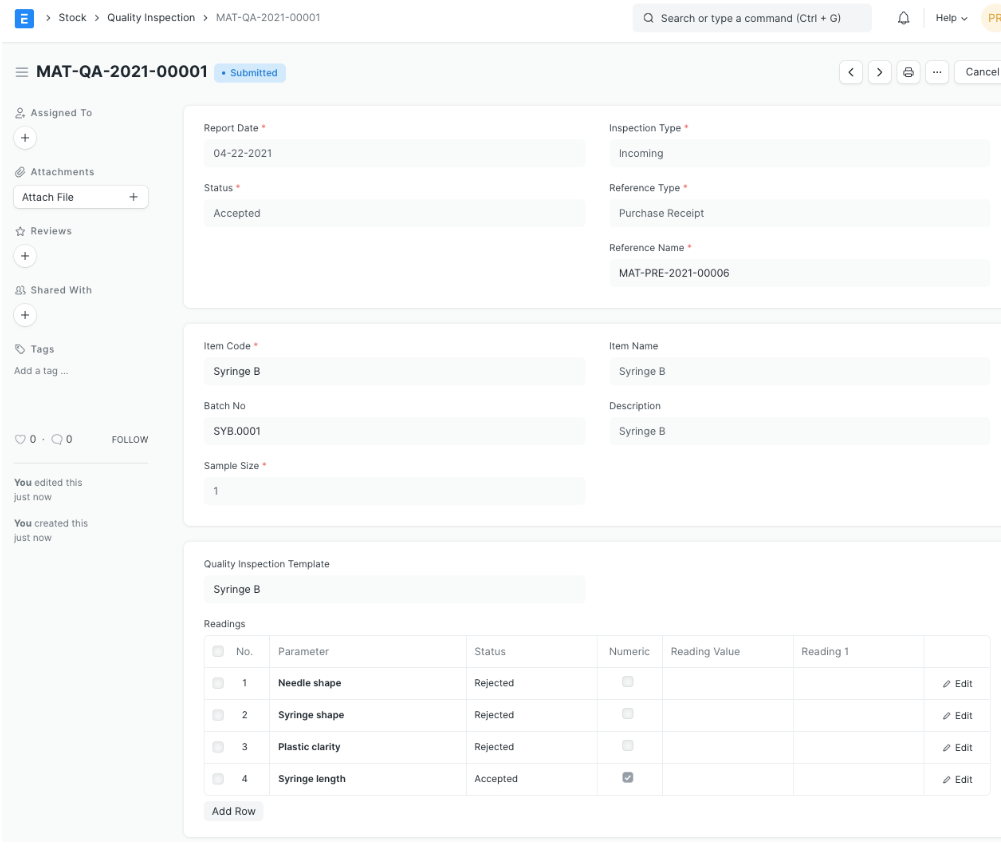
Next, pick the type of reference document. This could be a Purchase Receipt, a Purchase Invoice, a Delivery Note, a Sales Invoice, a Stock Entry, or a Job Card. Next, choose the Item you want to check and tell us the Sample Size, which tells us how many units will be checked. You can only choose items that have Quality Inspection turned on in the Item master.
If the Item is linked to a Quality Inspection Template, it will automatically be put together with its acceptance criteria and inspection parameters. You can ask the Inspected By and Verified By users to keep track of who is in charge and who is in charge of reviewing. In the Remarks section, you can write down any other thoughts or observations you have.
After checking everything, save the Quality Inspection, choose the right Status (like Accepted or Rejected), and send in the document. You can send in the attached stock or manufacturing document after the inspection results meet the standards.
Features
In ERPNext v16, a single Quality Inspection document can have more than one Quality Check (Parameter). A Quality Check is a different test or standard that an item must pass. These checks help make sure that inspections always give the same results and that quality control systems are more consistent. You can choose whether each parameter in a Quality Inspection is Numeric, Non-numeric (Value-based), or Formula-based. This depends on how the inspection result is measured and judged.
3.1 Quality Checks for Numbers
Numeric Quality Checks are used for parameters that need numbers, like size, weight, temperature, pressure, or chemical composition values. These checks are great when the result of a measurement has to be within a certain range of numbers for it to be valid.
For instance, you could check to see if a sheet is between 2.5 mm and 3.0 mm thick or if a raw material has a moisture level that is too low.
By default, all Quality Checks are seen as numbers. There are two important parameters for every numeric check: the Minimum Value and the Maximum Value. Together, these two fields determine the range of values that are acceptable for that parameter. In most cases, these limits are set once in a Quality Inspection Template and then automatically added to each new Quality Inspection. This makes sure that every inspection is the same.
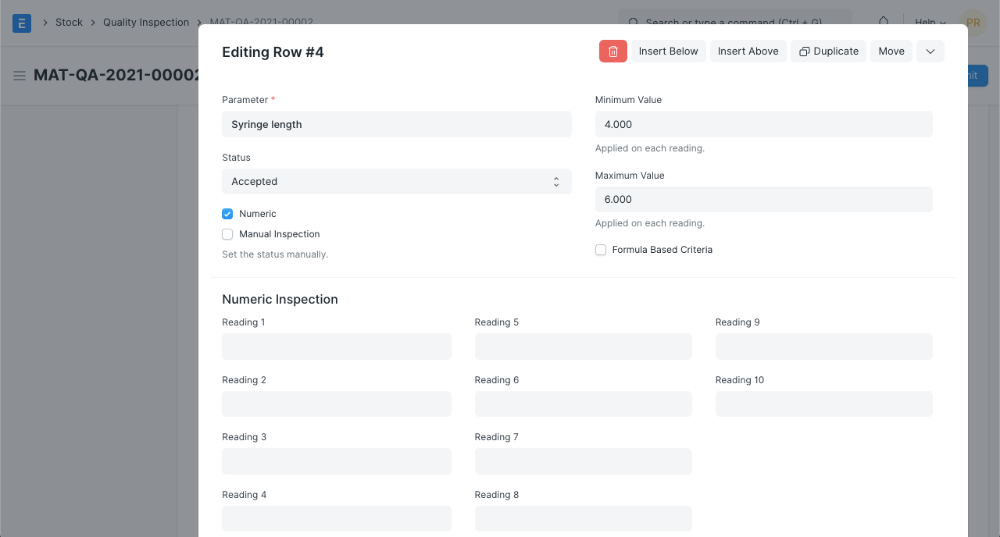
ERPNext v16 compares inspection readings when you submit them to the range that you have set. In case any reading falls below the minimum or beyond the maximum figure, the status of such a parameter row will automatically be modified to reject in case you save the document. The computerized review has reduced errors committed by human hands and ensured quality concerns are identified either immediately.
3.2 Quality Checks That Don’t Use Numbers (Value-Based)
Parameters that do not rely on numbers in order to measure things, but rather on qualitative or categorical values are checked using Not numbers Quality Checks. These checks may be applied to the inspections such as the visual checks, the functional checks, or the yes/no selections.
It’s common to check if a product’s colour is “White,” if a part is “Present” or “Absent,” or to choose Yes/No values for compliance-related parameters.
To set up a Non-numeric Quality Check, click on the Non-numeric option for the parameter. When you turn it on, the fields for Acceptance Criteria Value and Value-Based Inspection will appear. You can set the expected value in the Quality Inspection Template, like “Yes” or “White,” and then have it automatically pulled into the Quality Inspection.
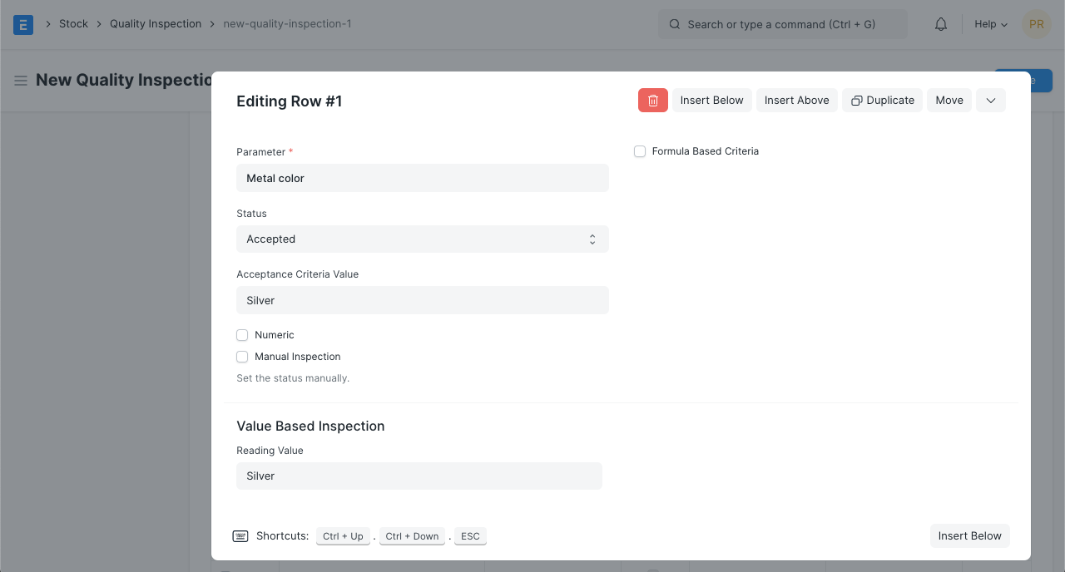
During the inspection, the inspector types in the Reading Value. This value is compared to the Acceptance Criteria Value by ERPNext v16. If the two values don’t match exactly, the status of the parameter row will automatically change to “Rejected” when you save the document. This makes it possible to be sure that qualitative checks always have clear pass/fail results and that quality standards are always met.
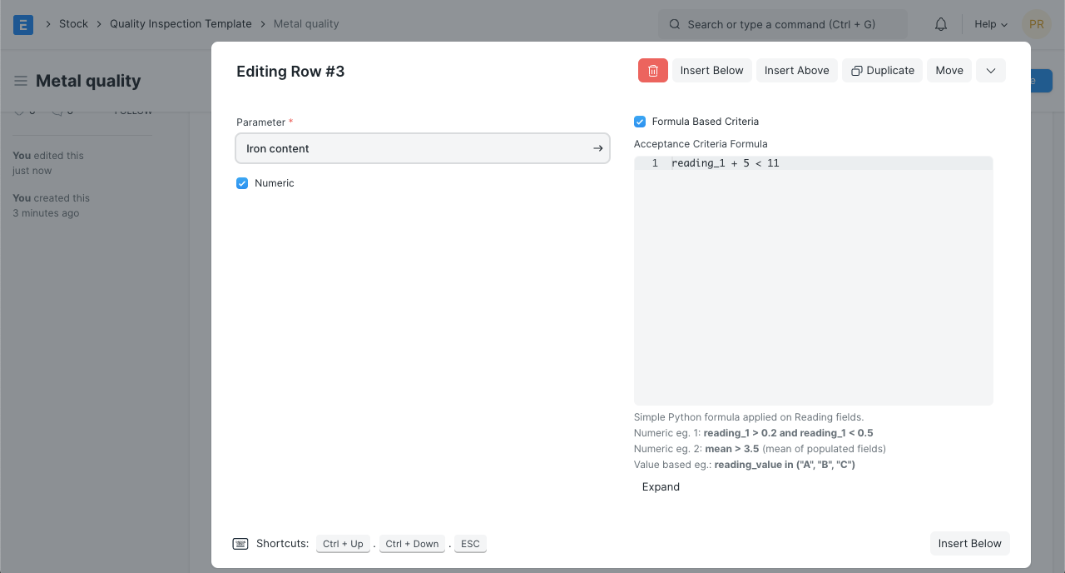
3.3 Quality Checks That Use Formulas
Formula-Based Quality Checks in ERPNext v16 are for advanced and complicated inspection situations where simple numeric ranges or fixed acceptance values don’t work. You can use these checks to create logical or mathematical expressions that determine whether or not a parameter should be accepted. You have a lot of options for how to control quality with this.
You may want to do the following:
- Make sure the grade of the material is in an acceptable range, like A, B, or C.
- Check to see if the average (mean) of a few readings is in the right range.
- Instead of just one reading, use conditional reasoning based on more than one.
You can use Formula-Based Quality Checks for both quality checks that are numbers and those that aren’t.
To turn on this feature, check the box next to Formula Based Criteria for the parameter. When you turn this on, a box called “Acceptance Criteria Formula” shows up. This field lets you make a formula that looks at the inspection readings and decides whether to accept or reject the check. You only need to set up this formula once in a Quality Inspection Template, and it will be added to every Quality Inspection. This makes sure that every inspection is the same.
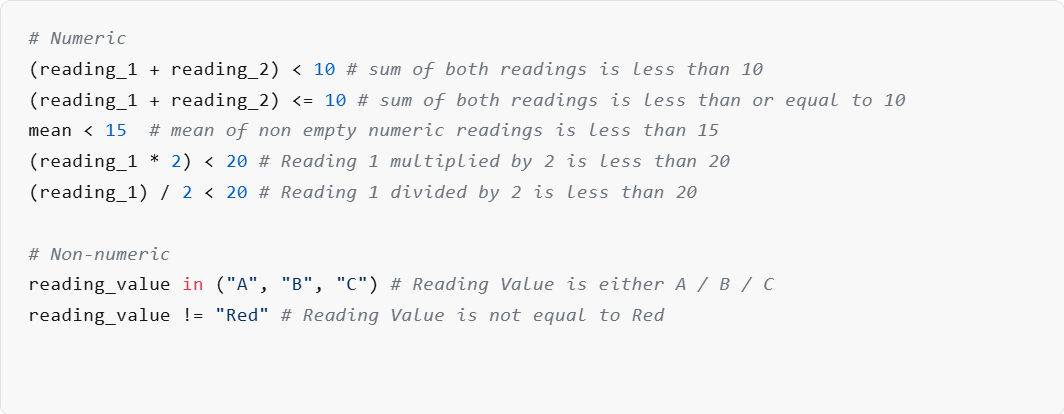
The formula uses the numbers in the Readings table of the Quality Inspection.
- To talk about specific readings in Numeric readings, you can use variables like reading_1, reading_2, and so on.
- Reading_value is the only variable that can be used in the calculation for readings that aren’t numbers.
Here are some common ways to write Acceptance Criteria:
After entering the readings, click “Save.” ERPNext v16 automatically checks the formula and updates the Status column in each row of the Readings table based on whether the acceptance criteria are met.
3.3 Checking by hand
In ERPNext v16, most quality checks are done automatically, but in the real world, a person often has to make a decision about quality control. There may be times when a reading doesn’t technically meet the set Acceptance requirements, but it is still considered acceptable because of tolerance limits, contextual factors, or expert opinion.
You can choose the “Manual Inspection” option for the parameter in these situations. When you turn on this option, ERPNext won’t automatically change the acceptance or rejection status of that check when you save it. The inspector can instead set the Status for that parameter row by hand, and the system will keep it that way without changing the decision.
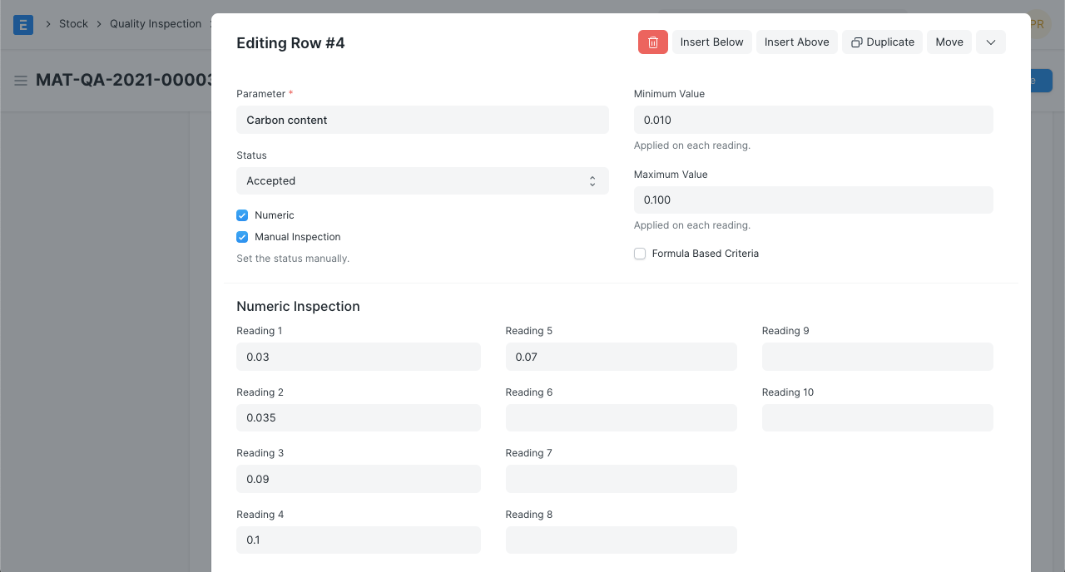
For example, a number that is just outside the defined range would usually be rejected. If the difference is small and acceptable based on practical tolerance, the inspector can mark the parameter as Accepted by hand. This gives you some freedom while also helping you keep track of quality in a structured way.
The user can choose the overall state of the Quality Inspection based on the organization’s quality policies once all the parameter-level statuses are set.