
Semi Auto Payment Reconciliation
Manually matching a lot of invoices and payments can be time-consuming and error-prone for a business. To manage this in a semi-automated manner, ERPNext provides a tool called “Process Payment Reconciliation.” Without having to open each invoice and payment by hand, this feature allows you to reconcile them using logic such as matching dates and amounts.
For invoices and payments, you only need to choose the company, the party type (supplier or customer), and the posting date range. Based on open invoices and available unallocated payments, the system will make recommendations for potential matches. After it has been examined, you can submit the reconciliation, and ERPNext will automatically link the corresponding payments and invoices to make sure your outstanding balances are appropriately updated.
This makes the reconciliation process quicker, more effective, and less prone to errors, which is particularly helpful in sectors or companies like manufacturing or retail, where large transactions happen regularly.
1. Steps
1.1. Enable Auto Reconcile Payments In Accounts Settings
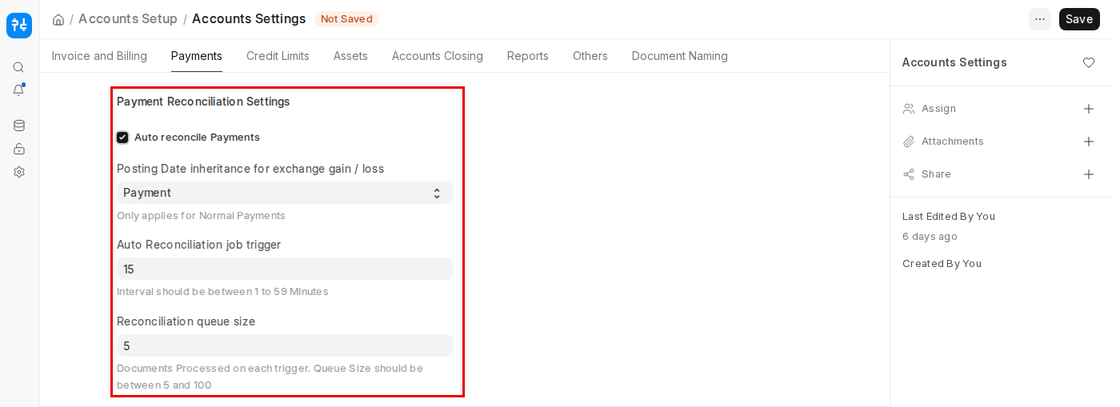
Enable the “Auto reconcile Payments” checkbox in Accounts Settings, on the Payments tab, under Payment Reconciliation Settings. In the same section, Auto Reconciliation job trigger sets how often the job runs (in minutes, between 1 and 59; 15 by default) and Reconciliation queue size sets how many documents are processed each time (between 5 and 100). In order to activate the background reconciliation feature, this step is necessary. The system won’t match payments and invoices Automatically if this isn’t enabled.
Search Process Payment Reconciliation in the search bar, or open it from the Payments workspace. You will configure the reconciliation task on this main screen. It is intended to make managing numerous invoice entries and payments easier.
1.3. Select Party, Company, and Account Receivable/Payable
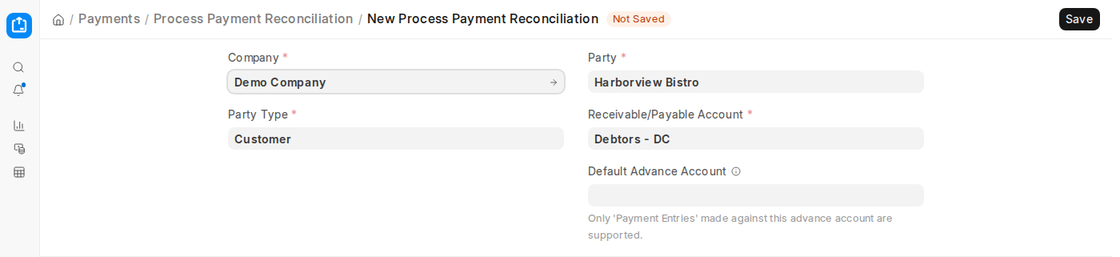
To perform a reconciliation, select the company, the party type (Customer or Supplier), the party, and the relevant receivable or payable account. If advances are booked in a separate account, you can also set the Default Advance Account. Save the document, then submit it. This gathers all the data that the background job needs.
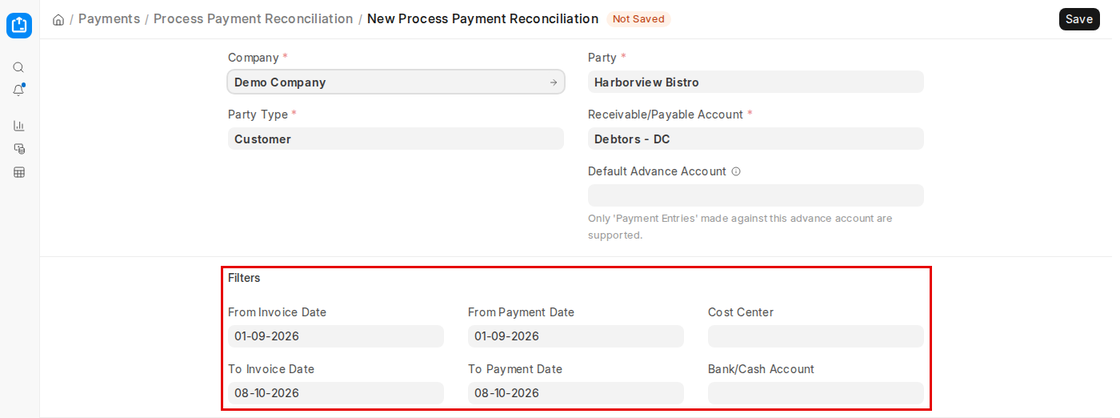
Or you can also use the Filters section: From / To Invoice Date, From / To Payment Date, Cost Center and Bank/Cash Account.
1.4. Document Will Be In “Queued” Status
The document status will change to Queued after submission. This indicates that it has been approved by the system and is awaiting processing by the background job. From this view, you can keep an eye on the status.
1.5. Background Job that is manually triggered or runs every fifteen minutes (by default)
By default every fifteen minutes (the Auto Reconciliation job trigger setting), ERPNext runs a background job that picks up the reconciliation requests in the queue. You can also click Start / Resume to start the job right away, and Pause to pause it. The status moves through Queued, Running, Paused, Completed, Partially Reconciled or Failed.
1.6. Review the Process Payment Reconciliation Log.
The number of entries that were attempted, the number that were successfully matched, and any errors or unmatched records are all displayed in the Process Payment Reconciliation Log that ERPNext generates after the job is finished. You can use this log to audit the entire reconciliation process and monitor any discrepancies for a later manual review.