Accounts Settings in ERPNext
You can adjust how your accounting functions across important modules like invoicing, payments, ledger, and multi-currency in ERPNext Accounts Settings. These ERPNext accounts settings features assist in automating and managing tasks related to party accounting, payment processing, invoice cancellation, and compliance audits.
This section is an important part of the ERPNext accounting module documentation and provides several ERPNext accounts settings configuration options that control how financial transactions behave in the system.
ERPNext follows the ERPNext double-entry accounting system, meaning most transactions automatically generate ERPNext automatic GL entries from transactions in the General Ledger. Understanding the ERPNext accounts settings documentation helps administrators properly configure invoicing, tax rules, deferred accounting, and payment reconciliation.
1. Invoice Cancellation
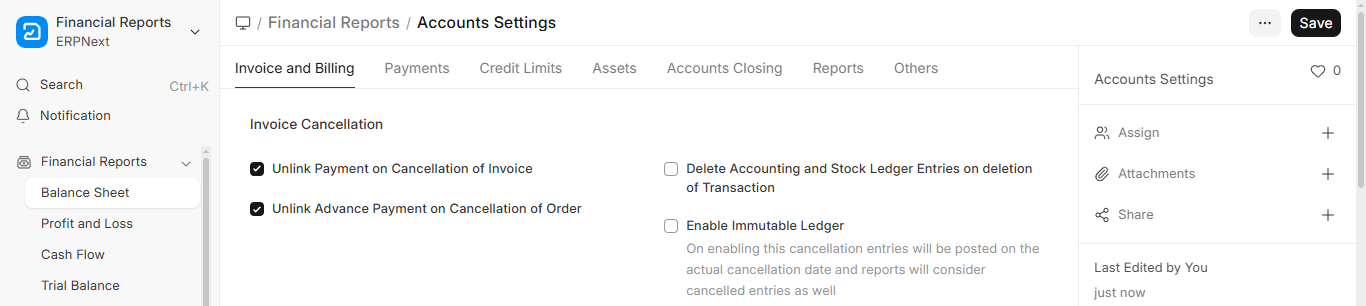
1.1. Unlink Payment on Cancellation of Invoice
When enabled ERPNext Accounts Settings, the system will automatically remove any Associated payment entry from a cancelled invoice (sales or purchase), allowing it to be used again.
1.2. Unlink Advance Payment on Cancellation of Order
Any advance payment associated with a cancelled order (purchase or sale) will likewise be unlinked. You can use the advance elsewhere as a result.
1.3. Delete Accounting and Stock Ledger Entries on Deletion of Transaction
If enabled, the associated GL (General Ledger) and stock entries will be deleted along with the document, such as an invoice.
1.4. Enable Immutable Ledger
- When checked, it stops changes to ledger entries from being made in the past.
- Instead of altering historical data, the system generates a new reversing entry on the cancellation date.
- Contributes to the integrity of audits.
2. Invoicing Features
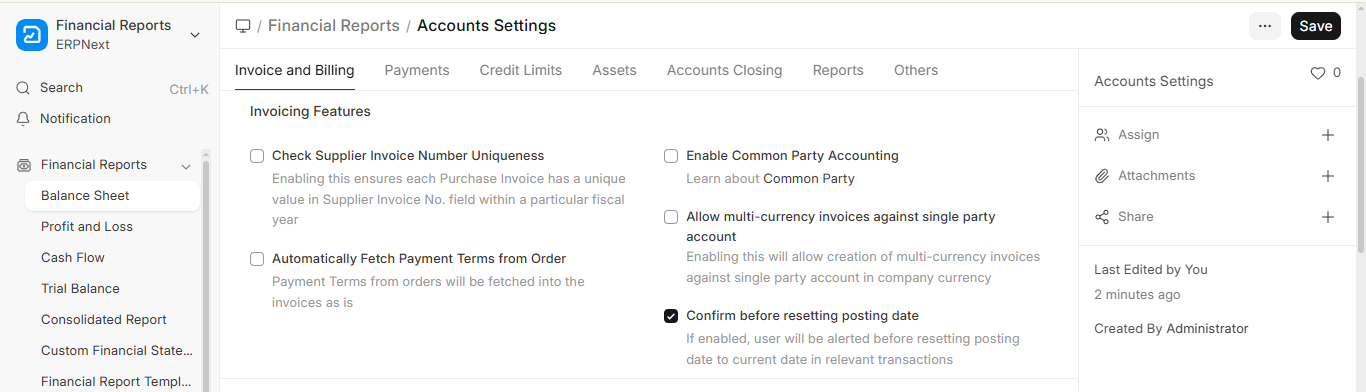
2.1. Check Supplier Invoice Number Uniqueness
- When checked, it ensures that no supplier invoice numbers for the same fiscal year are entered more than once.
- This ERPNext accounts settings option helps prevent duplicate entries, fraudulent transactions, and accounting errors.
2.2. Automatically Fetch Payment Terms From Order
- When enables, the terms of payment specified in a Sales/Purchase Order will automatically be applied to the associated invoice.
- This reduces errors in manual entry and saves time.
2.3. Enable Common Party Accounting
- Allows you to manage a single ledger for organisations that serve as both your suppliers and customers (a common party).
- This feature in ERPNext Accounts Settings makes reporting and reconciliation between transactions easier.
2.4. Allow Multi-Currency Invoices Against Single Party Account
- Enables you to use a single account to generate invoices for the same client or supplier in multiple currencies.
This ERPNext accounts settings feature is useful for companies that deal with international clients and suppliers in different currencies.
2.5. Confirm Before Resetting Posting Date
When you turn on this feature, ERPNext will ask you to confirm that you want to change the posting date of a transaction.
This means that if someone tries to change or reset the posting date while they are editing a document like a Sales Invoice or Purchase Invoice, ERPNext will ask them to confirm the change first.
This choice makes it easier to keep track of your money, especially when transactions are for a specific fiscal year. It also helps you not change accounting dates by mistake.
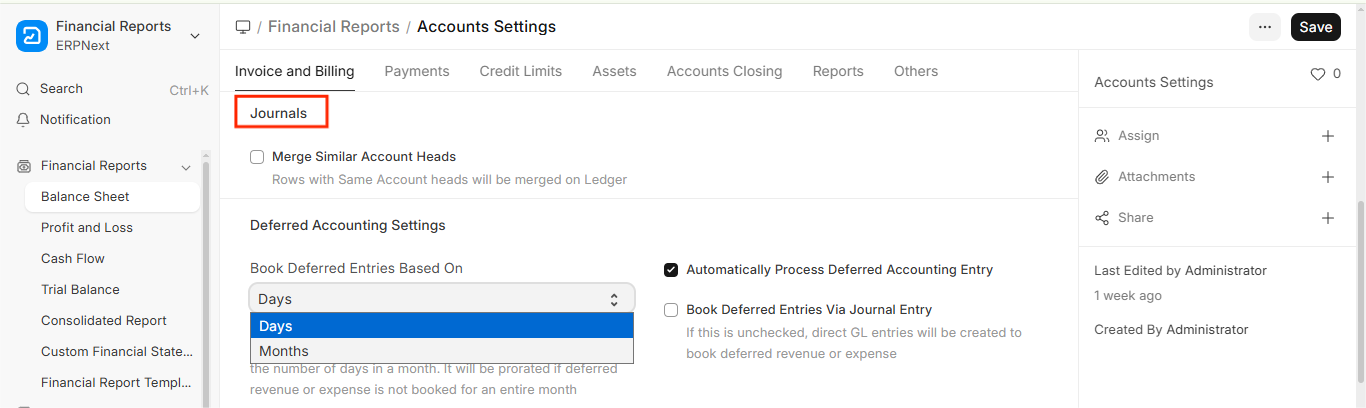
3.1. Merge Similar Account Heads
- When this option is enabled, ERPNext will automatically merge rows in journal entries that use the same account head.
- By consolidating duplicate lines into a single line, this keeps the general ledger neater and simpler to read.
- For instance, three entries posted to “Cash” in a journal will appear in reports as a single line.
4. Deferred Accounting Settings
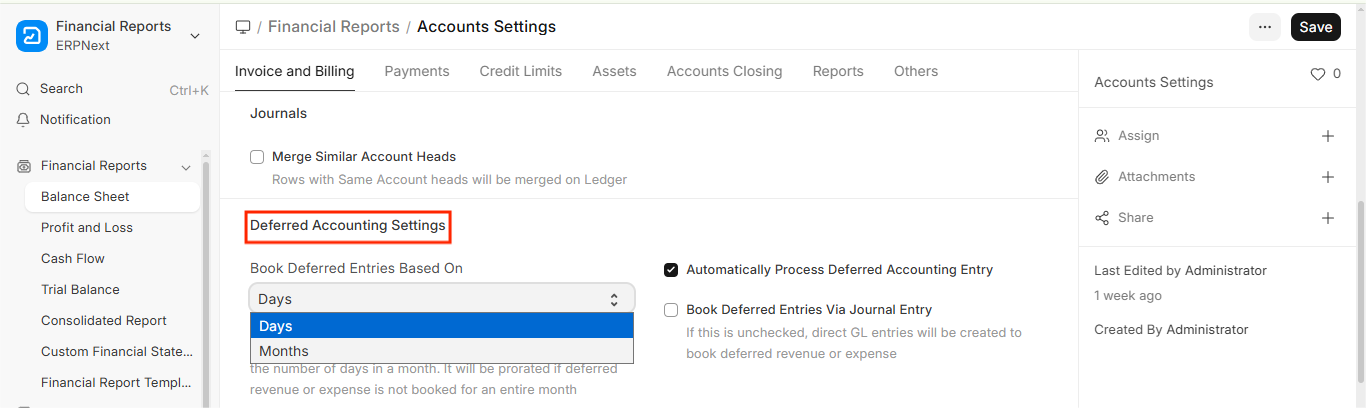
Instead of recognising the entire amount at once, deferred accounting spreads out revenue or expenses over a later time frame. This section of ERPNext accounts settings deferred accounting allows businesses to properly manage ERPNext deferred revenue and expense recognition over time.
4.1. Book Deferred Entries Based On
- Days (Selected): Since the deferred amount is divided daily, it is more accurate if your revenue or service is dependent on precise time frames.
- Months: Regardless of the number of days in a given month, a set amount is reserved for each one.
- For instance, if revenue is distributed over three months and you select “Days,” February’s share will be less than March’s because there are fewer days in February.
4.2. Automatically Process Deferred Accounting Entry
- ERPNext will automatically generate accounting entries to book deferred revenue or expenses at the specified time when this is checked.
- Prevents you from manually creating entries each month or period for deferrals.
- ERPNext will automatically record revenue each month if you sell an annual subscription.
4.3. Book deferred Entries Via Journal Entry
- ERPNext will generate a Journal Entry for every postponed reservation if it is enabled.
- If left unchecked, deferred entries won’t require a separate journal and will be posted straight to the general ledger.
Why Use Journal Entries?
- For improved auditability and visibility.
- Easier for accountants to keep track of reversals or adjustments.
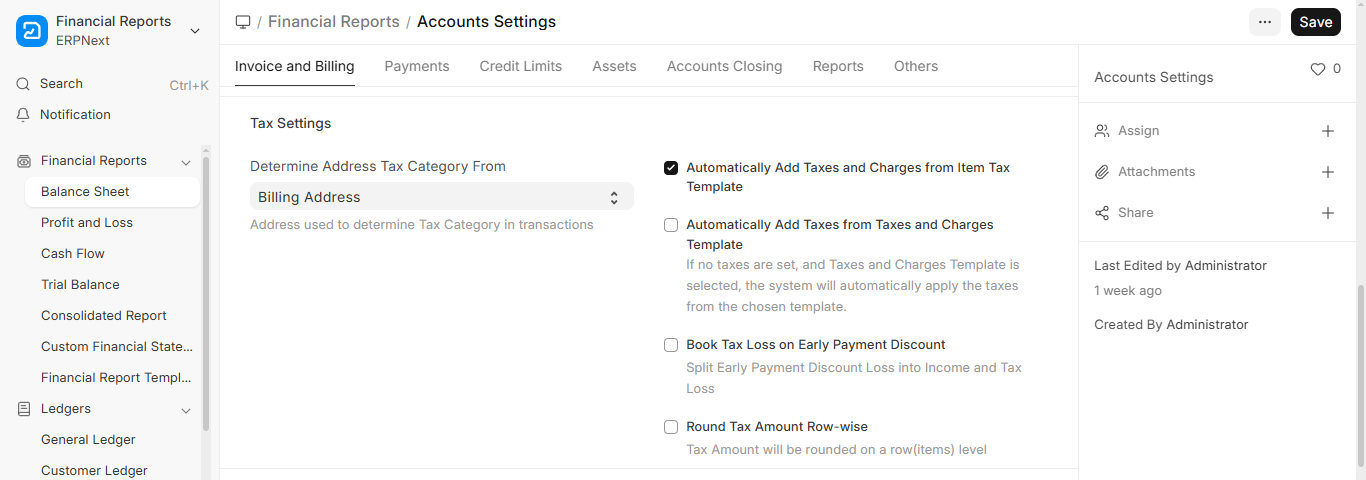
5. Tax Settings
5.1. Determine Tax Category From Field:
- Select address tax category from Choices i.e Shipping/Billing Address.
- Indicates to the system which address (shipping or billing) to use when figuring out the transaction’s applicable tax category.
- Choosing the Billing Address guarantees that the right tax is applied based on the buyer’s billing location, for instance, if tax laws vary between provinces or states.
- For service-based businesses, use the billing address. If tax is dependent on the actual delivery location, use the shipping address.
5.2. Automatically Add Taxes and Charges From Item Tax Template
- The system automatically applies the tax rules from the tax template if the item in the order or invoice has one set.
- Prevents having to manually enter taxes for every item, which is particularly helpful if different items have different tax rates (for example, food is taxed at 5% while electronics are taxed at 17%).
- Unless both are permitted, this occurs at the item level and is overridden if a general Taxes and Charges Template is used.
5.3. Automatically Add Taxes From Taxes and Charges Template
- ERPNext looks for a Taxes and Charges Template at the document level and automatically applies the tax if no item-level tax is set.
- The goal is to save time by applying the same tax regulations to every item on an order or invoice.
- You choose a single standard tax template because you are only selling taxable goods and your sales tax is set at a flat 17%.
5.4. Book Tax Loss on Early Payment Discount
- The tax component of a discount received by customers who pay early is also recognised. This configuration guarantees that ERPNext divides the discount into:
- Loss of income (to your account)
- Tax loss (adjusted in tax liability)
- In many nations, providing an early payment discount necessitates lowering the tax collected on the lower price. That is automated by this field.
- For instance, a client who pays early receives 2% off. The system appropriately lowers your income and tax liability.
5.5. Round Tax Amount Row-wise
- Rather than computing the total tax and rounding at the end, it rounds off the tax amounts separately for each item row.
- Avoids rounding errors, particularly when there are several items with varying tax rates and fractional tax values (such as 1.786 PKR) are frequently encountered.
- When rounding errors accumulate in high-volume billing or on invoices with numerous lines.
6. Print Settings
These determine what shows up when you print documents such as quotes, purchase invoices, and sales invoices.

6.1. Show Inclusive Tax in Print
- If this is enabled your printed invoice will indicate that the item prices already include tax.
- It enables clients to comprehend that there are no surprises because the prices they view are final and include taxes.
- For instance, the item’s price (including 17% tax) is Rs. 1,000. This field allows the printout to display that tax inclusion.
6.2. Show Taxes as Table In Print
- Displays a distinct table with each tax component—such as sales tax, VAT, GST, and so on—in the print view.
- Provides a clear breakdown of all tax charges to your clients.
- For instance, it prints the following instead of just the total:
- 170 rupees for sales tax (17%)
- 2 percent provincial tax: Rs. 20
6.3. Show Payment Schedule In Print
- This option will print the entire schedule in the document if a payment is divided into installments or is due on a later date.
- This Helps with installment-based invoices by keeping the buyer or customer updated on due dates and amounts.
- For instance: 50% is due on August 1, 2025. 50% is due on September 1, 2025.
7. Item Price Settings

7.1. Maintain Same Rate Throughout Internal Transaction
- When enabled, this guarantees that item prices for internal documents such as inter-warehouse transfers, stock transfers, and material issues stay the same.
- Prevents confusion when moving items internally and aids in maintaining clean costing.
- For instance, if Item A is valued at Rs. 500 in Warehouse X, its value will remain at Rs. 500 upon transfer to Warehouse Y; internal rates will not change.
7.2. Fetch Valuation Rate for Internal Transaction
For internal transactions like internal sales and purchase invoices, the system automatically retrieves the item’s valuation rate (stock cost) when enabled.
This guarantees that actual costs, not price lists, are used to record internal transactions.
It prevents disparities between stock value and transaction value and aids in maintaining accurate accounting.
For example, regardless of the price stated in the item price list, internal invoices will use the same valuation rate of Rs. 500 for Item A.
8. Currency Exchange Settings
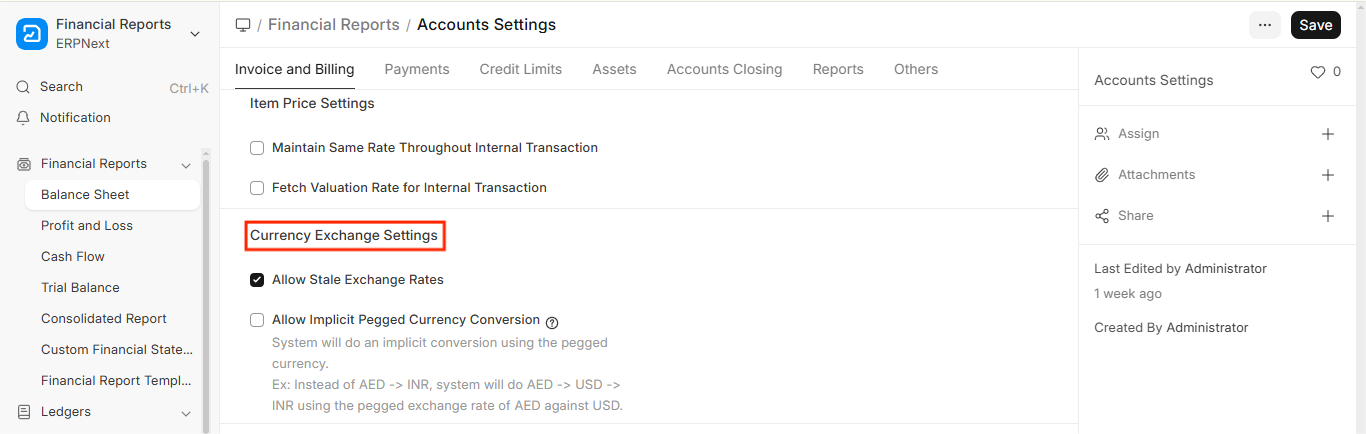
8.1. Allow Stale Exchange Rates
- If no current rate for a currency is available, ERPNext will permit the use of old (stale) exchange rates when this option is selected.
- When the most recent exchange rate hasn’t been updated, this helps to prevent transactions from being blocked.
8.2. Allow Implicit Pegged Currency Conversion
- If enabled, ERPNext will use a third (base) currency, such as USD, to automatically convert between two currencies. For instance, it will use the pegged rate between AED and USD to calculate AED→USD→INR if you don’t have AED→INR directly.
9. Payment Reconciliation Settings
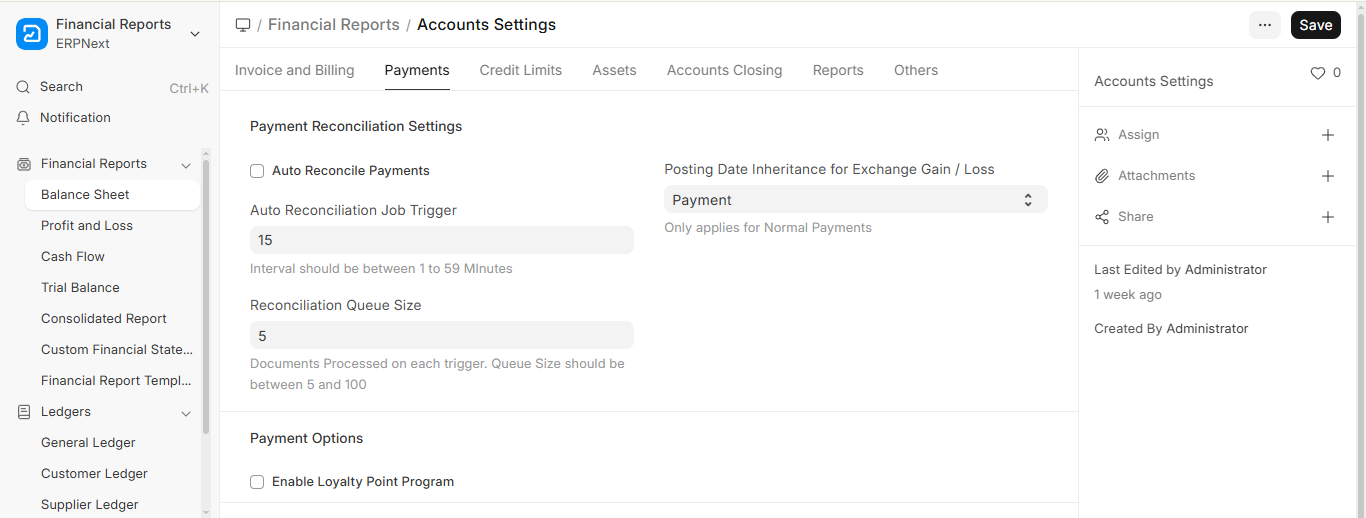
9.1. Auto Reconcile Payments
- When enabled, ERPNext will automatically match outgoing payments to purchase invoices or incoming payments to unpaid sales invoices.
- This lessens the amount of manual labour required, particularly if you receive hundreds or even thousands of payments every day.
9.2. Auto Reconciliation Job Trigger
- This field determines the frequency (in minutes) at which the system should attempt to automatically reconcile invoice payments. For instance, ERPNext will execute this background job every 15 minutes if it is set to 15.
9.3. Reconciliation Queue Size
- This specifies the number of documents that will be processed simultaneously when auto-reconciliation is activated. The range must be between 5 and 100. A value of 5 indicates that it will attempt to reconcile 5 documents each cycle.
9.4. Posting Date Inheritance for Exchange Gain or Loss
- When ERPNext records a currency exchange gain or loss, this dropdown selects the appropriate posting date. If you select “Payment,” the profit or loss will be recorded on the day of the payment. If you choose “Invoice,” it will be based on the invoice date.
- This has an impact on how foreign exchange adjustments are reflected in your general ledger, which is crucial for accurate financial reporting.
10. Credit Limit Settings
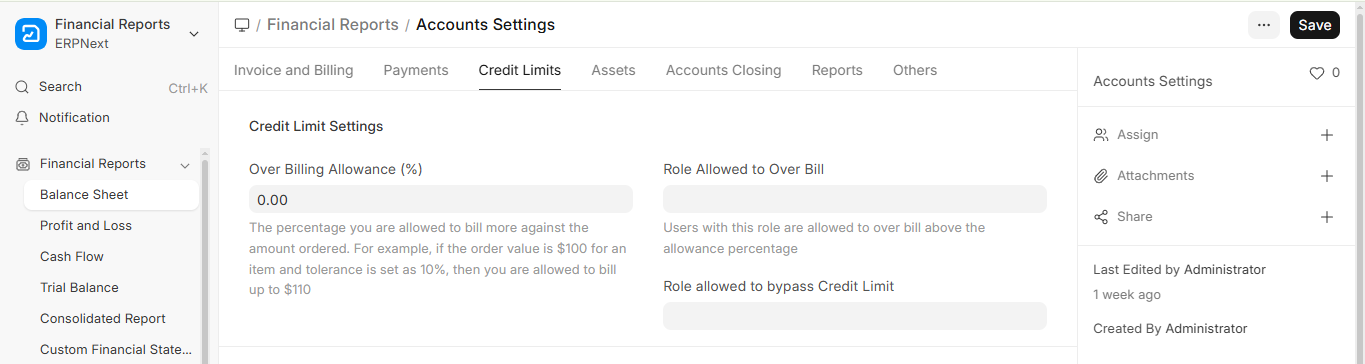
10.1. Overbilling Allowance (%)
- This sets the maximum amount you can charge over the initial order amount. For instance, the system permits invoicing up to $110 if the sales order is for $100 and this is set to 10%.
- Useful for minor price variations or rounding small prices.
- Any attempt to overbill if set to 0% will be prevented unless permissions are granted.
10.2. Role Allowed to Over Bill
- Here, you can assign a particular user role that has the authority to go over the overbilling cap.
- Invoices exceeding the tolerance specified in the preceding field may be generated by users with this role.
- This is helpful when certain roles (e.g., Managers) need more flexibility.
- No one may overbill beyond the percentage tolerance if they are not assigned.
10.3. Role Allowed to Bypass Credit Limit
- This field specifies who is allowed to completely disregard customer credit limits.
- Users with this role can continue even if a customer’s outstanding balance is greater than their credit limit.
- Higher-level access to override credit control measures is made possible by it.
- Perfect for senior employees such as directors or finance managers.
12. Asset Settings
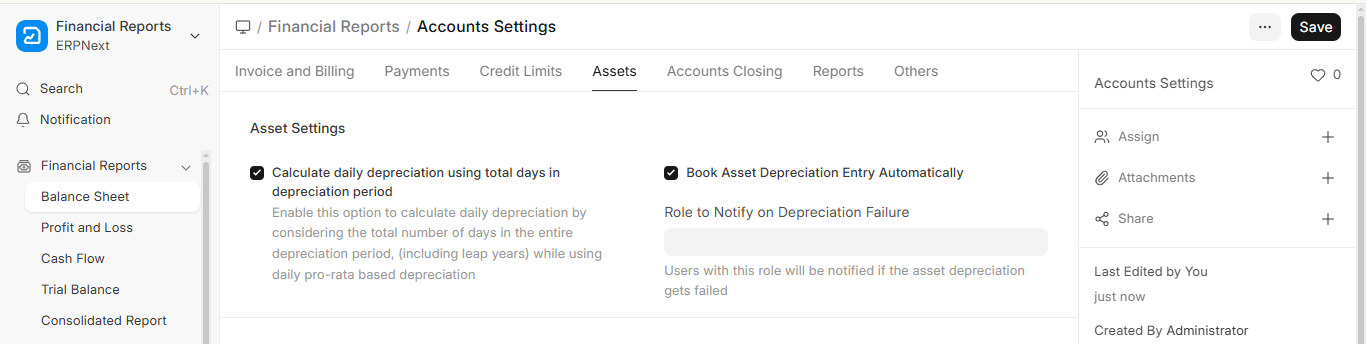
12.1. Calculate Daily Depreciation Using Total Days In Depreciation Period
- This setting allows the system to use the precise number of days in the depreciation period to calculate depreciation on a daily basis.
- This means that rather than merely assuming that each month has 30 days or that the year has a set number of days, it takes into account whether the year is a leap year (366 days) or a regular year (365 days).
- Particularly when an asset is added or removed midway through a year or period, it guarantees accurate depreciation amounts.
- This is helpful when employing daily pro-rata depreciation techniques, as precise time-based computations are crucial for audits and financial reporting.
12.2. Book Asset Depreciation Entry Automatically
- If you enable this option, the system will automatically post fixed asset depreciation entries at the conclusion of each relevant period (monthly, quarterly, or annually, depending on your configuration).
- The system will generate depreciation journal entries based on the depreciation schedule, saving you the trouble of creating them by hand.
- By ensuring that asset values and expenses are updated consistently, this automation lowers the possibility of missed entries and the manual workload.
- Large organisations with numerous assets that require regular depreciation tracking will find it especially useful.
12.3. Role to Notify on Depreciation Failure
With this setting, you can designate a particular role to receive notifications in the event that the system is unable to automatically generate depreciation entries.
Users assigned to this role will be notified if any problems arise during the depreciation process, such as missing accounts, incorrect configuration, or system errors.
This helps guarantee that issues pertaining to depreciation are found and fixed promptly, avoiding delays in financial reporting and preserving accurate asset records.
For example, the chosen role (such as Accounts Manager) will be notified to take prompt action if depreciation entry creation fails at month-end.
13. Period Closing Settings
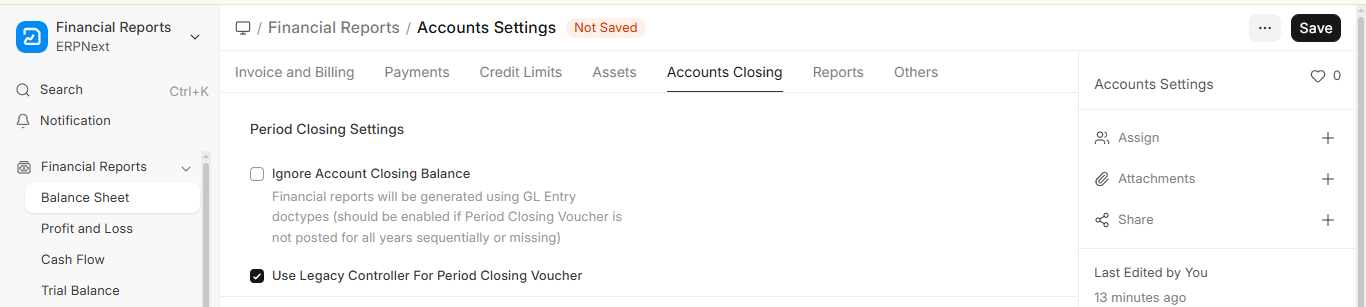
13.1 Ignore Account Closing Balance
When this option is enabled, ERPNext generates financial reports such as the Balance Sheet and Profit & Loss Statement directly from General Ledger (GL) Entries instead of using balances created through Period Closing Vouchers.
Normally, Period Closing Vouchers transfer the Profit & Loss balance to a closing account at the end of a financial year. However, if closing vouchers are missing or some financial years were not closed in sequence, reports may become inaccurate. Enabling this option ensures that reports are calculated directly from GL entries and still show the correct financial position.
13.2 Use Legacy Controller for Period Closing Voucher
This option allows ERPNext to use the previous processing logic for Period Closing Vouchers. It is mainly provided for compatibility with systems that were upgraded from older setups or that rely on earlier closing processes.
In most cases, this option remains disabled and is only enabled when there is a specific need to maintain the older behaviour for period closing entries.
14. Chart Of Accounts
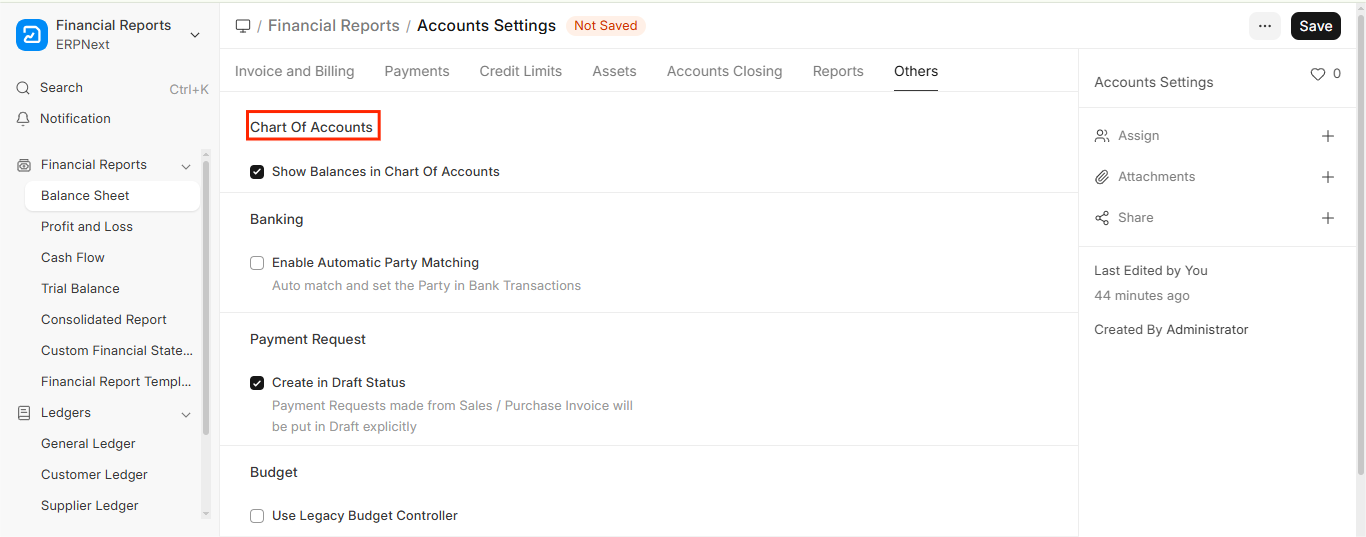
- The system will show the current account balances in the Chart of Accounts (CoA) view when you select the “Show Balances in Chart of Accounts” option.
- This implies that the current debit or credit balance based on the most recent General Ledger (GL) entries will be displayed next to each account (such as Cash, Sales, and Expenses).
- It provides a brief summary of your financial situation without requiring you to run different reports.
- For accountants and finance users who wish to keep an eye on balances while navigating the account structure, this setting is helpful because it makes it simpler to:
- Identify odd balances, such as a debit in a liability account.
- Examine group-level totals, such as total income or assets.
- Investigate accounts that appear suspicious as soon as possible.
15. Banking
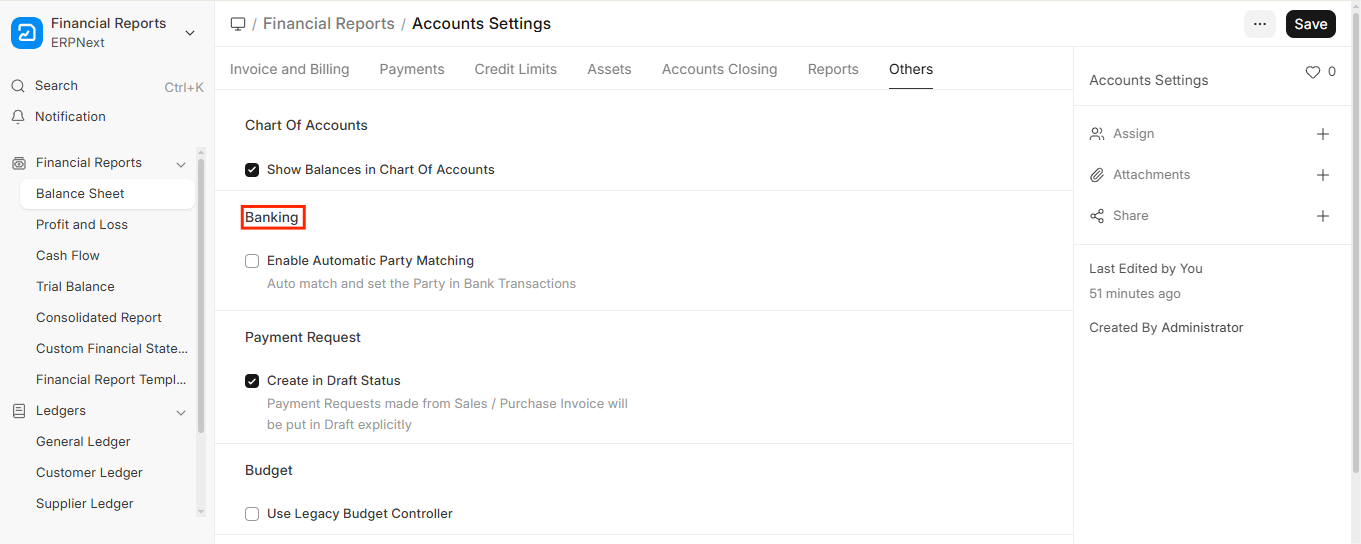
15.1. Enabling Automatic Party Matching
- When enabled, this option enables ERPNext to automatically identify and set the “Party” (such as a supplier or customer) in your bank transactions when importing bank statements or performing bank reconciliation.
- ERPNext reads the description or narration in each transaction line when you import a bank statement (either via CSV or a bank integration).
This option is commonly used to freeze accounting entries in ERPNext after financial statements or audits are completed.
Next, it looks for names or keywords in that narration that correspond to the names of:
- Clients
- Suppliers
- Workers
- Other Users in Your System
15.2. Benefits:
- Saves time: You can choose the right party without having to go over each queue by hand.
- Error reduction: Lowers the possibility of choosing the incorrect client or vendor.
- Accelerates reconciliation: Facilitates quicker and easier matching payments to bills or invoices.
16. Reports
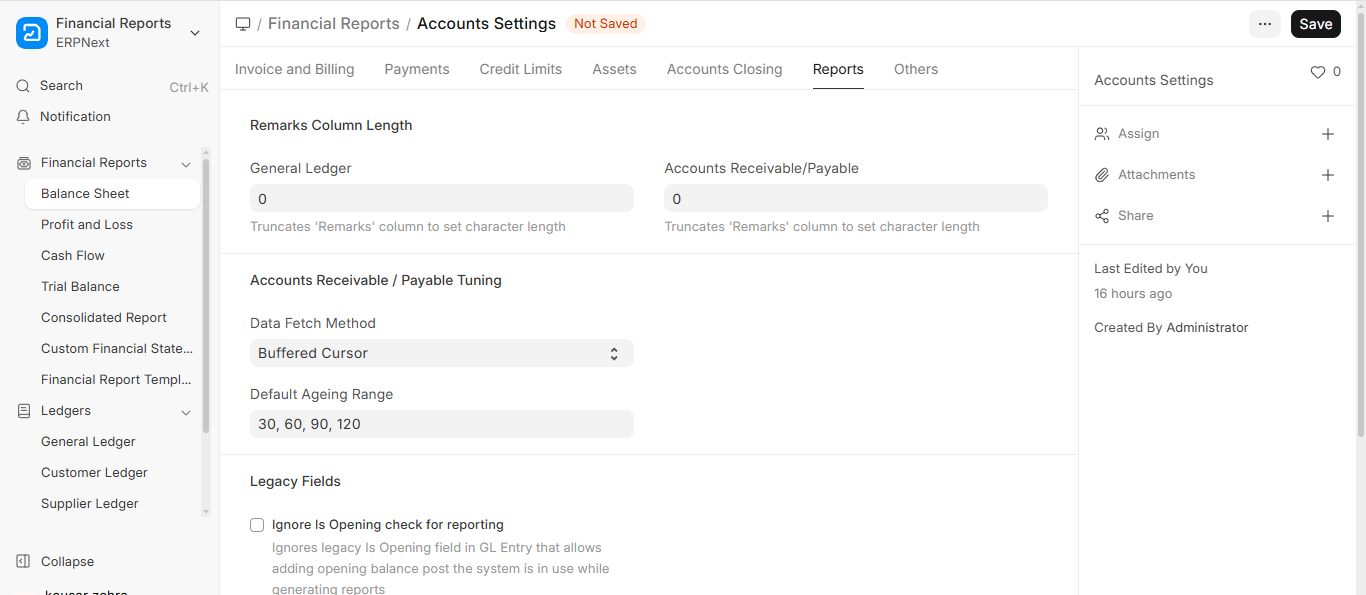
16.1. Remarks Column Length
16.1.1. General Ledger
- You can adjust the number of characters that appear in the “Remarks” field in the General Ledger report by using this setting.
- ERPNext will display the entire text of the Remarks field without cutting it if it is set to 0.
- ERPNext will truncate or shorten the remarks displayed in the report to the first 50 characters if you enter a number, such as 50.
- It helps keep reports organised if comments are often lengthy.
16.1.2. Receivable/Payable Accounts
- It is comparable to the previous one, but it pertains to reports for accounts payable and receivable rather than the general ledger.
- Set the text length in the Remarks column to a fixed size (e.g., 30 or 60 characters) here.
- If you want the entire remarks text to appear, set it to 0. Enhances the readability of reports, particularly when printing or exporting them as PDFs.
16.2. Accounts Receivable/Payable Tuning
16.2.1. Data Fetch Method
- Default Buffered Cursor: Reduces memory usage and speeds up the loading of large reports by fetching records in chunks or pages.
- The buffered cursor is more effective and made to work better in big databases.
- Unless you have particular problems with the way records are retrieved, it is advised that you leave this enabled.
16.3. Legacy Fields
16.3.1. Ignore Is Opening Check for Reporting
- When creating reports, this setting disregards the “Is Opening” flag in GL Entries.
- The “Is Opening” field was used to identify opening balances (entries carried forward from before ERPNext started being used) in older versions or migrated databases.
- If this option is selected, ERPNext will include those entries in financial reports as regular entries rather than treating them as separate entries.
- If you want more accurate, current reporting and are seeing discrepancies because of legacy balances, use this.
17. Payment Request
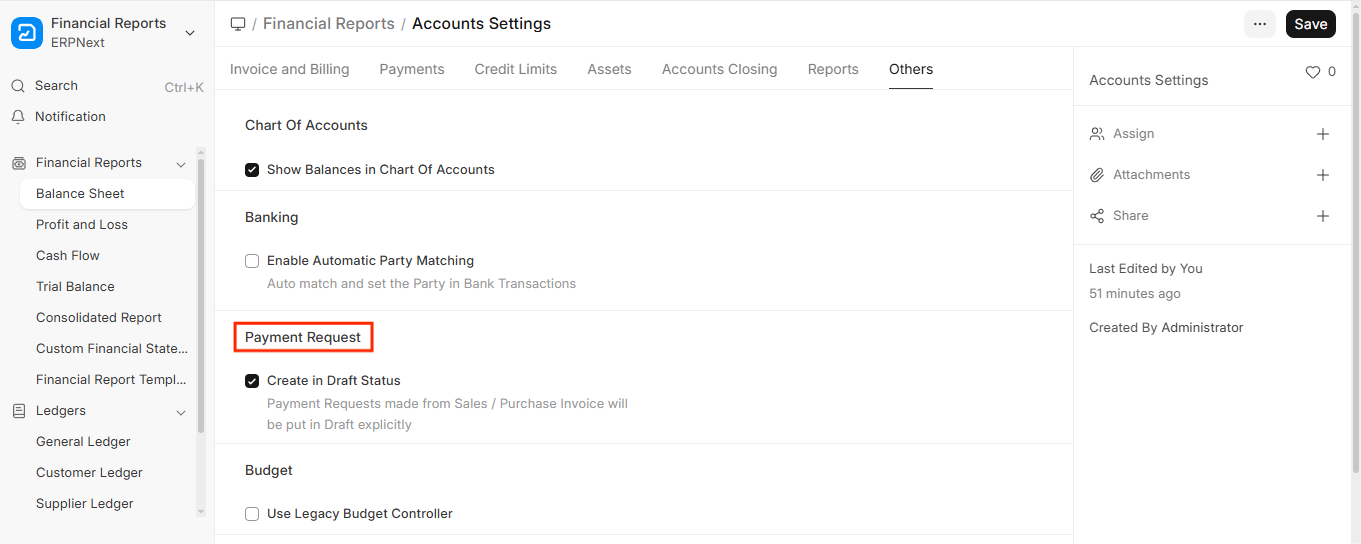
17.1. Create In Draft Status
- ERPNext will automatically generate new documents in “Draft” status rather than submitting them right away if this option is enabled.
This means:
- Although the document (journal entry, invoice, etc.) is saved, it is not yet complete.
- Before the document is submitted, users can review, edit, or approve it, and it can have an impact on inventory or accounts.
17.2. Why use this?
- Internal control: Allows managers or approvers to check entries before they are recorded.
- Flexibility: The form can be partially completed, saved, and then returned at a later time.
- Error prevention: Stops unintentional data submissions that contain errors.
17.3. When disabled
- Documents are generated and sent right away, which means transactions will appear in the stock or accounting system.
- Unless you cancel and change the document, there is no approval or editing.