Project
A Project is a planned piece of work that is designed to find information about something, to produce something new, or to improve something. In ERPNext, project management is task-driven. You can create a Project and divide it into multiple Tasks.
A Project has a broad scope and hence can be divided into tasks. Think of coming up with a new smartphone for the next year as a Project. Then things like designing, prototyping, testing, delivery, etc., become tasks under the project. Whilst each task within a Project can be assigned to an individual or a group of individuals, the assignment can also be done at the project level. These Tasks can be created from a Project itself or can be created separately as well.
To access Projects, go to:

1. Creating a Project
In ERPNext v16, the Project form is split into tabs: Details, Costing, Progress, More Info and Connections. To make a project:
Step 1: Access the Project Doctype
Step 2: Enter the Mandatory Project Details:
- Project Name: Put in a brief and descriptive name for your project. This is a required field, and the name will be used as the main identification of the project in all the reports and references.
- Status By default, the Status of the project will be set to Open.
You can manually change the status to:
- Completed: When the project is completed.
- Cancelled: If a project is cancelled.
- On Hold: Useful for put-on-hold projects.
When % Complete Method is based on tasks, ERPNext sets the Status to Completed automatically once the project reaches 100%, unless the Status is Cancelled or On Hold.
- Expected End Date (in the Timeline section) Provide the date until which you wish the project to be completed. This field proves to be useful in planning, reporting, and reminders if there is any delay.
- Save Once you’ve entered the required details, click Save to create the project. After saving, you can add Tasks, Timesheets and other linked documents from the Connections tab.
1.1 Additional Options while creating a Project
From Template: Enables you to choose a saved Project Template to automatically fill tasks, timelines, dependencies, and milestone markers into the new project. ERPNext creates the template’s Tasks for the project when it is saved. Each task’s dates are worked out from the project’s Expected Start Date using the task’s Begin On (Days) and Duration (Days), and dates that fall on a holiday move to the next working day. If the Project Type is empty, it is taken from the template.
Expected Start Date – planned project start date: This, together with the Expected End Date, sets the timeline. Both fields are in the Timeline section of the Details tab.
Project Type: To categorize projects (such as Internal, External or Other) so that you can filter and report on them.
Priority: Identifies how important or pressing the project is: Low, Medium or High. Each Task also has its own Priority.
Department: Links the project to the department of the company that will handle it.
Is Active: Set it to Yes or No to show whether the project is still active. You can set it back to Yes at any time, and the project’s history is kept.
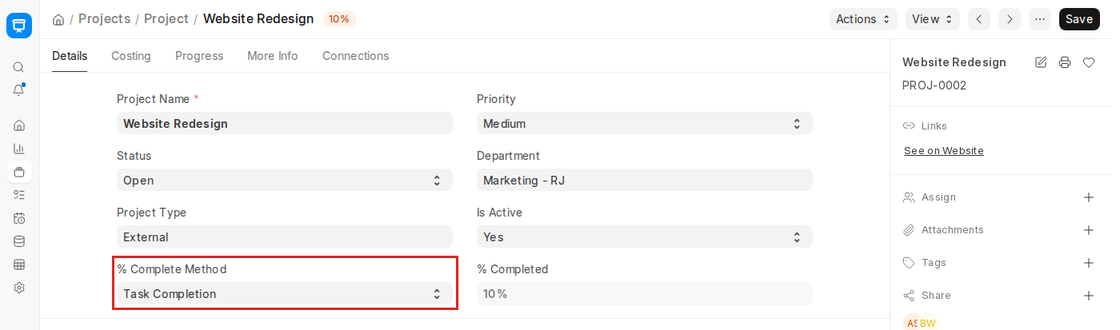
% Complete Method: Controls how the project’s percentage completion is calculated:
- Manual – Manually enter % complete.
- Task Completion – Number of completed (or cancelled) tasks ÷ total tasks.
- Task Progress – Overall average % progress on tasks.
- Task Weight – Weighted completion according to each task’s Weight.
With the Manual method, setting the Status to Completed sets % Completed to 100. With the Task Weight method, tasks with zero weight do not affect the percentage.
Some examples of how the Percentage Completion is calculated based on Tasks:
| Task | % Progress | Task Weight | Status |
|---|---|---|---|
| Build | 100 | 0.4 | Completed |
| Operate | 100 | 0.2 | Completed |
| Transfer | 50 | 0.2 | Open |
| Method | Formula | Calculation | % Completed |
|---|---|---|---|
| Manual | – | – | Entered manually |
| Task Completion | Completed tasks ÷ total number of tasks | 2 ÷ 3 | 66.67 |
| Task Progress | Sum of % Progress of all tasks ÷ total number of tasks | (100 + 100 + 50) ÷ 3 | 83.33 |
| Task Weight | Sum of (% Progress × Task Weight) ÷ total Task Weight | (100 × 0.4 + 100 × 0.2 + 50 × 0.2) ÷ 0.8 | 87.5 |
Note: The weighted progress is always divided by the total weight of the Tasks, so the weights do not have to add up to 1. In the example above, the weights add up to 0.8, so percentage completed = 70 ÷ 0.8 = 87.5%.
2. Features
2.1. Customers, Users and Comments
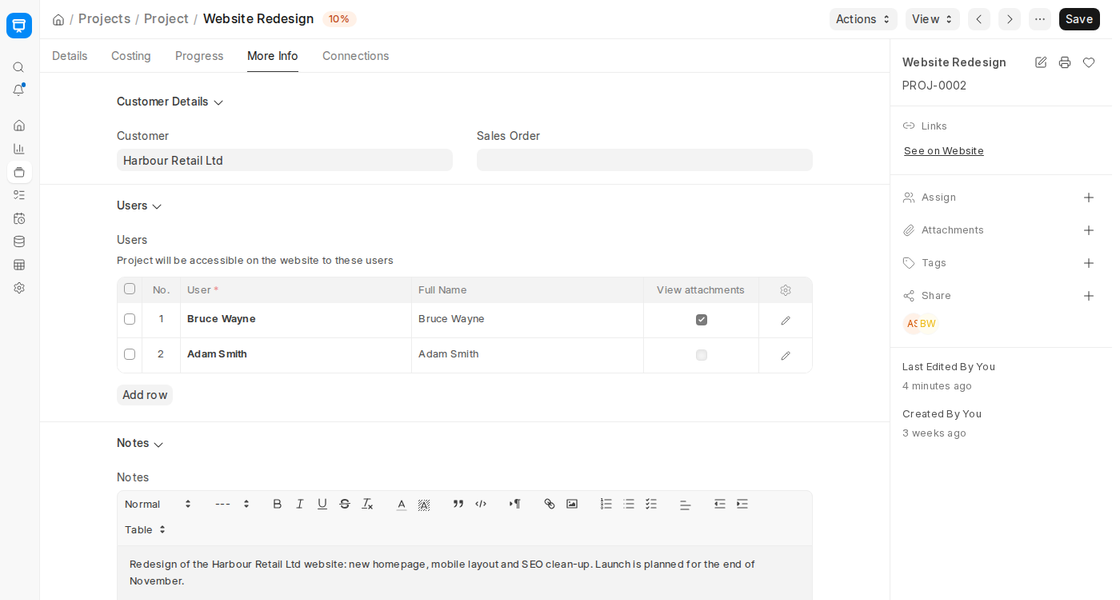
Customer Association: The Customer and Sales Order fields are in the Customer Details section of the More Info tab. While doing a project for a certain customer, the Customer field ensures easy association of the project itself with the record of the customer. In this manner, all updates, activities, and reports carried out on the project automatically link to the proper customer, maintaining communication and financial tracking streamlined within the project process.
Sales Order Integration If a Project is based on a Sales Order from a Customer, you can fetch the details here. This would enable you to update the Customer on the Progress on the project as per the Sales Order issued.
Adding Users In the Users table you can add internal staff members or external people (e.g., customers, freelancers, or suppliers) who have a user account. The project is shared with these users and is accessible to them on the website (portal), where they can see its progress and tasks.
User Options and Welcome Email When you save the project, each newly added user automatically receives a “Project Collaboration Invitation” email with a link to the project, and the row is marked Welcome email sent. For each user you can also tick View attachments and Hide timesheets to control what they see. This way, every stakeholder will get to see what they should be viewing.
Notes Section: The More Info tab contains a Notes field where you can enter free text description of the project. It can include special instructions, meeting notes, internal remarks or notices. The Notes are accessible to any person authorized to do the project, which facilitates the establishment of transparency and better cooperation.
2.2. Start and End Dates
Expected Start and End Dates: In the Timeline section of the Details tab, you may specify the Expected Start Date and the Expected End Date. They will also be strategizing milestones that will allow teams to plan activities, allocate resources and know how long the project will last. They help in reviewing scheduled performance as compared to actual performance.
Actual Start Date (Auto-Tracked): Actual Start Date is automatically populated from the earliest Timesheet submitted for the project. This obviates the need for manual tracking and provides a precise idea of when the project work actually started.
Actual End Date (Auto-Tracked): Likewise, Actual End Date is automatically filled with the latest Timesheet, and Actual Time in Hours (via Timesheet) shows the total hours logged. This gives the overall time of working of the project accurately without the manual efforts required to track the project.
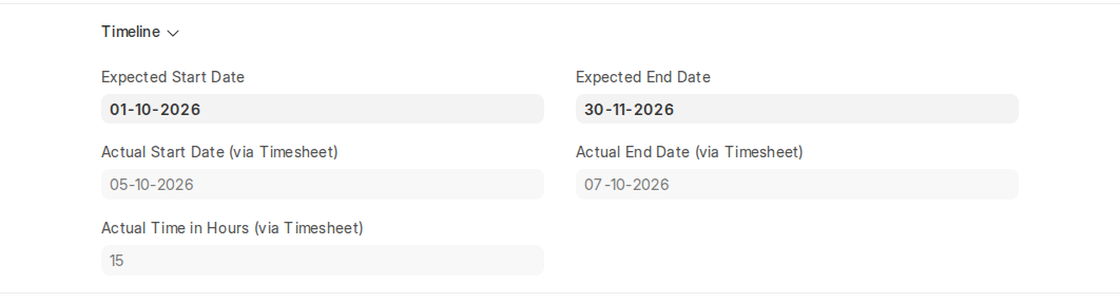
Timesheet Integration: Actual Start and End date automation relies on Timesheet data. When the staff log their working hours against the project, the actual timeline is automatically updated by the system. The integration helps to maintain the project progress simple to manage based on actual working hours.
2.3. Costing and Billing
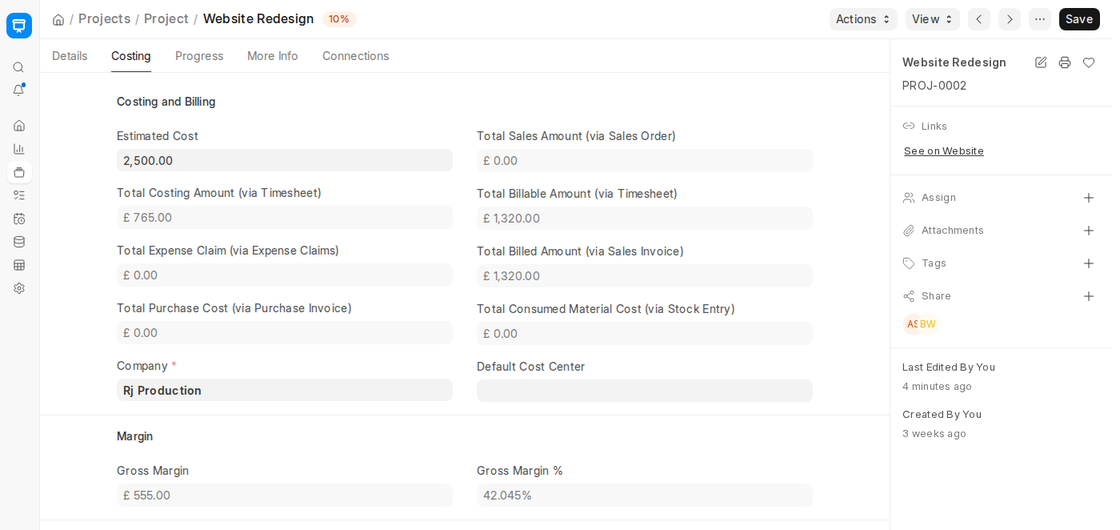
These fields are on the Costing tab. Apart from Estimated Cost, they are read-only and are updated automatically from the linked transactions.
Estimated Cost: The space provided here allows one to manually enter the estimated or budgeted cost to complete the project. It is commonly assigned mostly during the project planning and it can be utilized to act as a benchmark through which the analysis of future actual costs can be achieved.
Total Sales Amount: This field will automatically get the total amount indicated in the Sales Order when a project is related to a Sales Order. This relationship provides a good transparency into the contractual revenue expected to be generated by the project, which can be used to bill and make forecasts on revenues.
Total Costing Amount ERPNext automatically computes this field based on all Timesheets that are allocated to the project. It rolls up labor cost of hours according to the hourly rate of workers. This figure is critical in calculating what the true cost of implementation of the project is when in terms of manpower.
Total Billable Amount: This is automatically generated from billable Timesheet entries where the Billable checkbox is checked. This amount is the total revenue that would be charged to the client based on hours. It helps to ensure accurate client billing and prevent underbilling.
Total Expense Claim: Any Expense Claims filed by staff for reimbursable expenses incurred in the course of project delivery like travel, materials, or subsistence—are automatically tracked in this field. This captures information regarding other out-of-pocket expenses incurred while delivering projects.
Total Billed Amount: This is the total total of all the Sales Invoices invoiced against the project. This field will be reflected when Sales Invoice is created and connected to a project or Sales Order. It assists in monitoring the amount of revenue that the project has already generated.
Total Purchase Cost: If the Purchase Order is being issued to purchase materials or services for a project, cost from the associated Purchase Invoice is pulled here. The cost is outsourced material or vendor services that total up towards satisfaction of a project.
Total Consumed Material Cost: This is the cost of the material consumed from stock for the project. On posting Stock Entries (like Material Issue) against the project, ERPNext automatically calculates and populates this field with the cost of such items to help track material usage correctly.
2.4. Margin
Gross Margin: The Gross Margin is computed in order to ascertain the overall profitability of a project. In ERPNext v16, it is computed as:
Gross Margin = Total Billed Amount – (Total Costing Amount + Total Purchase Cost + Total Consumed Material Cost)
This gives a clear indication of profitability after subtracting the labor, purchase and material costs of the project from what has actually been invoiced. Expense Claims are shown separately in Total Expense Claim and are not deducted here.
Gross Margin %: This indicator gives you the percentage profit margin and is irreplaceable so that you would be aware of the financial status of a project. It can be found by using the following formula:
Gross Margin % = Gross Margin / Total Billed Amount × 100
ERPNext recalculates both figures automatically as linked transactions are submitted, so profitability can be monitored in real time. For example, the project below has billed £1,320.00 and has £765.00 of Timesheet costs, so Gross Margin = £555.00 and Gross Margin % = 42.045%.
2.5. Track Progress
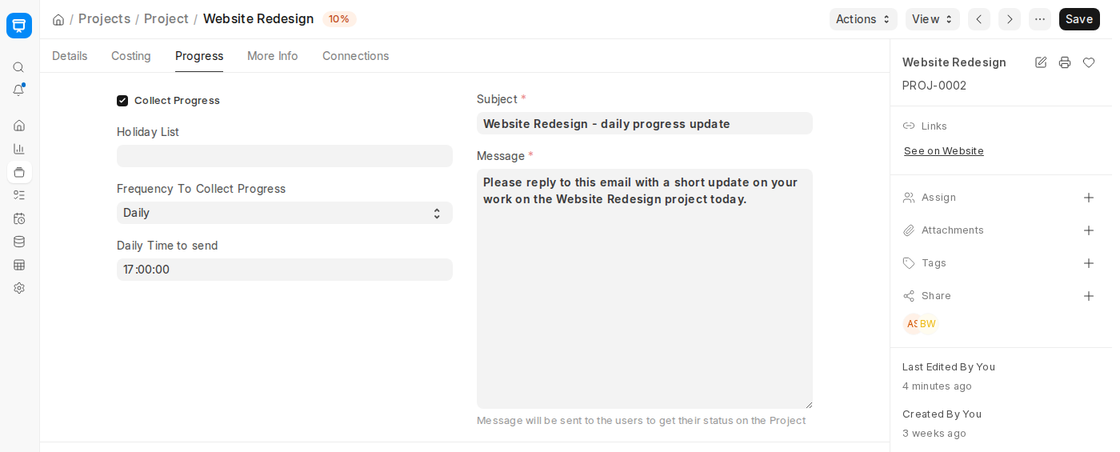
Enable Progress Monitoring: On the Progress tab, when the “Collect Progress” checkbox is selected, ERPNext enables a progress tracking system. The system is able to collect updates from project users under it at regular intervals. It is useful for long-running or client-critical projects where frequent updates are a necessity.
Holiday List Configuration: You can select a Holiday List for the project. No progress emails are sent on the days marked as holidays in it, for example, weekends or public holidays.
Reporting Frequency
Frequency To Collect Progress sets how often the progress email is sent: Hourly, Twice Daily, Daily or Weekly. Each option shows its own time fields (From Time and To Time, First Email and Second Email, Daily Time to send, or Day to Send and Weekly Time to send). Enter the Subject and Message of the email that asks the users for their status.
Stakeholder Notifications: Once this feature is turned on, ERPNext emails the Message to all the users in the project’s Users table. Their replies are saved in a Project Update, and the next day ERPNext emails a Daily Project Summary of the replies to the same users. This gives everybody transparency and keeps everyone aligned on the same page about how the project is progressing.