Purchase Invoice
A Purchase Invoice is the invoice you pay your supplier in return for goods or services they have rendered. This invoice is the foundation for how you’ll pay your supplier and is a vital aspect of maintaining accounts payable and expenses tracking for your business.
In ERPNext, the Purchase Invoice is the reverse of a Sales Invoice, but from the buyer’s side. Rather than earning income, you account for expenditures made and liabilities to your vendor. Creating a Purchase Invoice is practically the same as making a Purchase Order, except that you have an added responsibility of financial posting and follow-up payment tracking.
For viewing or creating Purchase Invoices, go through:
This will redirect you to the list view of all past invoices, in which you can make new ones or filter/search existing records.
1. Prerequisites
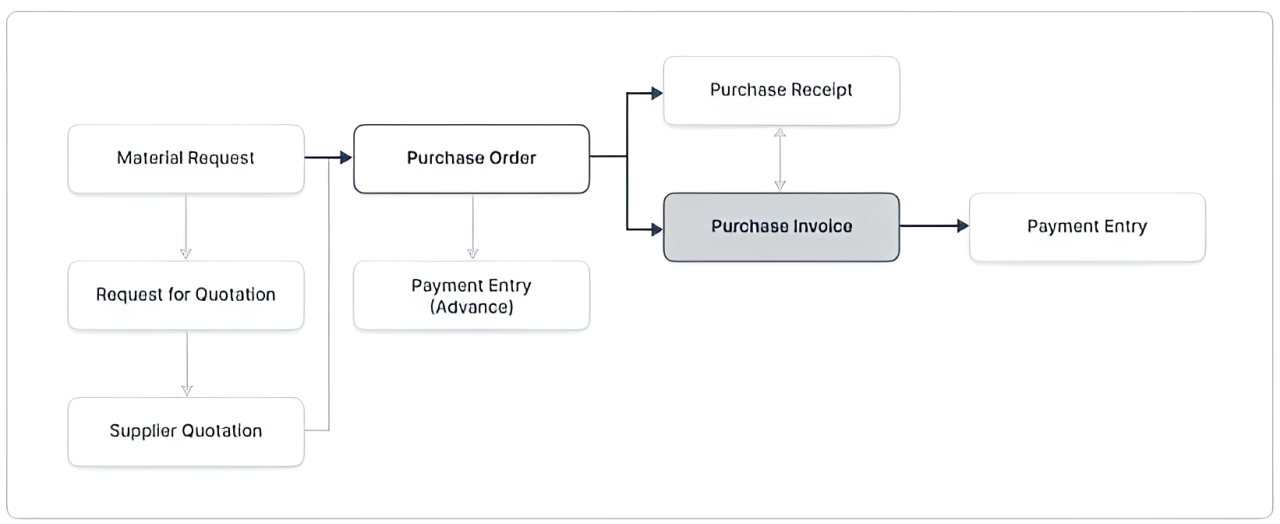
Before creating a purchase invoice, it is necessary to have a few prerequisite records already in the system. These records automate data retrieval and provide accuracy in financial reporting. During company setup, these prerequisite records must be in place.
- Item: The goods or services you are buying need to already be materialized in the item master.
- Supplier: The business entity or vendor from whom you’re buying goods/services ought to be registered in the Supplier master.
- Purchase Order: Preferably, there would exist a linked purchase order to monitor commitments made to the vendor.
- Purchase Receipt (Optional): This is a proof of delivery and can be used for taking receipt of goods prior to invoicing but is not a requirement in all instances.
Having these components ready in advance guarantees a hassle-free and streamlined purchase invoice generation process.
2. How to create a Purchase Invoice
In ERPNext, a purchase invoice is generally created directly or by copying data from a purchase order or a purchase receipt. From these source documents, it auto-fetches supplier-related item information, quantities, and prices, which saves time and minimizes errors.
When you are filling it out from an existent order or receipt, just press the Get Items From button. Then you will be asked to choose a purchase order or purchase receipt and the corresponding item and price will be automatically added to the invoice.
But to make a purchase invoice without a reference document (when you want to make it manually), you can go through the following steps:
- Navigate to the list of Purchase Invoices and click on New to open a new invoice record.
- Choose the supplier from whom you have purchased the items and also select the company.
- The posting date and time will automatically be set to the current time by default. If necessary, tick Edit Posting Date and Time to change them manually.
- Add Due Date—the date by which payment to the supplier is due.
- Add items or services that you bought in the Items table, with their corresponding quantities.
- Rate (price per unit) and Amount will be populated automatically according to the item settings or the document attached.
- After entering all the mandatory information, click on Save to store the invoice in draft mode. If it all appears to be correct, click on Submit to complete and post the invoice to the system.
After being submitted, the purchase invoice becomes part of your accounting record, and any subsequent payment entries or accounting reports will contain this transaction.
2.1 Additional options when creating a Purchase Invoice
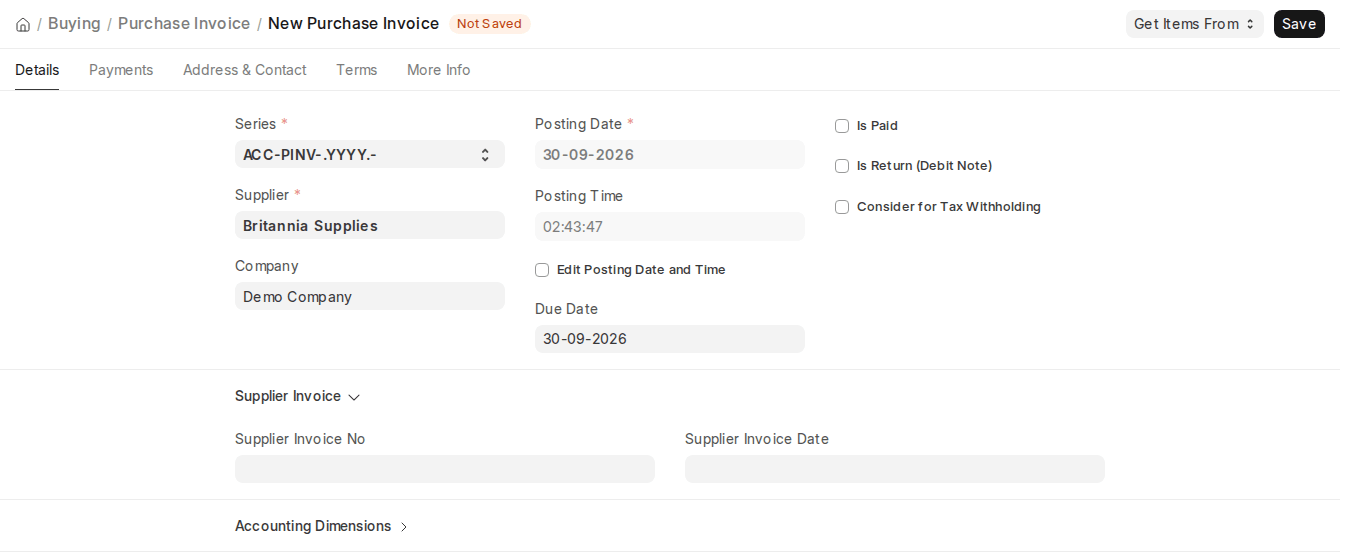
When making a purchase invoice in ERPNext, there are a few more options that offer more control and flexibility when issuing an invoice. Those options enable management of different situations such as advance payment, returns, and withholding tax.
- Is Paid: Check this box if you have already paid the supplier (fully or partly) at the time of the invoice, for example in a cash purchase. You then select the Mode of Payment, Cash/Bank Account and Paid Amount, and ERPNext records the payment together with the invoice. Advance payments made earlier are linked through the Payments tab instead (see Advance Payment below).
- Is Return (Debit Note): You can also select this checkbox in case the goods mentioned in the invoice are returned to a supplier. This will be considered a return entry and ERPNext will see it as a debit note. This would be typically used when the products are damaged, when surplus amount is shipped or rejected due to quality. To learn more about this feature, you can refer to the documentation of Debit note.
- Consider for Tax Withholding (called Apply Tax Withholding Amount in earlier versions): Tick this to apply withholding tax based on the Tax Withholding Category set in the supplier’s master record. The calculated deductions are shown in the Tax Withholding Entries table. This will avoid non-reflectance of regional taxes as well as the mistakes of manually keying in taxes. To set up and use, see Tax Withholding Category page.
These optional fields are useful during your invoicing process so that it can be accurate, efficient and regulatory and financial reporting compliant.
2.2 Statuses
In ERPNext, a Purchase Invoice may pass through different statuses based on activities performed and the life cycle of the transaction. Each status represents the invoice’s present place in the accounting process and aids in tracking, reporting, and vendor liability management.
- Draft: This is the original state of the invoice when it has been created and saved but not posted. It is still editable during this phase and does not impact any ledgers or accounts.
- Return: This is a status that happens when the goods have been returned to the supplier after posting of invoice. It means that the initial acquisition has been reverted, in whole or in parts.
- Debit Note Issued: This status is shown when debit note is charged against a purchase invoice due to the loss of goods which have been returned. It means that the goods were returned and in addition to that an actual accounting entry was made to record that the payable was made.
- Submitted: Once the invoice is posted and submitted, it is a permanent transaction in the system. The system updates the general ledger, and the invoice is locked to prevent any more edits.
- Paid: Once the supplier is completely paid against the invoice and all payment entries associated with it have been successfully posted, this status is shown. It indicates no more payment is due on this invoice.
- Partly Paid: When part of the invoice value has been paid to the vendor and related payment entries are present, the invoice depicts this status. It assists in monitoring outstanding balances and making future payments.
- Unpaid: It shows that the invoice has been posted, but payment has not yet been made. It is outstanding in the system and appears in accounts payable reports.
- Overdue: A payment due date has passed and the invoice remains unpaid or half paid, then it is considered overdue. It helps the finance department to sort out pending payments and supplier management.
- Cancelled: This happens when the invoice is canceled, such as mishaps in data entry, change of agreement or duplicate entries. A canceled invoice has no impact on ledgers or accounts, but serves only as an audit record.
Every status is critical in ensuring financial accuracy, workflow transparency, and vendor reconciliation.
3. Features
3.1 Accounting Dimensions
Accounting Dimensions in ERPNext provide a good way of reporting and classifying your financial dealings. They allow you to classify all transactions – Purchaser Invoices, Sales Invoices, Journal Entries, etc. – into your specialized dimensions e.g. Territory, Branch, Department, Customer or any other organization important to your business. This capability makes life a lot easier in creating detailed filtered financial reports which are targeted at specific business segments.
For instance, if your company has multiple branches or territories, you can allocate a suitable dimension (such as “Branch” or “Territory”) to each transaction. Subsequently, when displaying profit and loss, balance sheet, or general ledger reports, you are able to filter data using these dimensions and make better sense of unit performance.
This can be of great help when a company wants to trace the expenses, revenue and profitability of different business units, customers, or parts of projects. It also eliminates the need to have separate accounts per branch or region and enables consolidated and segmented financial reporting using a single integrated ledger.
To set up and learn more about accounting dimensions, you may go through the accounting dimensions documentation page in ERPNext.
Note: Project and Cost center are taken as default dimensions in ERPNext. This implies that even without custom dimension configuration, you already can label and report your financial entries with these two significant classifications.
3.2 Holding the Invoice
There are times when you might need to hold a Purchase Invoice temporarily, such as pending approvals, issues with quality, or internal examination. In ERPNext v16, a purchase invoice can be held (blocked) only after it has been submitted. If you tick Hold Invoice on a draft and save it, ERPNext shows the message “Purchase Invoice can be held after submitting.”
Below is how each holding mechanism works:
- Block Invoice (After Submission)
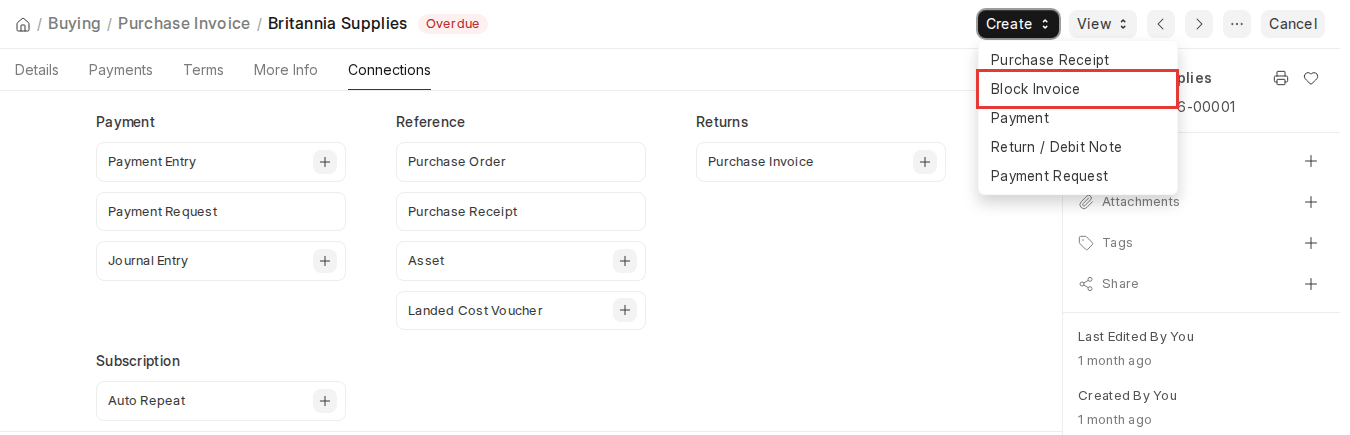
- Open the submitted, unpaid Purchase Invoice and go to Create > Block Invoice.
- In the dialog, enter the Release Date (mandatory) and optionally a Reason For Putting On Hold, then click Save. The invoice status will show “Temporarily on Hold” until the release date.
- This feature is useful if you need to enter the invoice now but settle later after considering supplier delivery or other in-house validations.
- Change Release Date (After Submission)
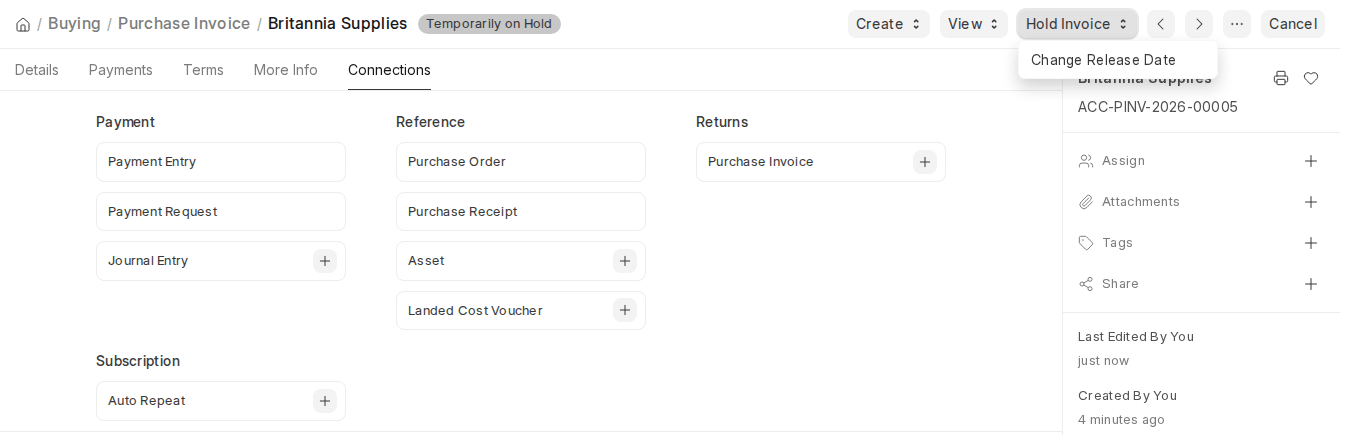
- If the invoice is on hold and you need to alter its release date, you can do so through Hold Invoice > Change Release Date on the top-right of the invoice form.
- Tapping this will bring up a dialogue box in which you can change the release date and optionally include a reason for holding the invoice.
- This is useful when the hold duration needs to be extended or adjusted due to shifting conditions.
- Unblock Invoice
- While an invoice is blocked, it does not appear in Payment Entry references and cannot be paid.
- You can lift the hold early by clicking Create > Unblock Invoice when you are ready to allow the payment again. Once the release date is reached, the invoice becomes available for payment automatically.
- Supplier-Level Blocking
- Along with holding single invoices, you can also put an entire supplier on hold by enabling Block Supplier in the Supplier master. Choose the Hold Type (All, Invoices or Payments) and optionally a Release Date; leave it blank to block the supplier indefinitely.
- This is well-suited for cases where the vendor is being scrutinized, or has compliance issues.
By utilizing these options, you have greater control over your accounts payable, prevent premature payments, and manage exception cases with ease in the ERP system.
3.3 Supplier Invoice Details
ERPNext enables you to capture details that are available on your actual invoice document from your supplier. Such fields assist in documentation as well as future reconciliation.
- Supplier Invoice No.: This is the amount that is quoted by the supplier in their physical or electronic bill. By filling in this field, you can cross-reference your internal invoice against the suppliers reference, and it comes in very handy when auditing or when trying to settle a dispute.
- Supplier Invoice Date: This is the date which appears on the supplier invoice and this is the date on which the supplier issued or authorized the bill on his part. It is useful to keep this field updated so as to know billing cycles and pay terms especially when dealing with foreign suppliers or long lead time orders.
These areas have no impact on accounting, but increase documentation and clarity in contacts with suppliers.
3.4 Address and Contact
ERPNext enables you to associate detailed contact and address information of the supplier with the Purchase Invoice directly. This guarantees seamless communication and proper billing and delivery documentation.
- Supplier Address: This is the billing address of the vendor, which is picked automatically from the supplier master if it has been set up. It helps the invoice display the correct legal entity and billing location of the vendor.
- Contact Person: When you have a supplier with multiple representatives, this field enables you to list and also associate the appropriate contact person who will process your order. ERPNext will automatically complete the contact in the invoice even in case contact was already specified in the supplier master.
- Shipping Address: Physical location of the shipping destination of the products. It can be your factory, or warehouse, or other receiving facility. The address may not be the same as the billing address and should be selected wisely to avoid a discrepancy in delivery.
These areas improve the readability of documentation and can be especially effective when there are several branches involved, foreign suppliers, or large volumes of purchases.
3.5 Currency and Price List
ERPNext supports multi-currency transactions and pricing rules, allowing users to manage cross-border purchases efficiently.
- Currency: This alternative identifies the currency that the purchase invoice is being issued in. The currency is typically acquired through the purchase order associated with the purchase, however, you can also enter it manually. An example of this is when a business is based in the UK and importing a supplier based in Europe, you can set the currency to EUR when the supplier quotes in EUR.
- Price List: When you already have a Purchase Price List configured with one or more suppliers or items, you can select it here to allow ERPNext to automatically retrieve item rates. It is standardized and eliminates errors of manual rate entry.
- Ignore Pricing Rule: When this box is checked, any previously created Pricing Rules in the system will be bypassed. This is useful in cases where you may want to have manual control of item prices or have special prices specific to suppliers.
It is important to understand and properly utilize these fields so your Purchase Invoice can accurately represent rates and currency values and maintain international transaction continuity and continuity in negotiating with suppliers.

For additional information, see the Price Lists and Multi-Currency Transactions documentation in ERPNext.
3.6 Subcontracting
ERPNext supports subcontracting in manufacturing and assembly functions, where you supply raw materials to a supplier who produces completed products on your behalf.
- In ERPNext v16, subcontracting is managed through a subcontracted Purchase Order together with a Subcontracting Order and Subcontracting Receipt, which track the raw materials sent to the subcontractor and the finished goods received back.
- The Is Subcontracted checkbox on the Purchase Invoice is read-only. It is set automatically when the invoice is created from a subcontracted Purchase Order.
- The Purchase Invoice then records the subcontractor’s charges for the completed work.
This functionality is especially helpful for business firms that outsource segments of their production process and wish to precisely monitor supplied inputs and received outputs.
In order to enable and set up this feature fully, you may refer to the comprehensive subcontracting documentation found in ERPNext.
3.7 Items Table
The Items Table for Purchase Invoice is where you set all the products or services that you are buying from the supplier. In this section, you can enter item information manually or by scanning barcode, and allow you to set pricing, tax, accounting, weight, and much more. Below is an explanation of each primary field and functionality accessible in the Items Table:
- Scan Barcode: If you are operating a barcode scanner, you can easily add items to the Items Table by just scanning their barcodes. You save yourself from having to manually search and click on items from the Item master, which is very helpful in busy warehouses or procurement setups. To find out how barcode tracking functions in ERPNext, you can check the specific documentation on barcode-based item entry.
- Item Details (Code, Name, Description, Image, Manufacturer): Whenever you pick an item in the table, ERPNext will automatically pick up the Item Code, Name, Description, Image, and Manufacturer details from the Item master. This makes sure that you are using the same product information for all your transactions. If the item has a specific manufacturer assigned, that will be shown here as well.
- Quantity and Rate: Choosing the Item Code will automatically bring with it its default UOM (Unit of Measure) and description. The UOM Conversion Factor defaults to 1, so you take the UOM as is. If, however, the supplier carries the product in a different unit (e.g., boxes rather than pieces), you can modify the conversion factor accordingly.
The rate for the item can be taken from various sources:
- **Price List Rate**: Taken from the chosen price list if basic buying rates are established.
- **Last Purchase Rate**: Represents the price from the latest Purchase Order for the identical item.
- **Item Master Rate**: If a rate is established in the item master, it will be utilized as the default.
Here, you can also calculate item specific taxes by using Item Tax Templates.
- Discount on Price List Rate: You can give a discount by percentage or as an amount on the Price List Rate. This is an item-based discount which can be implemented in promotional pricing, bulk purchase discounts, or negotiated supplier prices. To use it in detail, see the documentation on the ERPNext on Applying Discounts.
- Item Weight: If weight information is stored in the Item master, ERPNext will pick up the Weight per Unit and Weight UOM automatically. Otherwise, you can enter the weight manually to get proper shipping, freight, or compliance.
- Accounting Details: Each product can be assigned to a specific expense account (the Expense Head field), which determines where its cost will be tracked in your books. You can override this field if the default account is not the best fit for the purchase at hand, such as routing IT hardware to a capital asset account rather than an expense account.
- Deferred Expense: If an item’s expense is to be allocated over several future months instead of being fully booked at present, you can check the Enable Deferred Expense box. This assists in expense amortization and will be beneficial in the case of prepaid services, software licenses, or extended maintenance contracts. More about this in ERPNext’s Deferred Expense documentation.
- Allow Zero Valuation Rate: Some items have a Valuation Rate of zero (e.g., free samples or agreed-upon free-of-cost supplies), in which case you should select the Allow Zero Valuation Rate checkbox (shown when Update Stock is enabled). This enables the system to accept and file the entry with no monetary value attached to the item. It can be used in the testing, advertising or sample transactions.
- Bill of Materials (BOM): The BOM field is shown in the item row only for invoices that use the legacy subcontracting flow. It is particularly helpful in subcontracting or production situations where the components of an item are of utmost importance in tracing material or quality.
- Item Tax Template: To collect specific taxes based on the tax class, area or vendor agreement of an item, you can set an Item Tax Template on the item. This enables taxation per item as opposed to that over the whole invoice. The right tax percentage will be calculated and applied by ERPNext. The guide to the Item Tax Template covers this feature.
- Page Break: The Page Break checkbox is for printing. When checked, ERPNext will advance to a new page before printing this item on the PDF or printed invoice. This is helpful when there are specific items or categories that must be printed separately on different pages to improve formatting or presentation.
Update Stock
If you want the inventory to get updated automatically when you create a purchase invoice, then mark the Update Stock checkbox. This saves an extra round trip, making a purchase receipt, thereby simplifying the process and making it faster
However, this should be done only when you have received the goods physically because the stock gets affected directly. Accuracy is very important here to avoid mismatching of the inventory records.
Note: From version 13 onwards, ERPNext has introduced an immutable ledger, which changes how stock transactions and cancellations work. Once a stock update is made, canceling or editing backdated entries may be restricted. Make sure to read the Immutable Ledger documentation for a better understanding.
3.8 Taxes and Charges
In a purchase invoice, charges and taxes are crucial in establishing the amount payable. They are automatically pulled from the associated purchase receipt or purchase order. This maintains consistency in documents and saves time in not having to input the data again.
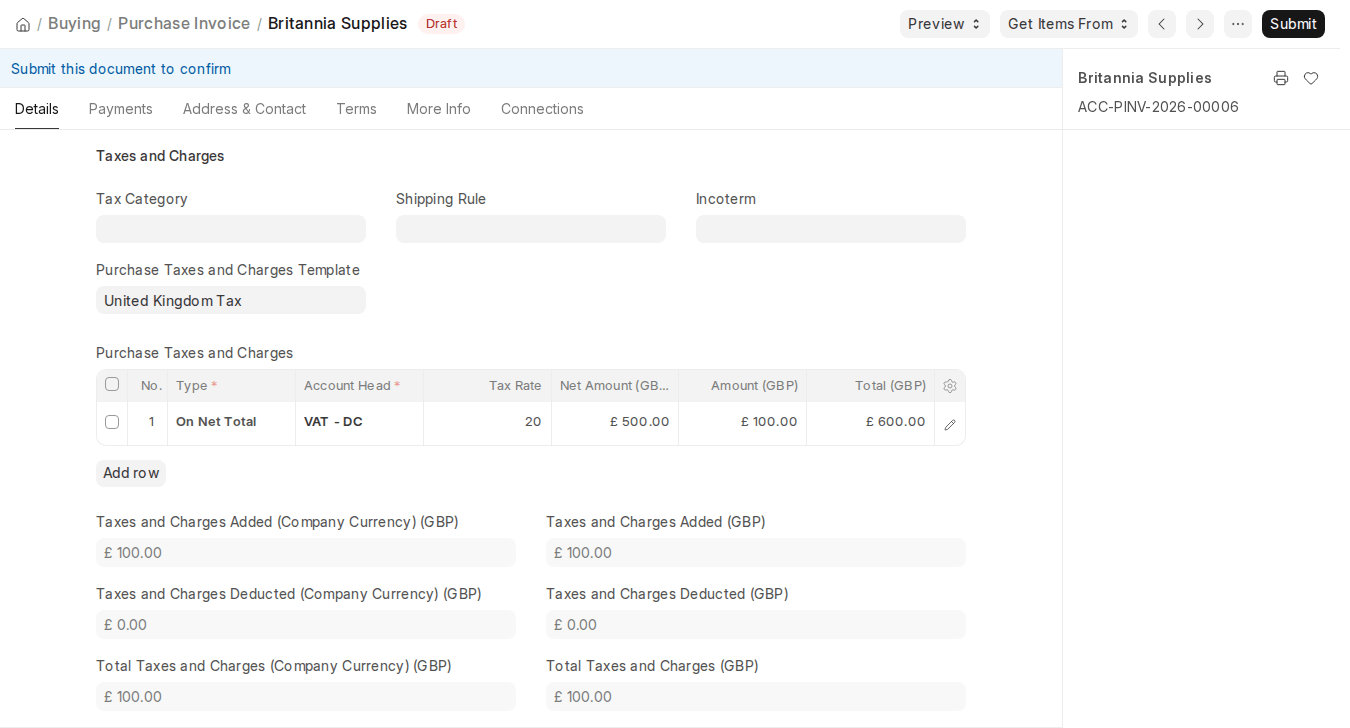
- Taxes Table: The system picks up all the taxes you are entitled to charge based on your set Purchase Taxes and Charges Template. You can check or adjust the values herein according to the deal with your supplier.
- Manual Edits: If need be, you can manually edit the rows of the tax table to charge custom rates or add/subtract specific charges.
- Tax Total: The tax amount is automatically generated and shown under the table including the Grand Total of an invoice.
- Tax Category: To automatically assign tax, you can leverage a tax category, which pre-sets tax rules depending on conditions such as item group, supplier, or region.
To set up tax templates and auto-tax logic, go to the Purchase Taxes and Charges Template documentation.
Shipping Rule
A shipping rule may be used to calculate and charge freight or logistics expenses on invoice as required. It is distance based, weight based or any one of the conditions based.
- It guarantees the invoice displays the actual landed price of the items.
- Go to the Shipping Rule page for complete configuration and examples.
3.9 Additional Discount
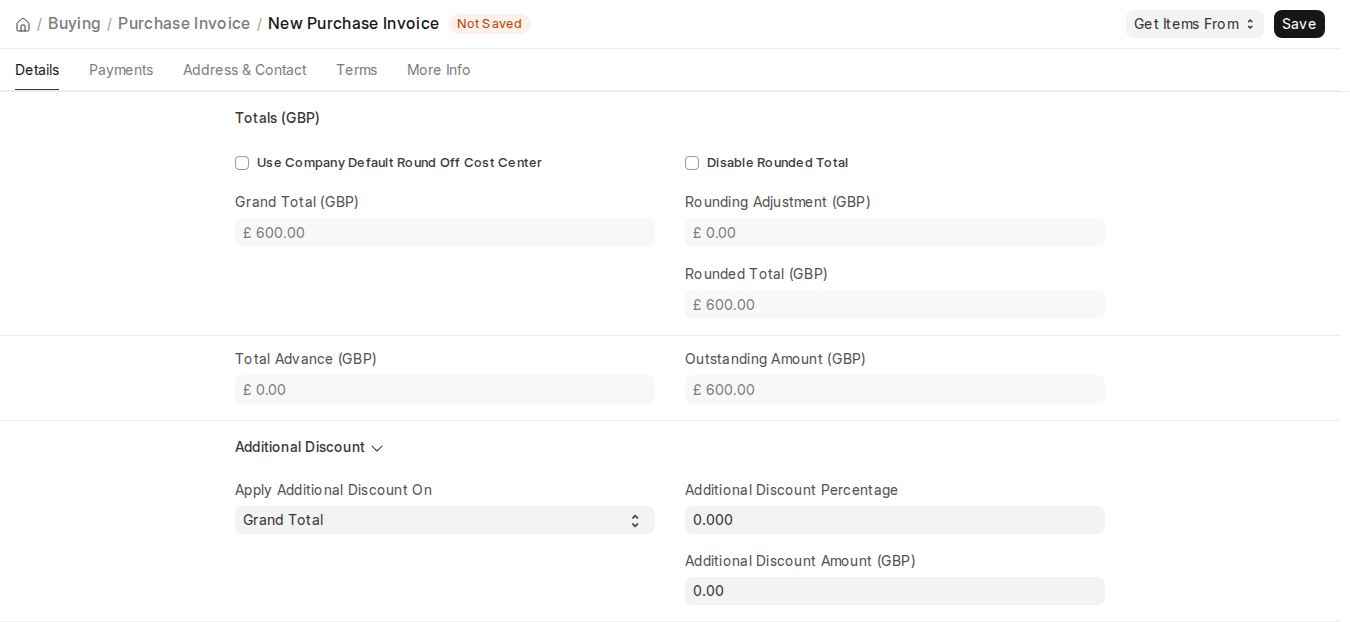
In addition to item-level discounts on each item, ERPNext permits the application of a global discount to the entire purchase invoice.
- Discount Application: It can be a fixed amount or percentage.
- Based On: Select if the discount is to be based on:
- Net Total (before tax and charges), or
- Grand Total (after tax and charges).
This is used for bulk prices, special vendor deals, or seasonal discounts.
For efficiently applying discounts and understanding pricing rules, go through the Applying Discount guide.
3.10 Advance Payment
In cases where the suppliers need a fraction of the payment in advance (in case of high-value products), ERPNext has functionality to handle advance payments within the purchase invoice.
- Retrieving Advances: On the Payments tab, click the “Get Advances Paid” button to fetch advance payment entries made to the supplier, or tick Set Advances and Allocate (FIFO) to allocate them automatically.
- Such advance payments will then be set off against the invoice value.
- When there is an excess or mismatch advance, the ERPNext allows you to track and address the variance in the supplier account.
Learn about recording and linking advance transactions by visiting the Advance Payment Entry page.
3.11 Payment Terms
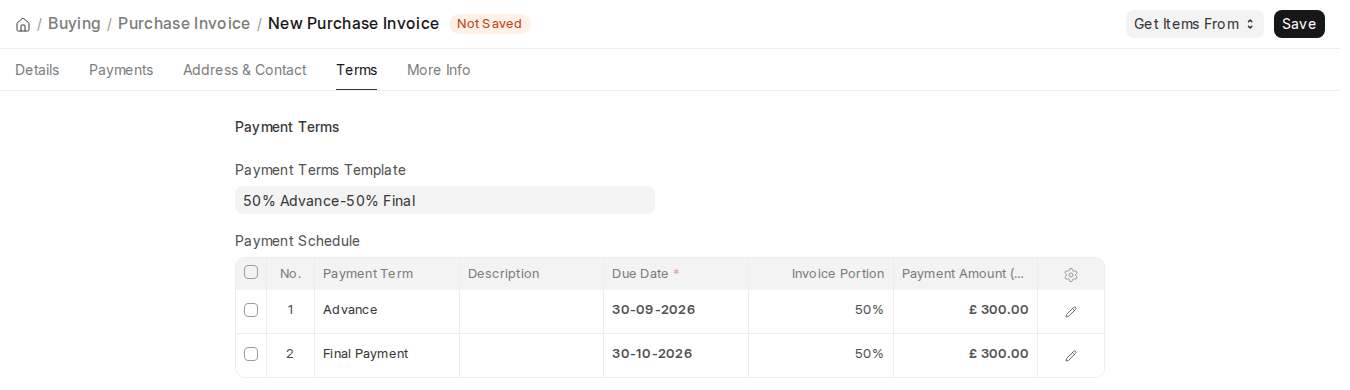
Sometimes instead of paying the supplier at a single time, you and your company can agree to make installment payments in a payment plan which might be spread over a time. The strategized payment plan is called Payment Terms.
- Automatic Fetching: Payment Terms are set on the Terms tab. In case Payment Terms are already set on the linked Purchase Order, it will be automatically fetched to the Purchase Invoice.
- Custom Schedule: The due dates and respective amounts/percentages in the invoice can also be set manually.
- Clarity in Payments: This keeps both parties on the same page in terms of how much will be paid and when, which aids in effective cash flow management.
Find more information on custom schedule setup on the Payment Terms documentation page.
3.12 Write-Off
At times, the customer or supplier is paid a little less than the invoice value, typically because of rounding, bank fees, or small differences.
- What is Write-Off?: We may write off this minor difference so that the invoice is not maintained open at trivial amounts (e.g., 0.50 or 10 cents).
- Automatic or Manual: Either the small differences will automatically be written off by ERPNext, or you may use it manually during entering the payment.
- Accounting Accuracy: This will keep your books in balance and clean without a small amount of receivables or payables outstanding.
See Write-Off section of Payment Terms to get more configuration hints.
3.13 Terms and Conditions
Business transactions typically involve specific Terms and Conditions (T&C) defining the liabilities, schedules, charges, policy of the return, etc. agreed upon between the buyer and supplier.
- Preset Templates: You can create and store several T&C templates, which can be used subsequently by you on your purchase invoice.
- Auto-Fill: In case a purchase order with T&C is referenced, it will automatically fill in this field in the invoice.
- Print Visibility: When generating the invoice, these conditions will be visible so that the legal situation will be clear, and the invoice is adequately documented.
To see set and term management details, see Terms and Conditions page.
3.14 Printing Settings
ERPNext provides a number of customizable print options to format and design your purchase invoices.
Letterhead
- You can configure your company’s official letterhead to appear on the printed invoice.
- This helps maintain a professional appearance and brand consistency.
Discover how to upload and use a company letterhead on the Letterhead page.
- Group Same Items
- If the same item appears more than once in the invoice (e.g., inadvertently added or included from several linked documents), checking this box will group those entries into one line in the print view.
- This makes the invoice more succinct and easier to read.
Print Headings
The default title of a document (such as “Purchase Invoice”) may be customized on print using a print heading.
You may create new headings from:
3.15 More Information
- Is Opening Entry: If you’re upgrading your accounting system from some other ERP to ERPNext and want to enter historical data during mid-year, you might have to identify some documents as Opening Entries. In the instance of a Purchase Invoice, setting “Is Opening Entry” to Yes instructs ERPNext that this invoice is included in your opening balance configuration and is not an actual transactional purchase. This is particularly helpful at the time of ERP migration when it enables you to update your accounts with previously outstanding supplier balances. When designated as an opening entry, this document will not impact your financial statements as a current period transaction but will rather be used to get your books in sync with the data under the old system.
- Remarks: In the remarks field you may add any other information or internal remarks that may be relevant to the purchase invoice. This is the field most suitable to receive clarifications, payment terms, comments on the communication or any other detail not indicated in any other field in the form. Such comments are stored in the document and can be accessed by any authorized user in future, increasing transparency and documentation to the company.
3.16 After Submitting
After submitting the purchase invoice, ERPNext allows you to take several follow-up actions directly from the invoice. These actions remove manual entries and errors from the post-invoicing activities and automate them.
You can create the following documents against the submitted purchase invoice, from the Create menu or the Connections tab:
- Journal Entry: Generate automatic accounting entries in case any manual adjustments are required.
- Payment Entry: Post full or partial payments received by the supplier.
- Payment Request: When the payment is not to be done yet, you can make a formal payment request to your finance team.
- Landed Cost Voucher: If there are extra expenses like freight, customs, or insurance, you can distribute them proportionally among received goods using a Landed Cost Voucher.
- Asset: When the purchased goods are capital assets, you can directly turn them into fixed assets from the invoice.
- Return / Debit Note: Create a return against the invoice when goods are sent back to the supplier.
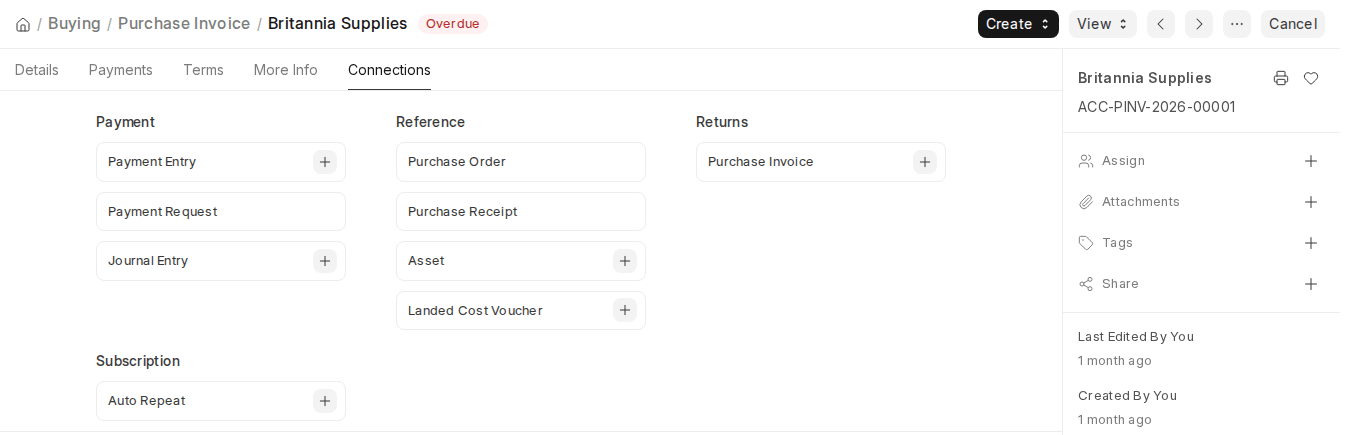
All of these alternatives facilitate deeper workflow automation and accounting standard compliance.
4. More
4.1 Accounting Impact
In ERPNext, not only is a purchase invoice a record of what you owe your suppliers, but it also directly affects your company’s general ledger (GL). For every item you have listed in the invoice, you need to decide whether the cost should be posted to an expense account (like for consumables or services) or an asset account (like for capital equipment).
The cost center of each line item can also be defined to measure spending in each department or project. These environments are customizable at various levels such as item level, company level, or at the invoice itself. An adequate setting is the key to proper financial reporting and budget analysis.
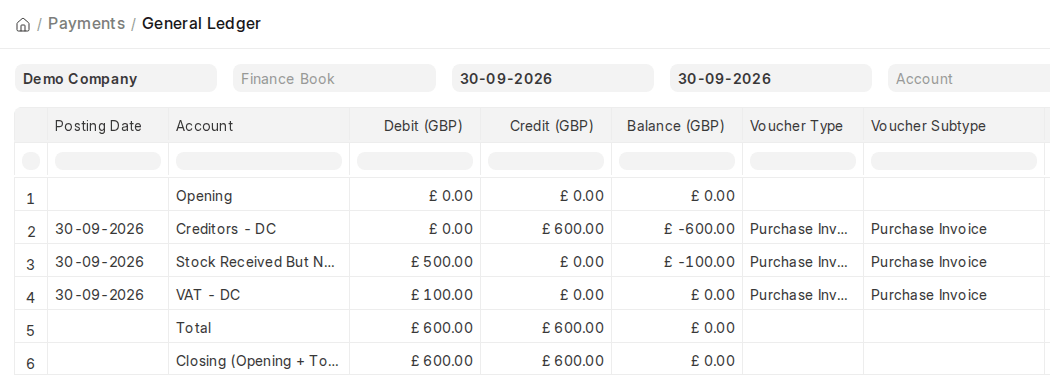
ERPNext will generate the following standard double-entry accounting transactions when submitted:
- Debits
- The expense or asset account linked to each item row (excluding taxes).
- Any relevant tax amount (debited as an input tax asset or expense, depending on your tax configuration).
- Credits
- The supplier account is credited with the full amount due, which is the incurred liability.
These postings keep your books in order and traceable, with a clean audit trail of financial commitments and apportionments.
4.2 Accounting When “Is Paid” is Selected
If you check the “Is Paid” box while making the Purchase Invoice, ERPNext considers that the supplier has been paid already at the time of the invoice. This option is often used in cases like cash purchase or advance settlement. When this is checked, ERPNext makes another set of accounting entries along with the normal purchase transaction:
- Debits: The supplier account is debited to settle the liability, which means no balance is owed.
- Credits: The bank or cash account is credited to account for the payment going out.
These additional journal postings ensure that your cash account and supplier balances are updated in real time. To see the accounting effect of the transaction, just click on “View > Accounting Ledger” once the invoice has been submitted. This gives complete visibility of all debits and credits created and guarantees transparency and accuracy.
4.3 Is a purchase an “expense” or an “asset”?
When creating a purchase invoice, be mindful of whether the item purchased is to be categorized as an expense or an asset, since it will directly influence your accounting treatment.
If it is consumed upon being purchased or is a service (e.g., phone bill, internet fees, or travel allowance), then the purchase will be accounted for as an expense. These expenses are accounted for as being consumed when paid, and their value does not remain on your company’s books.
However, when it comes to inventory items, the acquisition is not identified as an immediate expense. Rather, it’s accounted for as an asset as long as the item is in your warehouse or inventory. These items maintain their value until they’re used or sold.
- If the inventory item is a raw material, then it’s an asset until it’s used in production, at which time it becomes an expense.
- If the item is bought for resale, it becomes an expense only at the point of delivery or shipment to the customer.
With this knowledge, appropriate financial reporting, allocation of costs to various cost centers, and more open valuation of inventory and operation costs are possible.
4.4 Deducting Taxes at Source (TDS)
In most nations, including those whose taxation systems are stringent, companies are required by law to deduct taxes at source (TDS) when paying suppliers. The exercise guarantees tax payment on behalf of the supplier and is regulated by tax laws in each country.
Tax deduction plans, in most cases, operate on a percentage rate and are only applicable when:
- The aggregate billing by the supplier exceeds a stipulated amount, and
- The type of goods or services provided is in the taxable category.
In ERPNext, this is managed by setting up a distinct tax account, typically a head under “Tax Liabilities” or similar in your Chart of Accounts. When you process the invoice with Consider for Tax Withholding ticked, the deducted amount is credited to this tax account and your supplier is credited only with the net amount payable. The withheld tax is then paid to the government, satisfying your business’s tax liability.
This mechanism supports regulatory compliance, keeps your supplier records clean, and is fully integrated with ERPNext’s tax and accounting engine.
4.5 Hold Payments for a Purchase Invoice
ERPNext offers two different methods of holding payments to a supplier, allowing maximum flexibility in managing financial commitments with suppliers. The two options available are:
- Explicit Hold
- Date Span Hold
Explicit Hold
An explicit hold blocks payments indefinitely, i.e., until it is explicitly removed. In ERPNext v16 this is done at the supplier level, because an individual invoice always needs a release date. This is helpful where there is a problem with the supplier, missing papers, or any other problem that needs checking before payment.
To put on an Explicit Hold, open the Supplier, enable Block Supplier, choose the Hold Type (All, Invoices or Payments) and leave the Release Date blank, then save.
To remove the hold, untick Block Supplier on the Supplier.
Date Span Hold
The date span hold allows you to suspend payment for a fixed period. This method is helpful when you want to delay payment until a specific future date, such as pending goods inspection or awaiting internal approval.
To place this hold on a submitted invoice, click “Create” in the top right corner and choose “Block Invoice“. A dialog will ask you to specify a Release Date—the date when the hold will automatically be released—and a Reason For Putting On Hold. After entering, click “Save” to engage the hold.
You may modify the release date subsequently if necessary, provided that the invoice is not yet paid. To accomplish this, go to the “Hold Invoice” dropdown and select “Change Release Date.” A dialog will ask you to enter the new date.
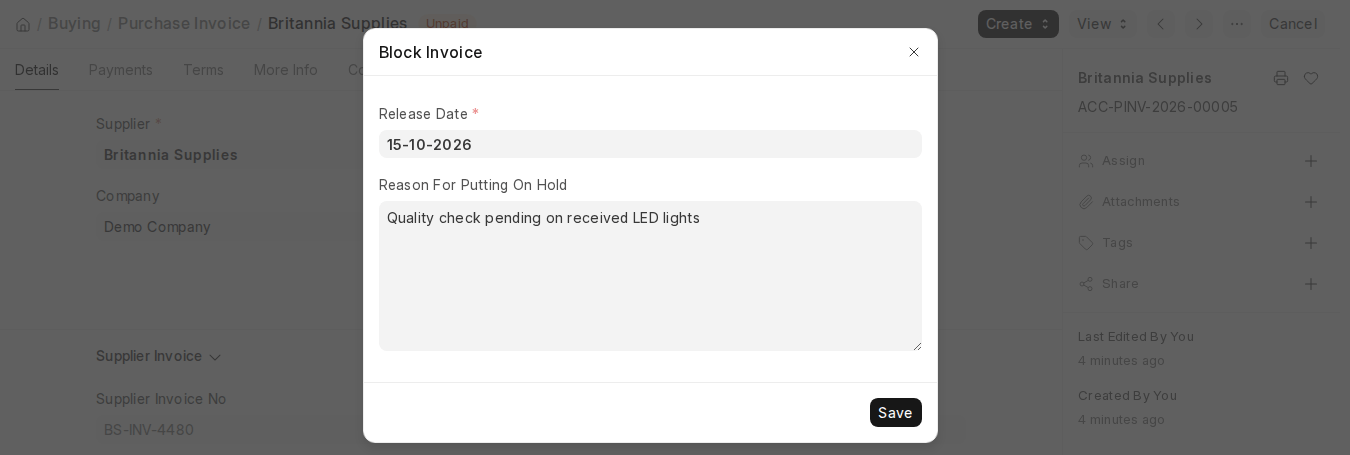
Important Notes: Purchase invoices that are held will not be included in the References Table of a Payment Entry to avoid errors in disbursement.
- The release date must be in the future—past dates and today’s date are not accepted.
- You can only unblock or block an invoice if it has not been paid yet.
- In the same vein, the release date can only be modified if the invoice is unpaid.
This two-hold scheme enables companies to exercise control over their payables so that payments are only made when suitable conditions have been fulfilled.
4.6 Provisional Accounting for Expenses (Only for Non-Stock Items)
In most real-world situations, companies might incur the related cost when a service is obtained but prepare the purchase invoice for the same in the subsequent accounting period or month. This leads to a mismatch, as the expense is not seen in the current month’s financial statements, such as the profit and loss statement, as the system reflects the expense only when the invoice is entered.
To make sure that such unbilled but incurred expenses are accounted for in the proper accounting period, ERPNext has a feature known as Provisional Accounting, which enables you to align your books more precisely.
Steps to Set Up Provisional Accounting:
- Turn Provisional Accounting ON in Company Settings: Begin by enabling Enable Provisional Accounting For Non Stock Items on the Stock and Manufacturing tab of the Company master. When it is turned on, you should also set the Default Provisional Account. This is a temporary account which contains the amount of expense till the posting of an actual invoice. It usually appears on the liabilities part of your chart of accounts.
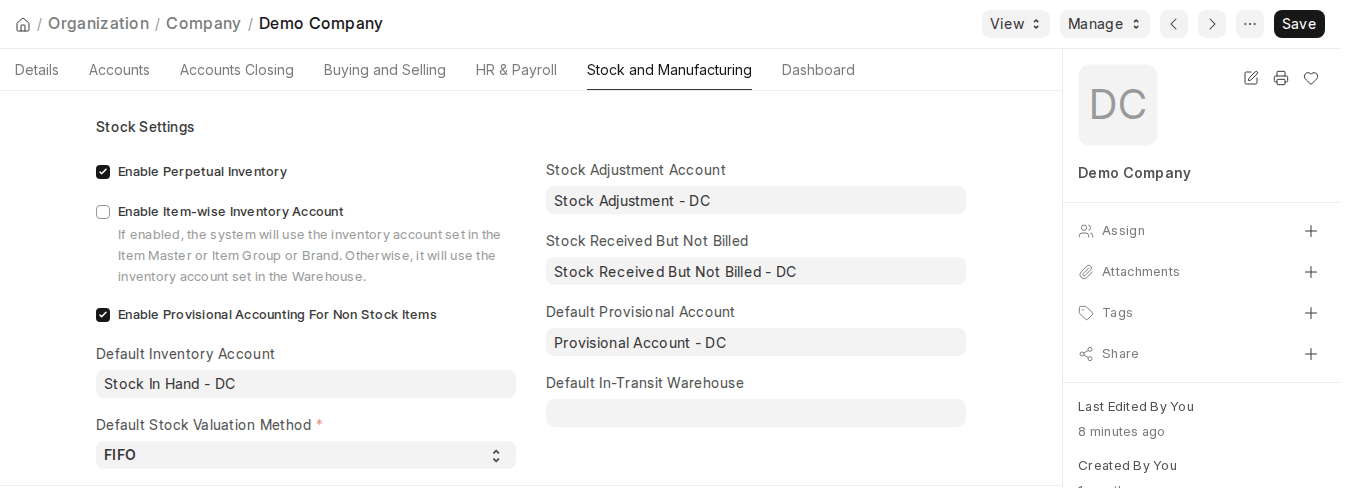
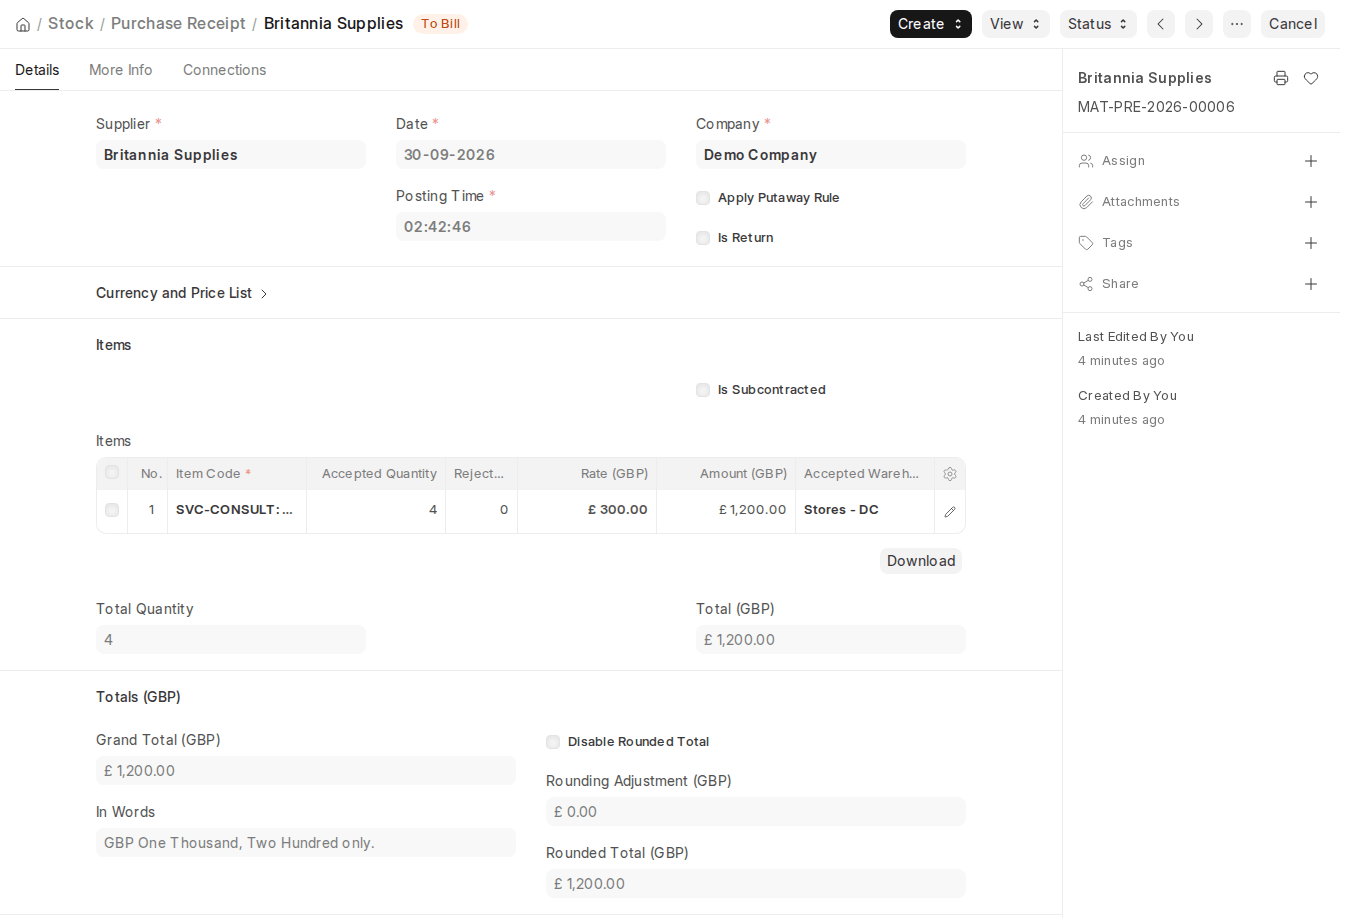
- Make a Purchase Receipt for a Non-Stock Item: After turning on the setting, you can then create a Purchase Receipt of a Non-Stock Item (only non-stock items like services use provisional accounting). Posting this purchase receipt will automatically convey accounting entries to charge the provisional expense.
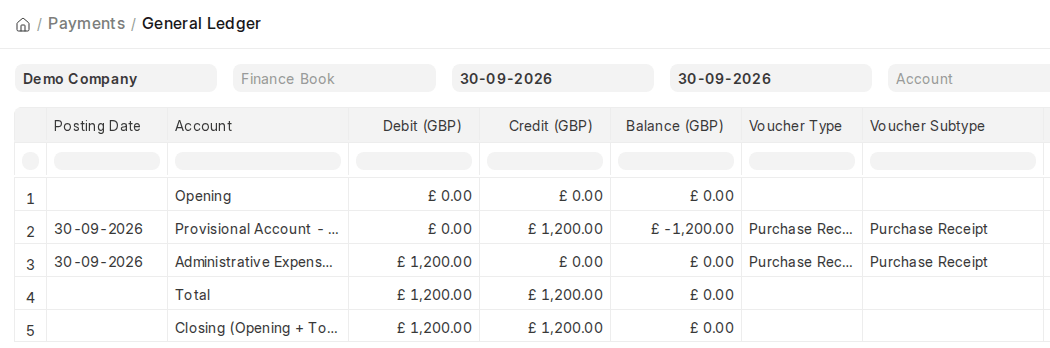
- Accounting Entries on Posting of Purchase Receipt: When submitting the Purchase Receipt, ERPNext makes temporary accounting entries. These entries make the expense appear temporarily in the expense account and offset it with a credit to the Default Provisional Account, so the expense will appear in financial statements even before an invoice is made.
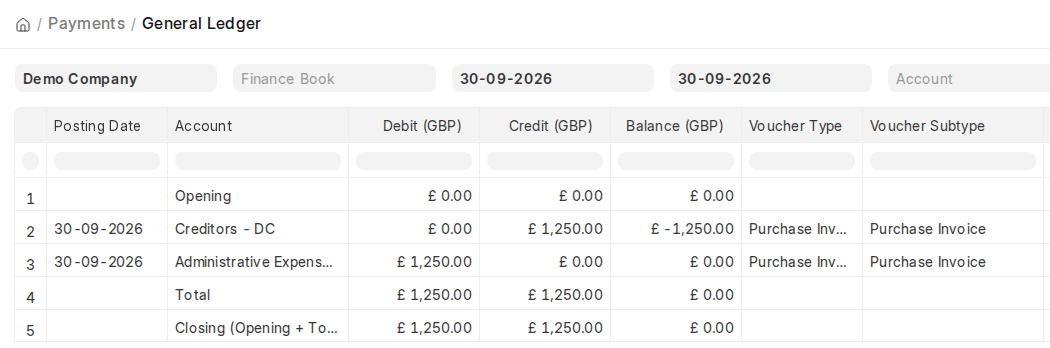
- Create a Purchase Invoice Against the Purchase Receipt: When you receive the actual purchase invoice later, you make it by associating it with the previous purchase receipt. When you submit this invoice, ERPNext posts the final accounting entries in the usual manner—debiting the expense account and crediting the supplier’s account.
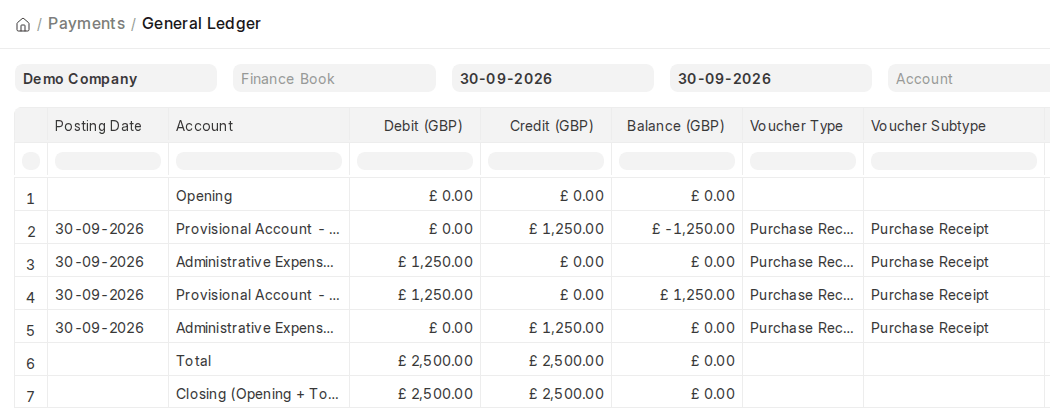
- Reversal of Provisional Entries: When the Purchase Invoice is posted, the system automatically reverses the provisional entries that were entered at the Purchase Receipt level (the reversal entries are posted against the Purchase Receipt). This is to ensure that your books are not double-stated or replicated and that all expense figures are in line with the actual invoice.
With the help of provisional accounting, businesses are able to obtain proper monthly accounting for Expenditures even when the billing is pending, and thus financial reports better depict the real utilization of services within the period.
5. Related Topics
- Sales Invoice
- Item Wise Taxation
- Payment Entry
- Payment Request
- Request for Quotation
- Purchase Order
- Purchase Receipt