Work order
A Work Order is a document ordered by the shop floor of manufacturing from the Production Planner to make a certain amount of a specific Item.
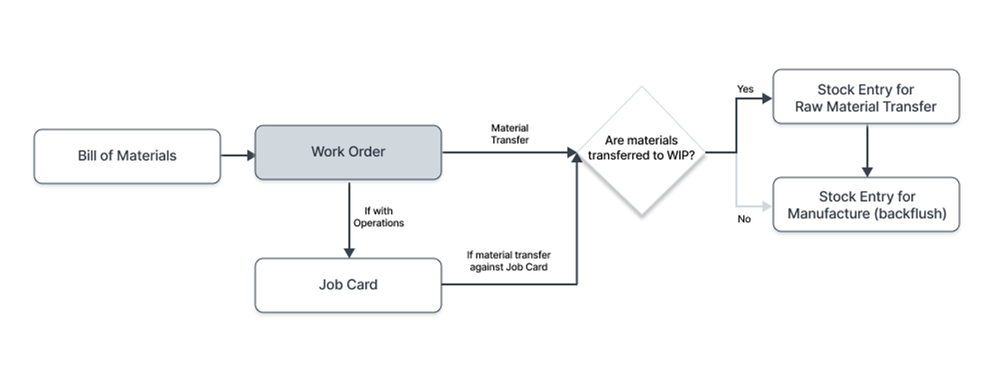
The Work Order also helps prepare the needed material requirements (via Stock Entry) for the to-be-produced Item, according to its corresponding Bill of Materials.
Work Orders may be automatically created from the Production Plan based on confirmed Sales Orders to ensure coordinated production planning. They may also be manually generated in case an ad-hoc manufacturing run is required.
In order to view the list of Work Orders, access:
1. Prerequisites
Prior to creating and applying a Work Order, the following must be set up:
- Bill Of Materials: Specify the final product’s layout consisting of raw material, sub-assemblies, operations, scrap settings, and costing information.
- Operation: Specify each manufacturing operation, such as default workstation and anticipated time.
- Workstation: Categorize or production cells according to features like working hours, hourly rate of cost, capacity and calendar of company holidays to give them adequate scheduling and costing.
2. Workorder Creation
- Click + Add Work Order on the Work Order list.
- Select the item that needs to be manufactured.
- Edit the Item that you want to create. ERPNext reads the default Bill of Materials (BOM) linked with that Item automatically. In the case where there will be numerous BOMs, you will be allowed to choose any BOM.
- Enter the production quantity to make. Only after determining this value will raw material Items be filled into the order. This is to ensure that material requirements are based on real production level.
- If the chosen BOM includes Operations, these will be retrieved into the Work Order. You are able to inspect and edit information like Workstation, Operation Time, Batch Size, and Hourly Rate. The Operations table is in the Operations section of the Production Item tab. See Section 3.3 for more details.
- Fill in the Planned Start Date (in the Time section of the Configuration tab), which serves as an estimate of when production should commence. ERPNext uses this date for capacity planning and scheduling on Workstations, including recognition of holidays or shift timings if configured.
- Use Multi-Level BOM (on the Configuration tab) is selected by default. If this option is turned on, all sub assemblies’ materials will be automatically planned and added. To plan and produce sub assemblies separately, clear this checkbox.
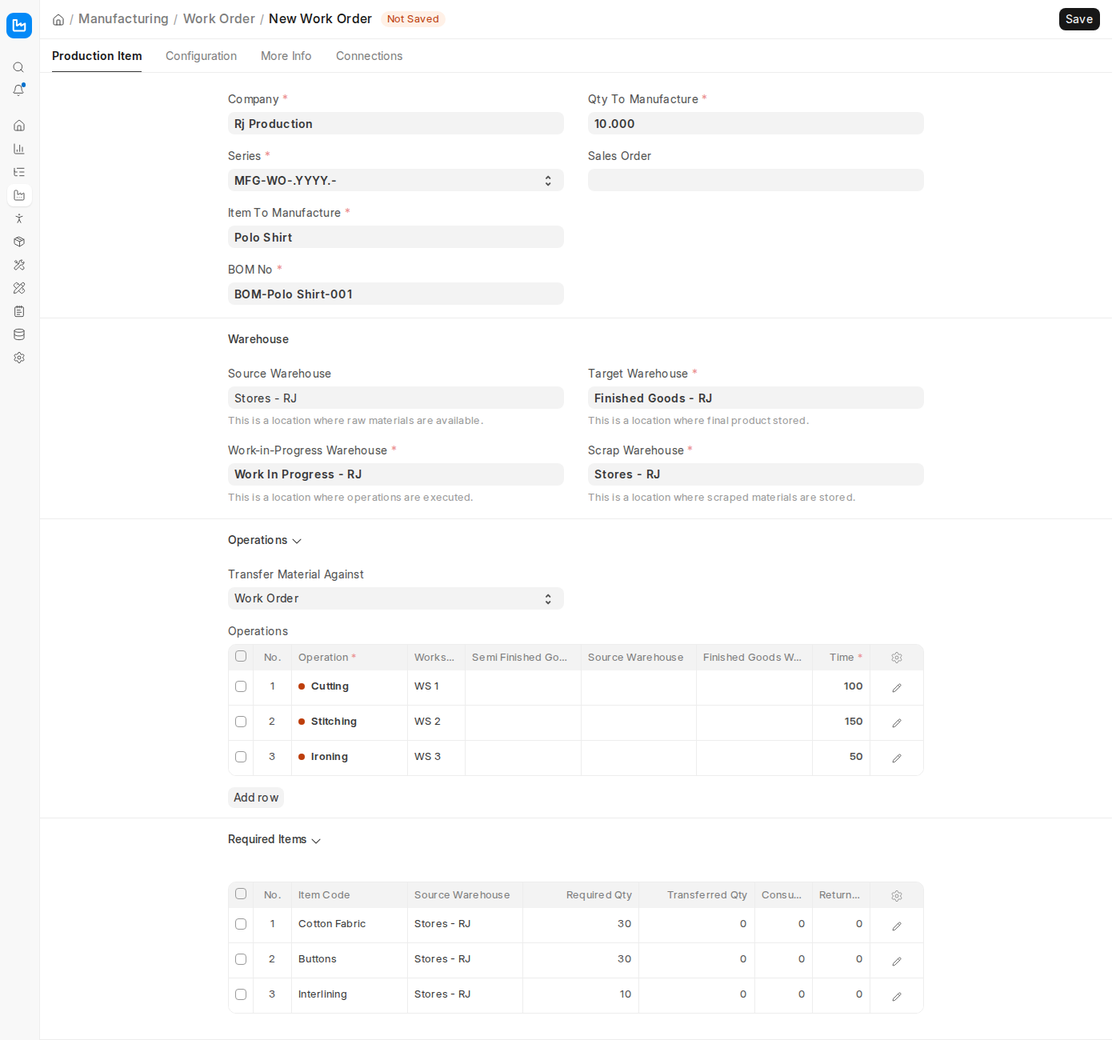
- Set the warehouses in the Warehouse section of the Production Item tab.
- Source Warehouses: Identify the warehouse where raw materials are stocked. When the Work Order is submitted, ERPNext reserves the raw material quantity for production in this warehouse.
- Work in Progress (WIP) Warehouse: Raw materials are moved here when production starts and are consumed from here when the finished goods are made.
- Target Warehouse: Goods are shipped here after production is complete, available for storage or shipping.
- Scrap Warehouse: Used when the BOM produces scrap items, and mandatory in that case. The scrap items are moved to this warehouse when the finished goods are made.
- All the required items (raw materials) are pulled from the related BOM into the Required Items table. You can change the Source Warehouse for a material there when required. As production goes on, the transferred, consumed and returned quantities are tracked in this table.
The Target Warehouse is always required. The Work-in-Progress Warehouse is required unless Skip Material Transfer to WIP Warehouse is ticked, and the Scrap Warehouse is required when the BOM has scrap items. If default Work-in-Progress, finished goods and scrap warehouses are set on the Company (Stock and Manufacturing tab), they are filled in automatically.
Also, a Work Order can be created automatically not only manually but also from a Sales Order. Under a Sales Order trigger, ERPNext captures the item, quantity, and default BOM automatically, making the process of completing the production in less repetition of data entry.
Note: A valid BOM is necessary to continue with Work Order creation.
2.1 Additional Choices when Making a Work Order
Sales Order: When you create a Work Order based on a Sales Order, the system will get automatically the related sales information like the item that is to be manufactured. It is also possible to manually assign (link) an existing Sales Order to the Work Order. The linking guarantees that production is according to customer requirements, and the order status shall be reflected as the Work Order is being carried out.
Project: Associating a Project to a Work Order is helpful for situations like engineer-to-order manufacturing or intricate projects where you would like to monitor in-depth progress. This relationship enables you to track the manufacturing process, monitor expenses, and create reports that account for project schedules and manufacturing milestones.
Allow Alternative Item: In situations when certain manufacturing materials are not available (i.e., substituting plastic beads for plastic crystals), this feature enables you to choose an Alternative Item. Upon checking this checkbox, ERPNext provides a way for you to input an alternate material for production. This is handy in managing stock shortage or replacing alternate materials without halting the manufacturing process.
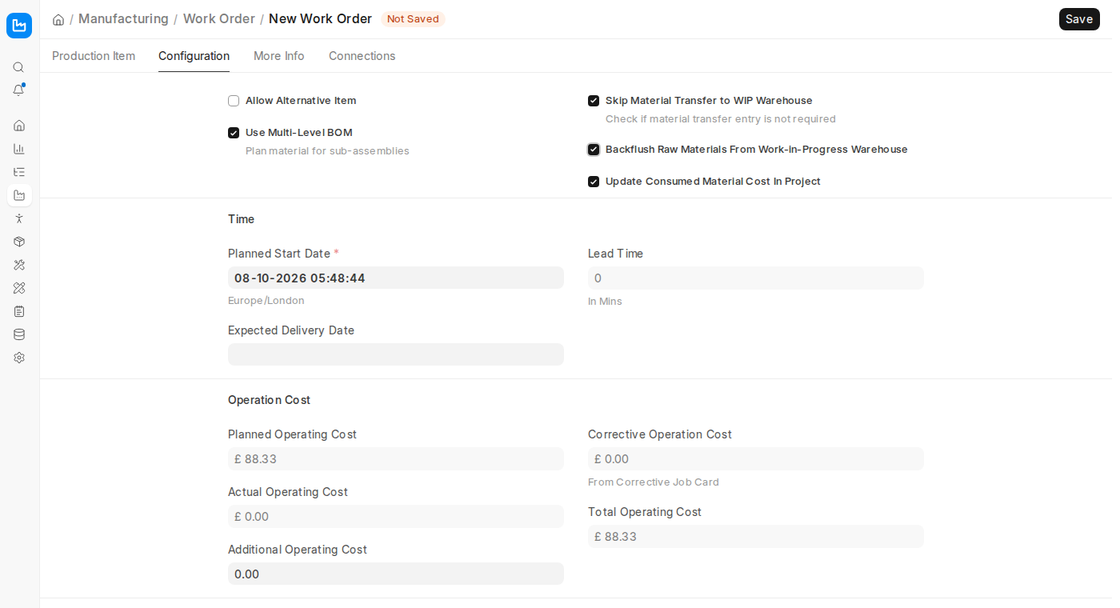
Skip Material Transfer to WIP Warehouse: Normally, raw materials are first moved to the Work In Progress (WIP) Warehouse with a Stock Entry of type Material Transfer for Manufacture, and are consumed from there when the finished goods are made. If you tick Skip Material Transfer to WIP Warehouse (on the Configuration tab), this transfer step is skipped and the raw materials are consumed directly from the Source Warehouse when you click Finish.
Backflush Raw Materials From Work-in-Progress Warehouse: This checkbox appears only when Skip Material Transfer to WIP Warehouse is ticked. With it ticked, the Manufacture Stock Entry consumes the raw materials from the Work-in-Progress Warehouse instead of the Source Warehouse. Use it when the materials are already placed in the WIP Warehouse by other means, for example a separate Stock Entry.
3. Features
3.1 Time
The Planned Start Date and Expected Delivery Date may be entered here. These fields are in the Time section of the Configuration tab, together with the Planned End Date and Lead Time. The Planned Start Date takes the date and time of creation of the Work Order by default. These dates are essential in planning and scheduling production operations and assist the Production Planners in coordinating resource availability and shop floor activity.
The Expected Delivery Date may be manually set based on the customer requirements or on internal due dates or on related Sales Order. The date is important in Production Planning Reports and can cause notices or dependencies in other Projects.
3.2 Required Items Table
In this table, all the raw material items required to make the product of choice are listed. The information is pulled from the associated Bill of Materials (BOM), and every row is an item with expanded control fields. The Source Warehouse for an item can be altered manually here. If a Source Warehouse is set on the Work Order, it is used for all rows. Otherwise it comes from the BOM item or the item’s default warehouse.
Following are important fields in the Required Items table:
- Required Quantity: Based on the BOM and the production quantity defined in the Work Order, automatically calculated. It indicates the precise quantity of raw material required for producing the finished product.
- Transferred Quantity: After submitting the Work Order and starting the production, raw materials are transferred from the Source Warehouse to the Work In Progress (WIP) Warehouse. This field indicates the quantity physically moved to WIP. If Skip Material Transfer to WIP Warehouse is ticked, this field is not updated, since no transfer entry is made.
- Consumed Quantity: This figure is refreshed when the WIP warehouse materials are utilized during production, and the goods are finished and transferred to the Target Warehouse. It allows real raw material consumption monitoring.
- Allow Alternative Item: For every row, whenever raw materials are unavailable, checking this box allows the selection of an alternative item from the Item Alternative list. This is particularly handy in ensuring production continuity in case of material shortages.
- Include Item In Manufacturing: Taken from the BOM. When it is unticked, the item is not transferred or consumed against the Work Order.
- Returned Qty: The quantity sent back from the WIP Warehouse with Return Components (see Section 4.1).
- The row also shows Stock Reserved Qty, Is Additional Item and Is Customer Provided Item.
- After the Work Order is Saved, the below fields will also be filled based on actual stock levels available:
- Available Qty at Source Warehouse: Shows the real stock available at the chosen source warehouse.
- Available Qty at WIP Warehouse: Displays the present stock of the item in the Work In Progress warehouse.
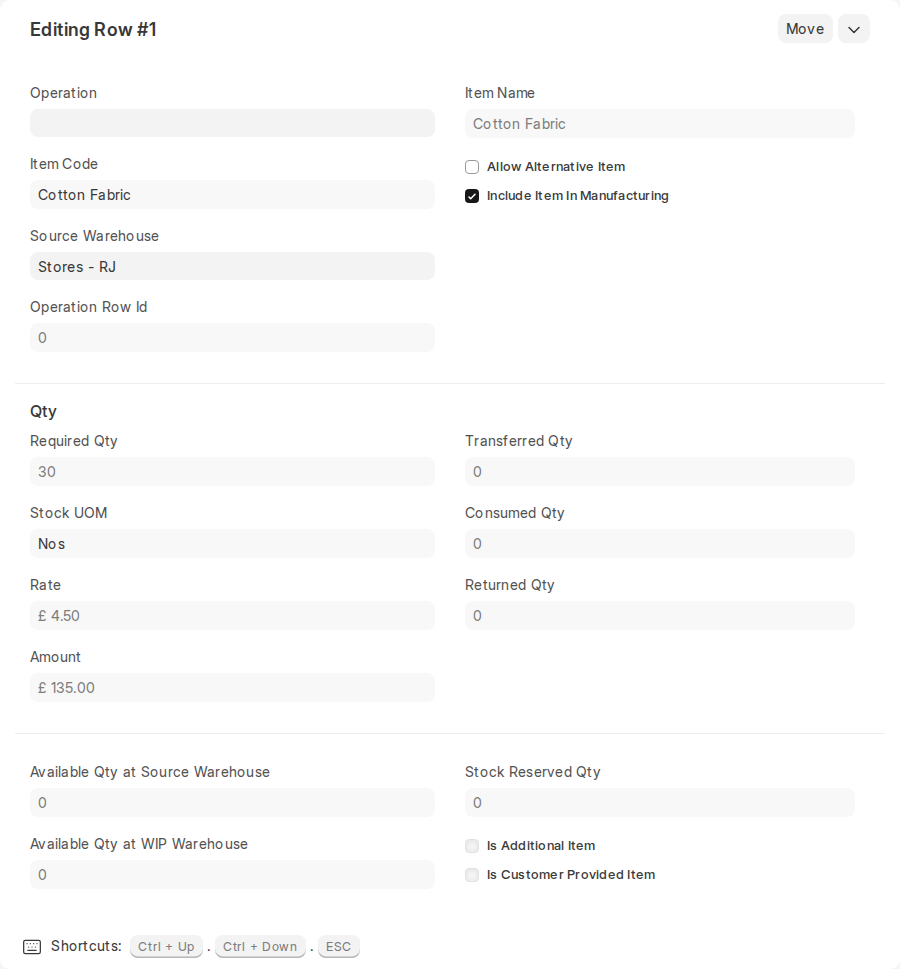
These real-time inventory data enable the manufacturing team to make timely determinations of material readiness prior to or concurrent with manufacturing, eliminating delays due to stock unavailability.
3.3 Operations Table
The Operations table within the Work Order shows all of the manufacturing operations needed to make the chosen product. This information is typically retrieved from the Bill of Materials (BOM) if the BOM is set with operations, but these can be manually altered within the Work Order. The table is in the Operations section of the Production Item tab.
Material Transfer: Production materials can be transferred against the Work Order or against single Job Cards. This is set in the Transfer Material Against field, just above the Operations table. It is taken from the BOM unless you change it.
When a BOM is selected:
- In the Operations table, the following are retrieved:
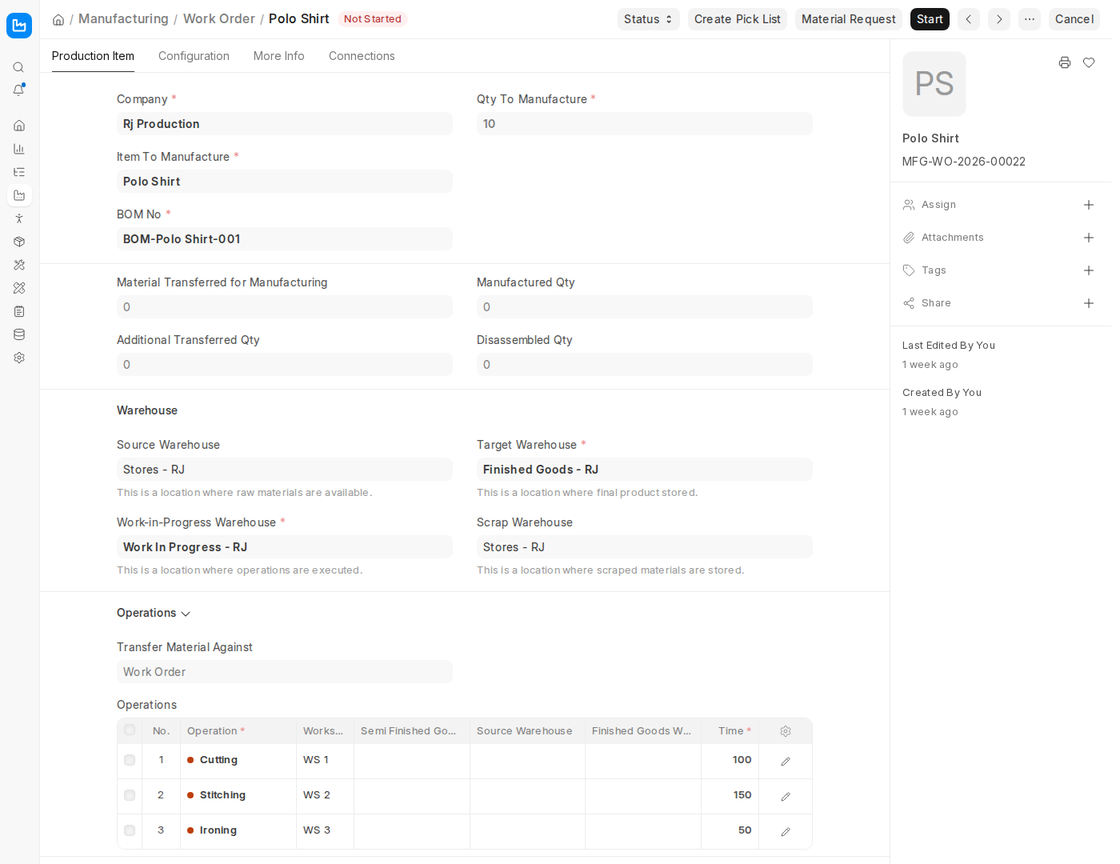
- Operation: The operation type to be carried out (e.g., Cutting, Assembling).
- Workstation: The station or location where the operation will be performed.
- Operation Time: Time allotted per operation, in minutes.
- Hour Rate: Taken from the Workstation and used to calculate operating costs.
In the Items table, the system will automatically allocate:
- Item-wise Operations: Which operation(s) will be performed on each item.
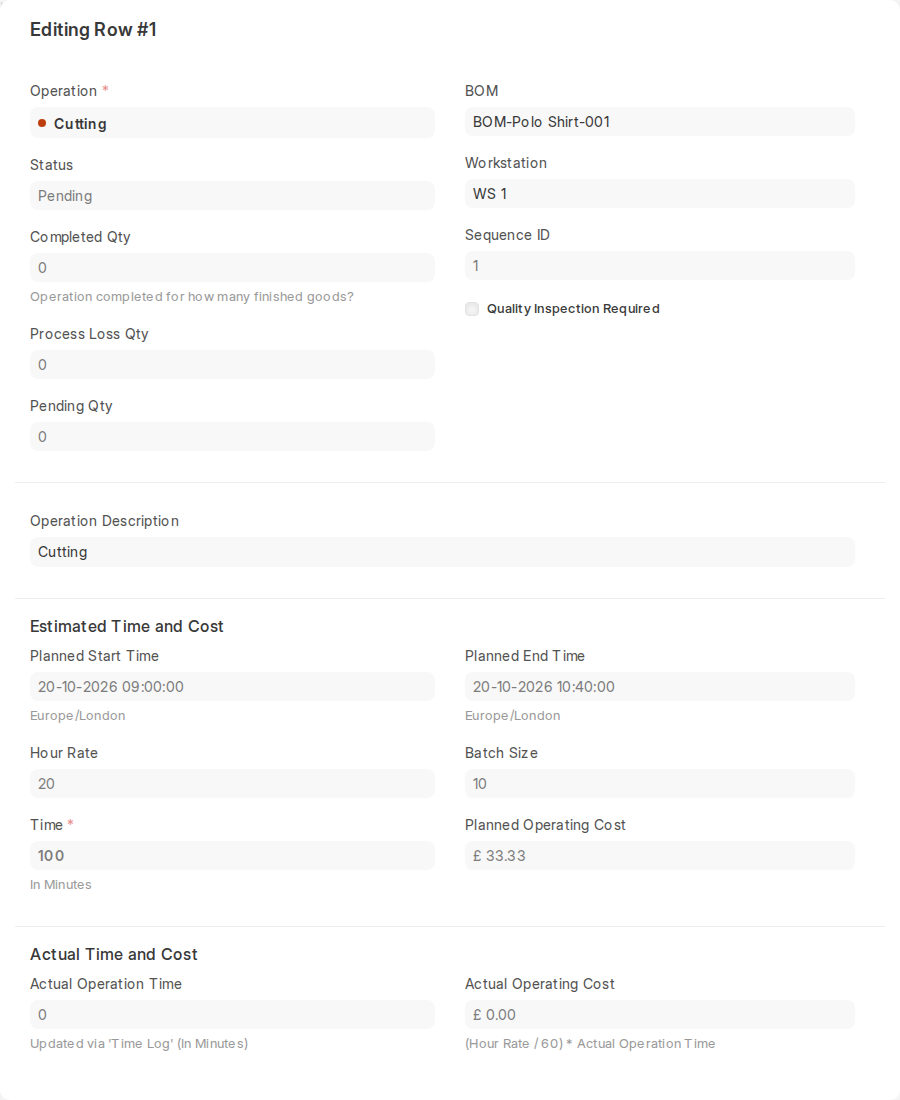
These can be edited after selection if there is a need for customization during production planning.
Upon saving the Work Order, the fields below are made visible and auto-populated based on Job Cards:
- Completed Qty: Quantity of units for which the operation has been completed.
- Status: Shows real-time progress of the operation. Statuses are:
- Pending: Operation has not been initiated.
- Work in Progress: Operation is in progress.
- Completed: Operation is performed for the planned quantity.
- Operation Time: Originally retrieved from the BOM, but editable per operation according to production planning.
- Planned Operating Cost: It is obtained as follows:
Planned Operating Cost = Hour Rate × Time (in minutes) / 60
The system will also be automatically updated like this:
- Actual Operation Time
- Actual Operating Cost
- Actual Start Time
- Actual End Time
These values allow effective comparison of the planned and the actual performance and variance analysis of time / costs.
3.4 Operation Cost
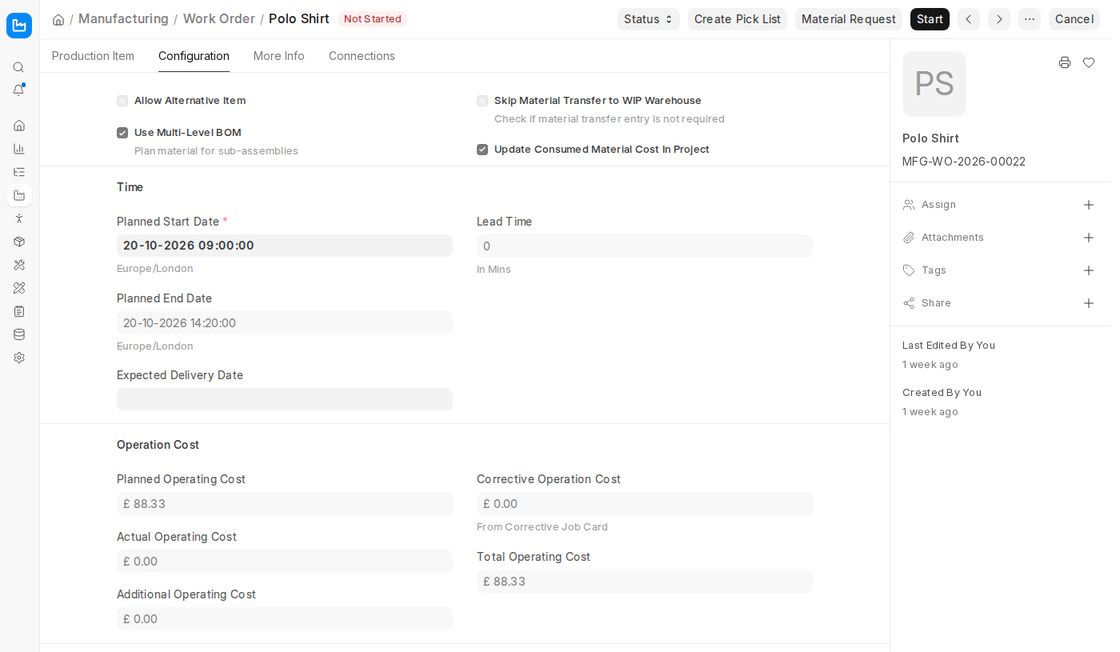
The Operation Cost section (on the Configuration tab) of a Work Order provides an overview of the cost structure on the basis of operations and actual performance from the floor.
The following fields are shown and updated based on BOM configuration and Job Card execution
- Planned Operating Cost: Calculated from the operation time and hourly rate specified for every operation. It provides an initial impression of the cost to be incurred prior to actual production.
- Actual Operating Cost: Automatically calculated as per Job Card activity. This represents the actual cost incurred during making the item, taking into account any delay or any change in efficiency.
- Additional Operating Cost: Field for free entry of any other, unforeseen, or overhead expenses borne during production (e.g., third-party processing charges, utility surges, temporary labor).
- Corrective Operation Cost: Cost of corrective operations, taken from corrective Job Cards.
- Total Operating Cost: Calculated field as:
Total Operating Cost = Actual Operating Cost (or Planned Operating Cost while no actual cost is recorded) + Additional Operating Cost + Corrective Operation Cost
These cost-related fields aid in finding and balancing the gap between estimated and actual cost of manufacture, enabling appropriate product pricing and margin analysis.
3.5 Information on item and references to sources
On the More Info tab of the Work Order, the Item Description and the Stock UOM (Unit of Measurement) of the item being produced are shown automatically. Their values can be taken off the Item Master and provide information regarding which product is being produced and also the unit in which it is produced (e.g. Nos., Kg, Liters).
If the Work Order was created from a Material Request (as is typically the case where material planning is being accomplished via a Production Plan or Sales Order), the link to the underlying Material Request will be found here. The traceability of procurement planning to subsequent manufacturing execution is enabled by this relationship.
3.6 Transferring Materials for Manufacturing
Once a Work Order is submitted, the next action is to transfer raw material from the Source Warehouse to the Work-in-Progress (WIP) Warehouse for beginning the manufacturing process. This transfer is recognized as a Stock Entry of the type Material Transfer for Manufacture.
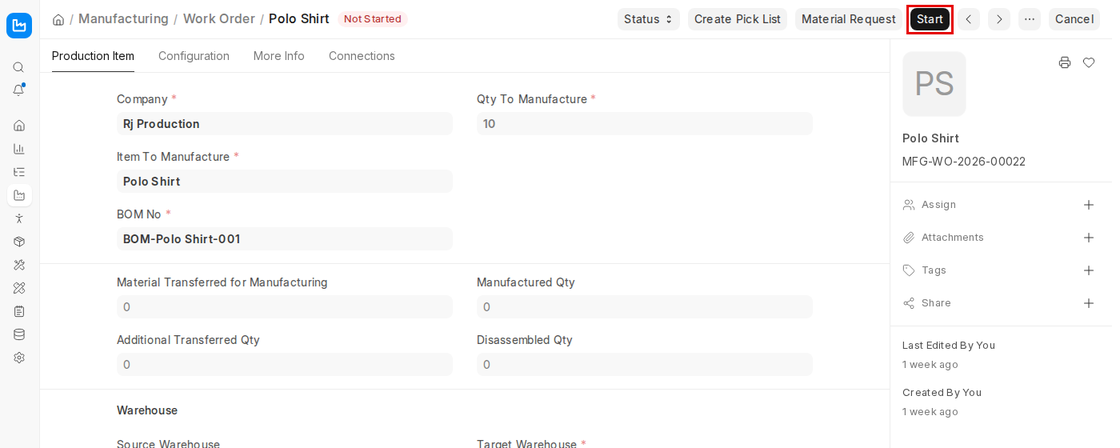
Step-by-Step Process:
- Click ‘Start’ on the submitted Work Order. (The Job Cards for the operations are already created when the Work Order is submitted.)
- Select the quantity A Select Quantity dialog asks for the Qty for Material Transfer for Manufacture. It defaults to the quantity not yet transferred. You can enter a smaller quantity for partial production runs or when working with limited WIP space. Click Create.
- Review the Stock Entry A new Stock Entry of type Material Transfer for Manufacture opens with the raw materials from the Work Order. If Use Multi-Level BOM is ticked on the Work Order, sub-assemblies are exploded into their raw materials. If not, sub-assemblies are transferred as-is.
- Submit the Stock Entry After checking the quantities and the source/target warehouses, submit the Stock Entry.
Submitting moves the raw materials from the Source Warehouse to the WIP Warehouse, updates the Transferred Qty on the Work Order and changes its status to In Process.
This gives proper movement of inventory and real time display of raw material in the shop floor.
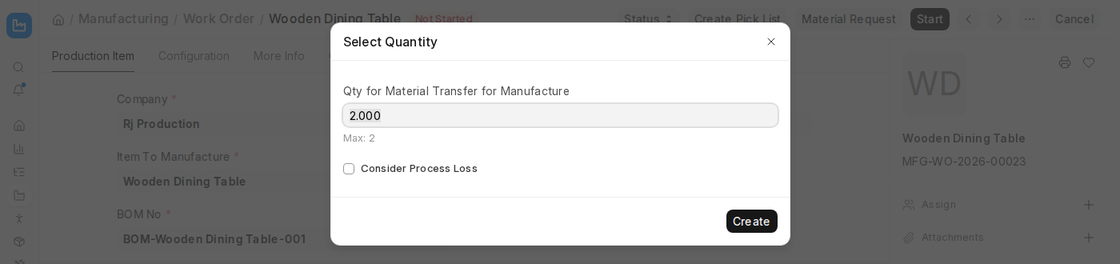
3.7 Material transfer by means of stock entry (manual flow)
There are manufacturing settings in which there is a separation between the processes of Work Order execution and material transfer, or they are controlled by other personnel (e.g., storekeeper vs. production supervisor). In these cases, ERPNext supports a manual material transfer workflow.
Use Cases:
- Bulk transfer of raw materials which are not work order-specific.
- Material handling responsibilities are delegated to a user aside from production tracking.
- Particular manufacturing streams where rigorous integration between Work Order and inventory is not essential.
How to Use:
- On the Work Order’s Configuration tab, tick ‘Skip Material Transfer to WIP Warehouse’.
- This deactivates the automatic requirement for creating a Material Transfer for Manufacture record.
- It is particularly helpful when everything is already at the WIP Warehouse or is brought manually in advance.
- When production is ready to finish, click on the ‘Finish’ button.
- This makes a Stock Entry of type Manufacture directly.
- The raw materials are consumed directly from the Source Warehouse, or from the WIP Warehouse if Backflush Raw Materials From Work-in-Progress Warehouse is ticked, and the finished goods are added to the Target Warehouse.
This strategy allows for customized workflows, particularly in low-complexity or manually controlled shop floor setups.
3.8 Job Card Creation
Job Cards are utilized to track actual work progress, time taken, and operation status on the shop floor. They are required for monitoring execution accuracy, labor utilization, and cost control.
Working of Job Cards in ERPNext:
- Automated Draft Generation When a Work Order is submitted, draft Job Cards are automatically created from its operations. At least one Job Card is created for each operation (more if the quantity is split by the operation’s batch size), which can then be edited, begun, suspended, or completed.
- Creating Additional Job Cards If additional Job Cards are required—e.g., for individual batches or work shifts—you can make them manually from the Job Card list by selecting the Work Order and operation.
- Manual Flexibility Each Job Card can be allocated to a particular Employee, Workstation, and Planned Start/End Time. This provides in-depth tracking of each phase of manufacturing.
- Operations Update When Job Cards are finished, their progress updates the status of the related operation within the Work Order. Time logs and actual times entered here also feed into operation costing. For deeper usage and tracking functionality, ERPNext offers a specific Job Card module within the Manufacturing category.
3.9 Finished Goods Update
After production is finished (either fully or partially), you will need to record the output of finished goods. It is accomplished by updating the Work Order to shift produced items out of the Work-in-Progress (WIP) Warehouse and into the Target Warehouse that contains finished goods.
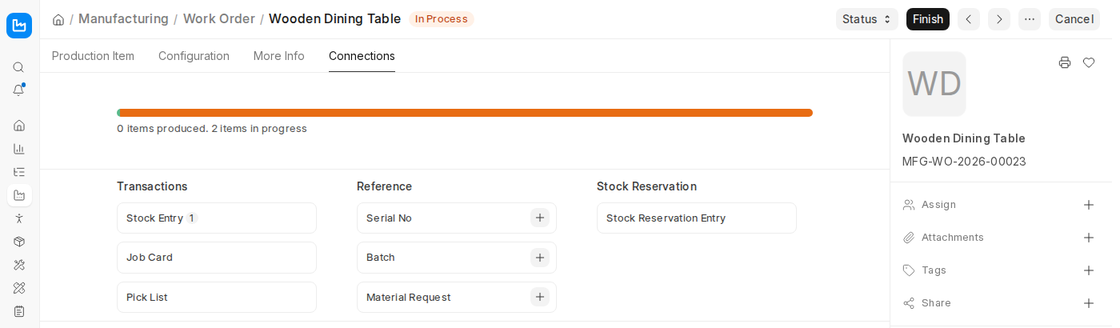
Updating Finished Goods Steps:
- Click ‘Finish’ on Work Order It signifies manufacturing completion for a batch or the total Work Order quantity.
- Enter Quantity Produced A Select Quantity dialog asks for the Qty for Manufacture. It also has a Consider Process Loss option. You can partially or completely finish the Work Order. ERPNext allows batch-wise manufacturing, so you can finish and stock step by step by indicating the precise quantity being manufactured in every run.
- Stock Entry Creation After you click Create, a Stock Entry of type Manufacture is created. On submission it:
- Subtracts the raw materials and sub-assemblies from the WIP Warehouse
- Adds the finished goods to the Target Warehouse
- Auto Consumption (Backflush) The raw materials to consume are filled in automatically according to the Backflush Raw Materials Based On setting in Manufacturing Settings (BOM or Material Transferred for Manufacture), so no manual posting is needed.
- Partial Completion Flexibility Having the option to partially update finished goods is especially helpful when:
- Production is done in small batches
- There is limited WIP storage
- Quality checks need to be done prior to stocking the whole quantity
This process guarantees that the inventory system represents current updates for raw material usage and availability of finished goods.
3.10 Work Order Capacity Planning
ERPNext offers capacity planning in working on the Work Order if the Work Order has a defined list of operations to which ERPNext will automatically schedule based on the Planned Start Date and the Workstation availability.
How Capacity Planning Works:
- Automatic Scheduling on Submission At submission, the Work Order is scheduled for every operation sequentially according to:
- The Planned Start Date that has been entered in the Work Order.
- The availability and schedules of every associated Workstation.
- The Holiday List and the pre-books on the Workstation.
- Draft Job Cards with planned times For every operation, the system creates a draft Job Card with its planned start and end time in a free slot. The Job Cards are not submitted automatically, so you can review or change them later.
- Slot Reservation and Operation Sequencing The system guarantees that no two operations are scheduled for the same Workstation at overlapping times. Operations are booked one after another: each operation is scheduled after the previous one ends, plus the Time Between Operations (Mins) set in Manufacturing Settings.
- Scheduling Window In Manufacturing Settings, Capacity Planning For (Days) defines how many days ahead the system looks for free slots. It defaults to 30 days. You can modify this value higher or lower depending on your manufacturing environment.
- Handling Capacity Conflicts If no free slot is found for an operation within that window, ERPNext stops the submission with the message “Unable to find the time slot in the next {days} days for the operation {operation}”. You can then:
- Increase Capacity Planning For (Days) in Manufacturing Settings, or
- Change the Planned Start Date or the Workstation.
This planning saves wastage of resources and avoids scheduling conflicts on the shop floor. To turn it off, tick Disable Capacity Planning in Manufacturing Settings.
4. Stopping a Work Order
There may be cases in which a Work Order has to be halted—due to quality issues, raw material supply, equipment breakdown, or cancellation of a customer order.
Stopping a Work Order:
- Check the raw materials first. Material that is still in the Work In Progress (WIP) Warehouse stays there while the Work Order is stopped. ERPNext does not block Stop for this, so decide whether the material will be:
- Consumed in manufacture later, or
- Sent back to the Source Warehouse with Return Components once the Work Order is Completed or Closed (see Section 4.1).
- Stopping the Work Order
- Open the Status menu on the Work Order and click Stop.
- The Work Order status will be changed to Stopped, meaning the production processes have been officially halted.
- The same menu also has Close. Closing is final: ERPNext warns “Once the Work Order is Closed. It can’t be resumed.”
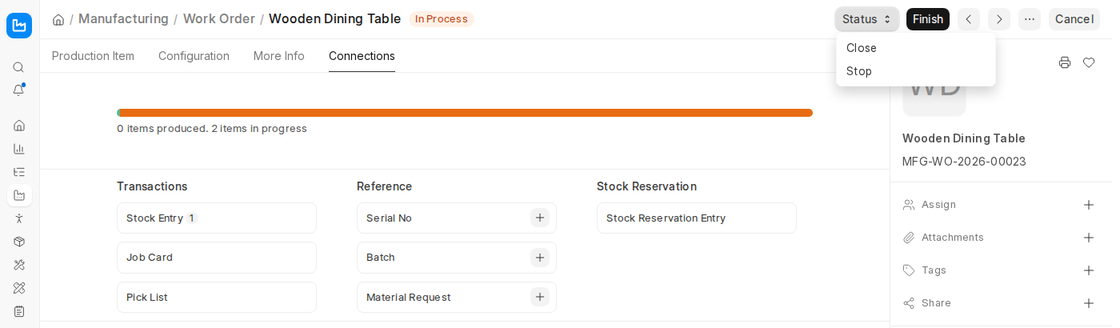
- Reopening a Work Order A stopped Work Order may be reopened if required. To reopen it:
- Open the Status menu on the stopped Work Order and click Re-open (the menu also offers Close).
- The status goes back to match the progress, for example In Process or Not Started, so you can resume production.
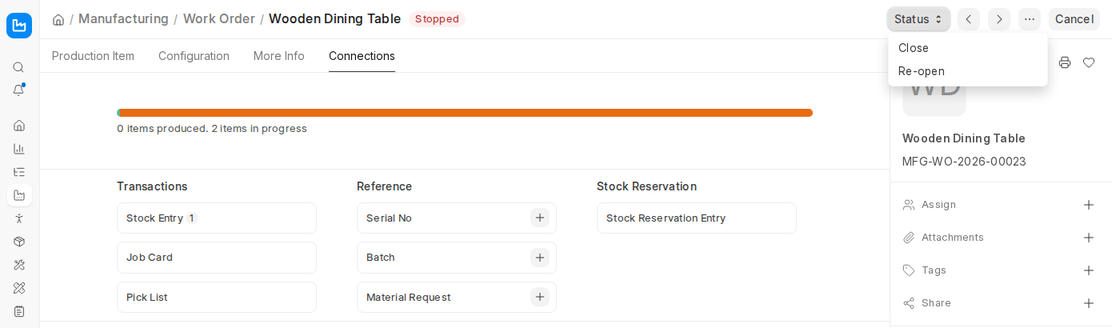
Suspending and reinstating Work Orders is especially useful for managing surprise disruptions or rescheduling within the production stream.
4.1 Revert Non Consumed Materials to the Stores from WIP Warehouse
If you have routed extra or surplus raw materials to the Work In Progress (WIP) Warehouse and upon completion of the Work Order such materials are not utilized, ERPNext enables you to revert the unused materials back to the original (Store) warehouse so that your inventory levels remain accurate.
To do this, go to the concerned Work Order and click on the “Return Components” button. This will create a Stock Entry of type “Material Transfer for Manufacture”, but in reverse direction — i.e., from the WIP Warehouse to the original source warehouse. Check the entry, then save and submit it. If you work with more than one company, also check the Company field on this Stock Entry before saving: in ERPNext v16 it can open with your default company instead of the Work Order’s company.
The system only returns unconsumed quantities of material. In case partial quantities were used up from the batch that was transferred, only the balance remaining will be shifted back. This assists in the prevention of wastage and enhances accountability of raw materials throughout production stages.
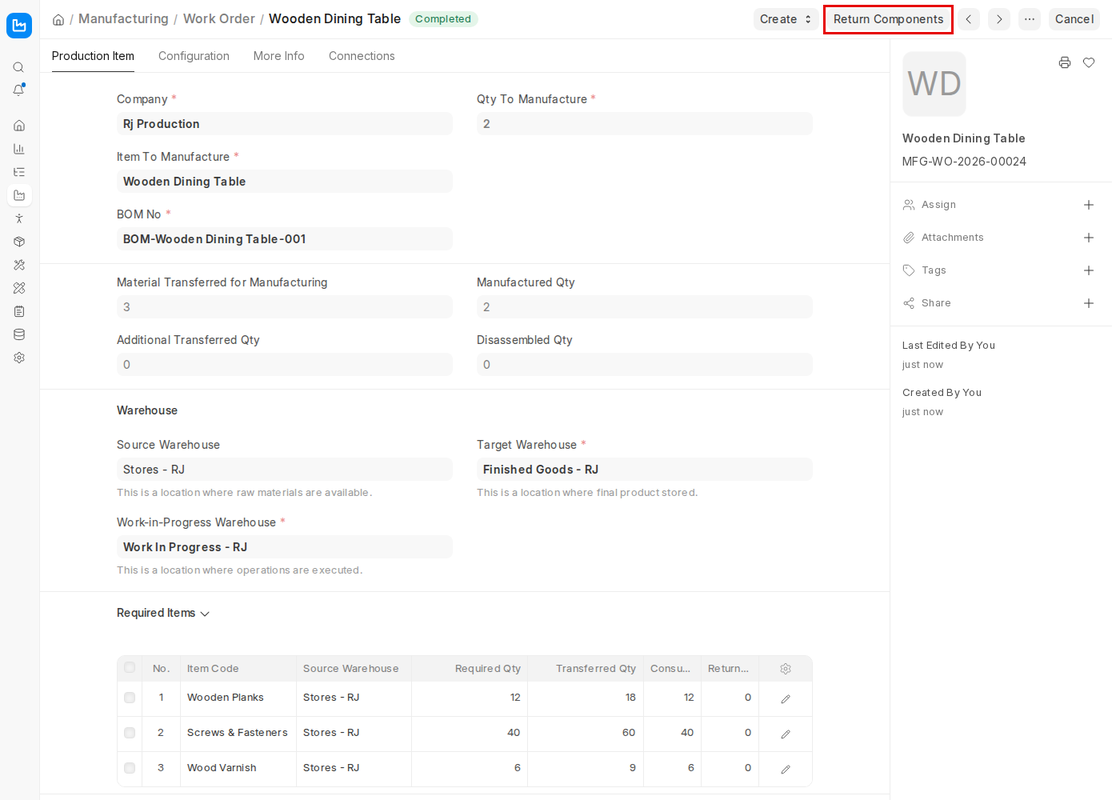
Note: The Return Components button only appears when the Work Order is Completed or Closed and some of the transferred material has not been consumed.
Return Components
The moment this return stock entry is submitted, inventory will be updated in the source warehouse accordingly. This also assists in improved monitoring of material efficiency and reduced material holding cost in the WIP warehouse.
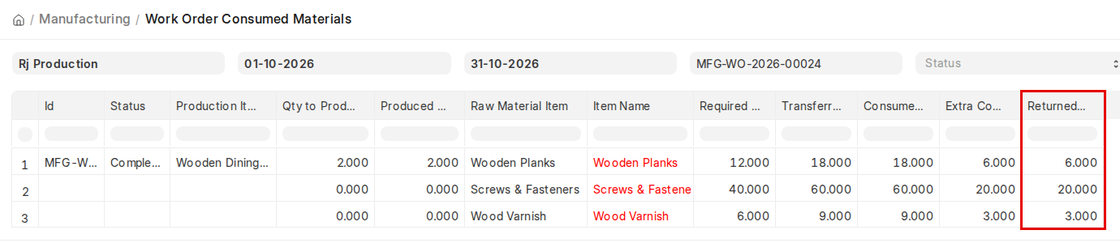
To track and check returned quantities, utilize the Work Order Consumed Materials report. This report shows all materials issued, consumed, and returned against each Work Order, providing an overall view of material movement and consumption accuracy. It lists Work Orders that are In Process, Completed or Stopped (Closed Work Orders are not shown), created within the selected date range.