
Journal Entry
A journal entry is a transaction that is made in the company’s general ledger book that records every transaction carried out with a date. Each entry in the journal serves an individual purpose.
Journal Entries are also used to capture all non-cash-based transactions or for transactions other than sales and purchases. Journal entries involve accounting, wherein the credits and debits must also offset with the ledgers to avoid an imbalance.
It is common to use Journal Entries for adjustments, opening balances, depreciation, transfers between cash and bank accounts (contra entries) and similar entries. Examples of how it is used include, but are not limited to, operating expenses such as payment for fuel, overhead expenses, date correction, or adjustment to the output invoiced amount.
You can navigate through the Journal Entry list through:
1. How to Create New Journal Entry
- Open the Journal Entry list and click + Add Journal Entry to start a fresh entry.
- The default Entry Type is ‘Journal Entry’, which is used for a wide range of transactions.
- You may also use a Journal Entry Template by choosing it in the From Template field (on the More Info tab).
- Select the company in the Company field. For instance, here Demo Company means this entry is for the company named Demo Company.
- If needed, you may modify the Posting Date.
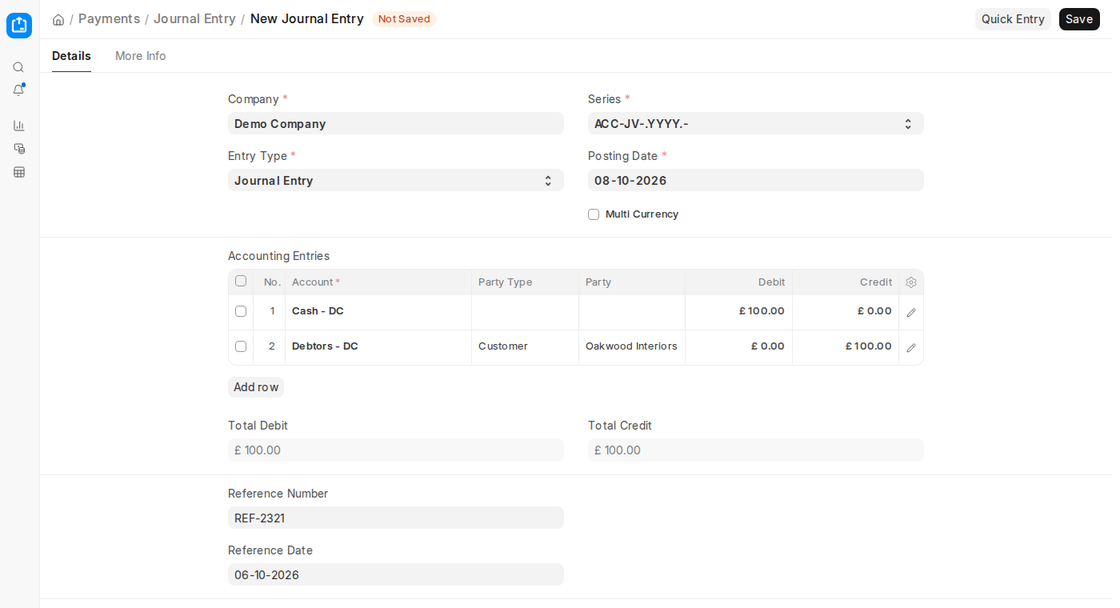
- In the Accounting Entries table, add a row for the account to be debited and enter the Debit amount.
- If the account is a receivable or payable account (for example Debtors), choose the Party Type and Party.
- Add a row for the account to be credited and enter the Credit amount.
- Make sure that the total debit and credit amounts are equal.
- Click Save and Submit.
1.1 Quick Entry
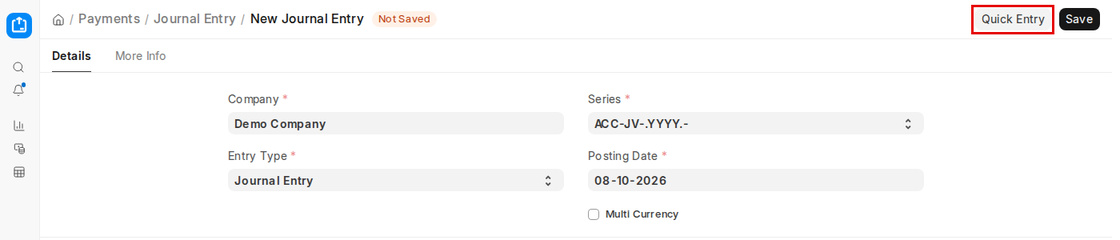
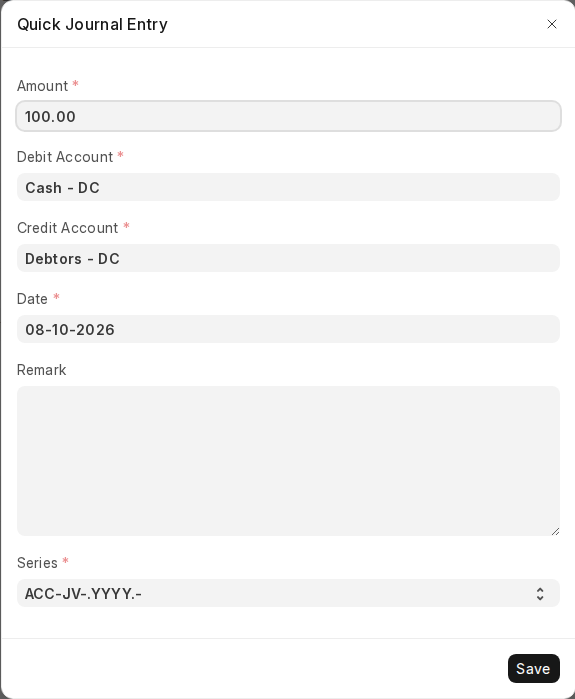
When you are creating a new Journal Entry (before it is saved), you will see a Quick Entry button at the top right side. This function makes the process quicker by providing the ability to enter:
- The amount
- Choose the debit account, for example Cash – DC
- Choose the credit account, for example Debtors – DC
- Select the posting date
- And add a remark if necessary. When you click Save, the system fills the Accounting Entries table with the entered details.
2. Features
2.1 Accounting Entries
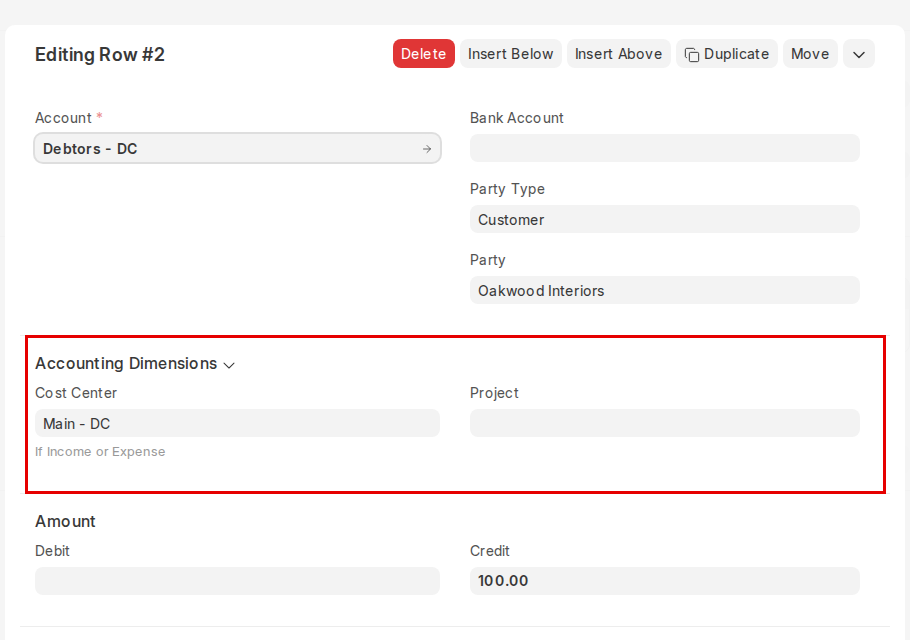
Open a row of the Accounting Entries table (edit icon) to see all its fields.
1- Accounting Dimensions: You can attach a Project or Cost Center to separate costs.
2- Bank Account: For a bank row, you can select the company’s Bank Account record.
3- Reference Type and name: You can link the journal entry to a referencing transaction. Suppose the journal entry has to do with a certain Sales Invoice, then link the entry to the invoice to synchronize the outstanding amount.
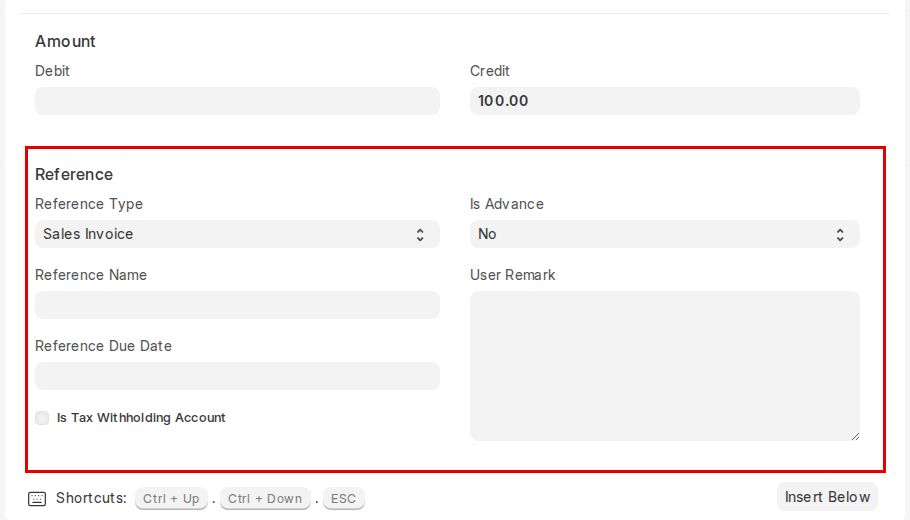
Under Reference Type, following documents are allowed to link:
- Sales Invoice
- Purchase Invoice
- Journal Entry
- Sales Order
- Purchase Order
- Expense Claim
- Asset
- Loan
- Payroll Entry
- Employee Advance
- Exchange Rate Revaluation
- Invoice Discounting
- Fees
- Full and Final Statement
- Payment Entry
- Bank Transaction
Is Advance: If the payment is an advance from a customer (or to a supplier), choose Yes. This will associate the journal entry with the transaction indicated in the Reference Name field.
User Remark: Enter any other comments regarding this row in this field.
2.2 Reverse Journal Entry
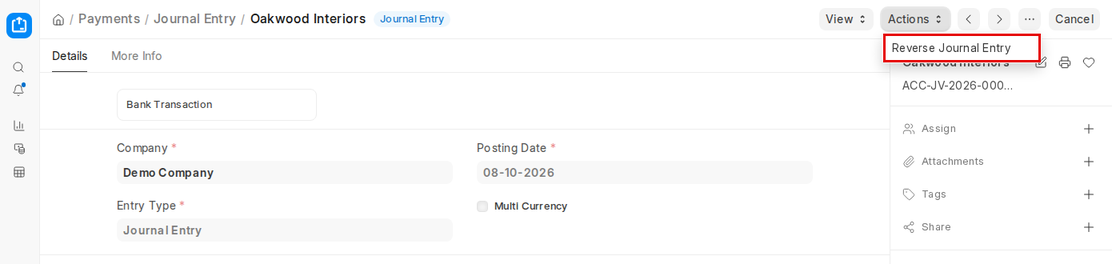
You can reverse a submitted journal entry from Actions > Reverse Journal Entry. This opens a new Journal Entry with the debit and credit amounts swapped, linked to the original through the Reversal Of field. Save and submit it to post the reversal.
2.3 Referencing
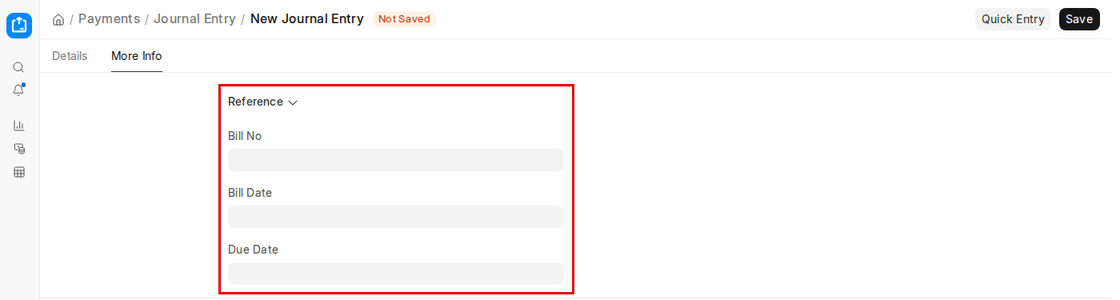
You can manually input a Reference Number and Reference Date (on the Details tab, below the totals) for a transaction not posted in the ERPNext system. The feature comes handy when a bill was posted offline, for example:

Offline reference fields (in the Reference section of the More Info tab):
1- Bill No
2- Bill Date
3- Due Date
2.4 Best Practices for Journal Entries
1. Clear Descriptions: Use clear and descriptive references and remarks for each journal entry.
2. Balanced Entries: Ensure that the total debits equal the total credits in every journal entry.
3. Regular Reconciliation: Periodically reconcile journal entries with bank statements and other financial records.
4. Audit Trail: Maintain a clear audit trail by documenting the purpose and approval of each journal entry.
2.5 Multi-Currency Entries
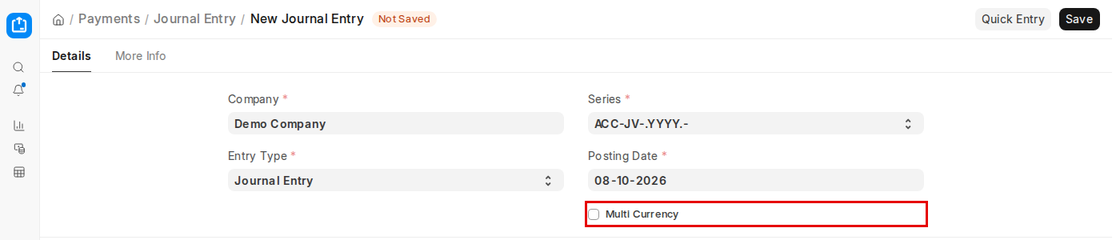
If the accounts you are choosing are in different currencies, tick the Multi Currency box (on the Details tab, below the Posting Date). This will enable you to choose foreign currencies and show the exchange rate. If this box is not ticked, you can only choose the base currency.
2.6 Journal Entry Template
By choosing a template, you can automatically enter the following information into the journal entry:
- Template Title
- Journal Entry Type
- Series
- Company
- Is Opening
- Multi Currency
- Accounting Entries
2.7 Print Settings
The Printing Settings section is on the More Info tab.
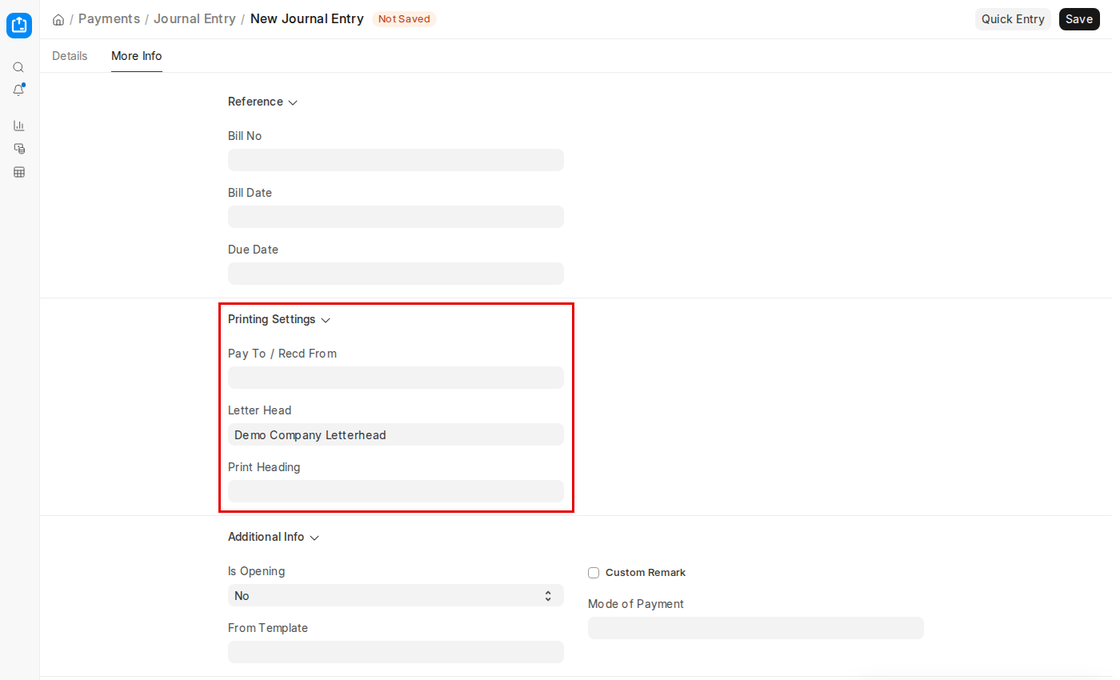
Pay To / Received From: Use this as the name of the person or business you’re making a payment to in the journal entry.
- If you’re paying someone, you enter their name here (such as “Ali Traders”).
- If you’re receiving money, enter the name of the person paying the amount (such as “Rohan”).
Why it matters?
Because the name will appear on the hardcopy document, particularly if you’re printing a cheque. It clearly indicates the money is for or from whom, keeping everything tidy and concise.
Letter Head: This is regarding how your printed journal entry will appear. If you select a Letter Head, your company’s logo, address, and formal design will be included in the printout. Similar to a letter you print on your company’s formal pad.
Why it matters?
It gives your document a professional appearance. This is useful when presenting to clients, banks, or auditors. It adds an official feel to the entry.
Print Heading: This allows you to modify the title of the Journal Entry when you print.
Rather than constantly displaying “Journal Entry” in the top, you can name it something such as:
- Payment Voucher
- Cash Refund
- Adjustment Note
Why it matters?
Occasionally you would prefer the document title to be accurate to what the entry actually is for. This helps other people more easily see the purpose at first glance.
2.8 More Information
These fields are in the Additional Info section of the More Info tab.
1- Mode of Payment: Identify whether payment was by wire transfer, bank draft, credit card, cheque, or cash. You may also include additional payment modes if desired.
2- Is Opening: If the entry is an opening balance, indicate this field as Yes.
3- From Template: If a template is chosen, the current entries will be erased before posting the template data. You may include additional accounts later.
3. Journal Entry Types
There are various types of journal entries that can be posted in ERPNext. In v16 the Entry Type options are Journal Entry, Inter Company Journal Entry, Bank Entry, Cash Entry, Credit Card Entry, Debit Note, Credit Note, Contra Entry, Excise Entry, Write Off Entry, Opening Entry, Depreciation Entry, Asset Disposal, Periodic Accounting Entry, Exchange Rate Revaluation, Exchange Gain Or Loss, Deferred Revenue and Deferred Expense (several of these are normally created by the system). Below is a list of the most frequently used ones:
3.1 Journal Entry
This is an all-purpose entry for a variety of transactions. Below are a few examples:
Expenses (Non-Accruing):
At times, costs do not necessarily have to be accrued and can be posted directly. For example, telephone bills or travel allowance can be debited in the Expense Account and credited to the Cash or Bank Account on payment.
Debit: Expense Account (Telephone Expense)
Credit: Bank or Cash Account
Crediting Salaries:
Salaries of employees can be credited through a journal entry.
Debit: Salary components
Credit: Bank Account
3.2 Inter-Company Journal Entry
When there are transactions between a parent and subsidiary companies, sister companies, or companies belonging to the same group, you can make an Inter-Company Journal Entry. This type of entry facilitates recording financial transactions between related parties.
3.3 Bank Entry
This entry is made when payments are received or made through a bank account. For instance, payment of entertainment expenses through the company’s bank account.
3.4 Cash Entry
A Cash Entry is similar to a Bank Entry, except money going into or out of a bank account is replaced by money going into or out of a Cash Account.
When do you use it?
- When you receive cash from a customer.
- When you make payment to a supplier from the office drawer.
Example:
Suppose you sold goods for Rs. 5,000 and your customer pays you in cash. You can record it with a Cash Entry (debit your Cash Account, credit the customer’s receivable account with the Party), or with a Payment Entry using Mode of Payment = Cash. This keeps you aware of how much money is with the firm at any given time.
3.5 Credit Card Entry
Use a Credit Card Entry if payments are received through a credit card. This entry keeps you well aware of all the credit card transactions all at once.
When do you use it?
- When your firm pays a supplier with a credit card.
- When you receive payment from a customer through credit card.
Example:
You purchased office stationery of Rs. 3,000 on your company’s credit card. You can record it with a Credit Card Entry (debit the expense account, credit your Credit Card Account), or with a Payment Entry using Mode of Payment = Credit Card. This keeps your books clean and makes it simple to reconcile credit card bills in the future.
3.6 Debit Note
A debit note is created when goods are returned to a supplier. You can post a debit note directly from a Purchase Invoice.
When returning goods:
- Debit: Supplier Account
- Credit: Purchase Return Account
This note means that the firm is requesting a refund or offsetting the value of returned goods against another invoice.
3.7 Credit Note
A credit note is sent to a customer where goods are being returned. A credit note serves as evidence that a customer is owed an adjustment or refund.
When returning goods:
- Debit: Sales Return Account
- Credit: Customer Account
This note is generally prepared when the company must make a customer’s payment for the returned products.
3.8 Contra Entry
A Contra Entry is prepared when the transaction is between the same company’s cash and bank accounts, e.g.,
1- Cash to Cash
2- Bank to Bank
3- Cash to Bank
4- Bank to Cash
This entry is made to record internal fund transfers, such as paying cash into a bank account or drawing cash from the bank.
3.9 Excise Entry
When buying items that have excise duty involved, this entry type captures the transaction:
On purchase (paying excise):
1- Debit: Excise Duty Account, Purchase Account
2- Credit: Supplier Account
On sale (receiving excise):
1- Debit: Customer Account
2- Credit: Sales Account, Excise Duty Account
3.10 Write-Offs or Bad Debts
When an invoice becomes uncollectible, it is written off as a bad debt.
1- Debit: Bad Debts Written Off
2- Credit: Customer Account
This account acknowledges that the company will not be paid the customer’s due amount.
With the Entry Type Write Off Entry, a Write Off section appears where you choose Write Off Based On (Accounts Receivable or Accounts Payable) and click Get Outstanding Invoices to fill in the rows.
3.11 Opening Entry
Opening entries are applied to post balances when transitioning from another system to ERPNext. These entries record existing balances like outstanding bills or equity at the beginning of a financial period.
3.12 Depreciation
Depreciation entries reflect the decrease in asset value over time. For instance, depreciating a computer over five years:
1- Debit: Depreciation Expense
2- Credit: Asset Account
This entry assists in spreading the cost of an asset over its useful life.
3.13 Exchange Rate Revaluation
If your accounts contain more than one currency, you might need to account for exchange rate movements. This entry assists in bringing the value of accounts up to date based on the current exchange rate.